A container started with no option keeps several root powers its service
usually does not need: changing the owner of a file, creating a special file,
opening raw sockets. The Linux kernel splits these powers into
capabilities, rights you grant or remove one by one, and Docker leaves
14 of them to every container by default. This lesson teaches you to start
from zero (--cap-drop ALL), to add only what a specific error asks for, to
forbid a program from gaining privileges along the way (no-new-privileges)
and to give access to a device without --privileged. The measurements come
from a Debian 13 VM with Docker Engine 29.9.2 and Compose 5.6.1. Seccomp and
AppArmor profiles, rootless mode and the read-only root each have their own
lesson, linked where they come up.
What you will learn
- You read a container's effective capabilities in
/proc/1/status. - You drop every capability with
--cap-drop ALL, then add them back one at a time, naming what makes each one necessary. - You enable
no-new-privilegesand check the flag in the kernel. - You give access to a single device with
--deviceand its permissions, rather than with--privileged. - You recognize the settings you must never use to silence a denial.
- You assemble a minimal profile in a Compose file, with every exception commented.
Prerequisites
You know how to start a container with docker run and how to read a Compose
file. The general idea of capabilities is explained in
Linux capabilities, which details
the kernel's capability sets. You need a disposable Docker host: the
measurements create containers, which the last section deletes.
The measurements use two pinned images. The objects they create carry the
c38-m- prefix and live in a dedicated working directory:
ALP="alpine:3.24.3@sha256:be2656061b536c1883c4034790e21d0a09c5aaaf51968b89368a3c0371ea2c9a"NGX="nginx:1.31.3-alpine@sha256:4a73073bd557c65b759505da037898b61f1be6cbcc3c2c3aeac22d2a470c1752"W=/tmp/c38-m-workmkdir -p "$W" && cd "$W"Run the blocks in order and in the same terminal: they reuse ALP, NGX and
the current directory. The two labs at the end of the lesson work on other
services, other files and other values: redo the reasoning there rather than
copying the blocks.
Which capabilities does a container receive without asking?
An unprivileged container receives the 14 capabilities listed in the
docker run documentation:
AUDIT_WRITE, CHOWN, DAC_OVERRIDE, FOWNER, FSETID, KILL, MKNOD,
NET_BIND_SERVICE, NET_RAW, SETFCAP, SETGID, SETPCAP, SETUID and
SYS_CHROOT. The kernel knows more, including SYS_ADMIN, NET_ADMIN and
SYS_MODULE, which Docker does not give without --cap-add.
To know what a container can really do, ask the kernel. The /proc/1/status
file describes PID 1, the first process of the container. Its CapEff field is
the mask of the effective capabilities, the ones the process exercises,
written in hexadecimal: every bit set to 1 is a capability. Its CapBnd field
is the ceiling this process can never exceed.
docker run --rm --network none "$ALP" grep -E '^Cap(Eff|Bnd):' /proc/1/statusCapEff: 00000000a80425fbCapBnd: 00000000a80425fbThe a80425fb mask matches the 14 capabilities of the list, and the two fields
are identical: the process exercises everything its ceiling allows. To turn a
mask into names, the command capsh --decode=00000000a80425fb (package
libcap2-bin) lists the capabilities. The names and the bits come from
man 7 capabilities.
The table picks seven of the default capabilities, with the case where a service really needs one: this is the question to ask before keeping any of them.
| Capability | What it allows | A service needs it when... |
|---|---|---|
CHOWN | Change the owner of a file | it prepares directories for another user |
SETUID, SETGID | Change the identity of the process | it starts as root, then switches to a dedicated account |
DAC_OVERRIDE | Ignore the read, write and execute permissions of files | it reads or writes files it does not own |
NET_RAW | Open raw sockets | it crafts its own packets (some diagnostic tools) |
MKNOD | Create device files | almost never inside a container |
KILL | Send a signal to a process owned by another user | it stops processes that are not its own |
The NET_RAW row does not target ping: in a default Docker container,
net.ipv4.ping_group_range is 0 2147483647, and any process can send an ICMP
echo without a raw socket. Measured on 29.9.2, ping -c1 127.0.0.1 succeeds
with --cap-drop NET_RAW and with --cap-drop ALL.
For an action that is not in the table, look it up in man 7 capabilities: the
full list describes each capability by the actions it allows. The next section
shows how to link an error to one of them.
How do you drop all capabilities?
The --cap-drop ALL option removes every capability, including the ones Docker
grants by default. Predict before you run: can a process that runs as root (UID
0) but has no capability still change the owner of a file it has just created?
docker run --rm --network none "$ALP" sh -c 'grep ^CapEff /proc/1/status; echo uid=$(id -u); touch /tmp/c38-m-f; chown 1000 /tmp/c38-m-f; echo chown_rc=$?'docker run --rm --network none --cap-drop ALL "$ALP" sh -c 'grep ^CapEff /proc/1/status; echo uid=$(id -u); touch /tmp/c38-m-f; chown 1000 /tmp/c38-m-f; echo chown_rc=$?'CapEff: 00000000a80425fbuid=0chown_rc=0CapEff: 0000000000000000uid=0chown: /tmp/c38-m-f: Operation not permittedchown_rc=1Look at the uid lines: they are 0 in both containers. Being root in a
container and holding a capability are two independent things: with CapEff
at zero, the process is root on paper and no longer has the power to change an
owner. This is what makes --cap-drop ALL useful even for a service that never
leaves root. The message only names the refused action (chown), never the
missing capability: the next section shows how to find it.
A denial does not always come from a capability: a seccomp filter (which limits system calls) or an AppArmor profile (which limits access to files, to the network and to capabilities) can cause it too. To know which of these layers refuses, the lesson Seccomp and AppArmor profiles for Docker containers gives the method: remove one layer at a time on a disposable container.
How do you find and justify an exception?
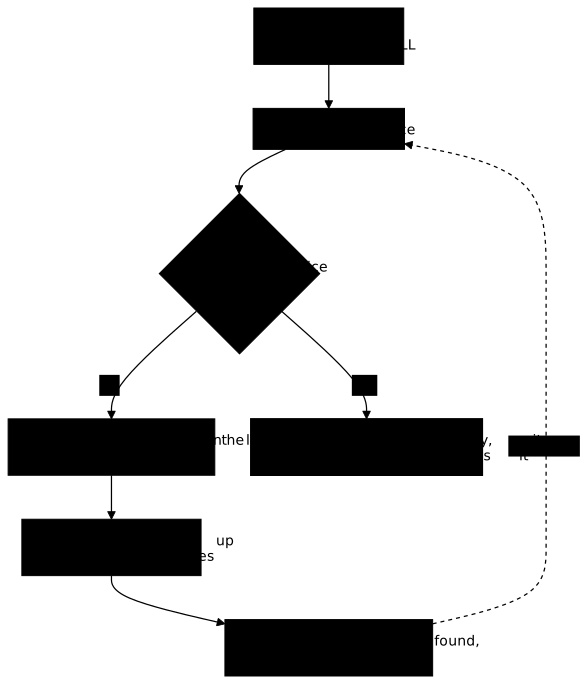
You find an exception by trial: remove everything, start the service, read the
error, look up the capability that matches the refused action in
man 7 capabilities, add it alone and start again. You repeat until the
service starts, then you write next to each capability you keep the
configuration line or the error that requires it.
The diagram shows this loop. Follow the "no" branch until the service answers,
then note each capability you keep with its error. The stopping test is "really
answers", not "starts": a container in the running state may serve nothing,
as the example below shows.
A real service shows the method better than a toy example: nginx starts as root, prepares its cache directories, then hands its worker processes over to a dedicated account.
docker run -d --name c38-m-web --cap-drop ALL "$NGX"sleep 2docker logs c38-m-web 2>&1 | grep -o 'chown(.*'docker inspect -f '{{.State.Status}} {{.State.ExitCode}}' c38-m-webdocker rm -f c38-m-webchown("/var/cache/nginx/client_temp", 101) failed (1: Operation not permitted)exited 1The log names the action (chown) and its target: the cache directory, which
nginx wanted to hand over to user 101, the nginx account. The chown action
matches CHOWN. Add it alone and start again: each new run points to the next
startup step that fails. This time the container stays in the running state,
but nginx's worker processes die immediately, and the service does not answer.
docker network create c38-m-netdocker run -d --name c38-m-web --network c38-m-net --cap-drop ALL --cap-add CHOWN "$NGX"sleep 3docker inspect -f '{{.State.Status}} {{.State.ExitCode}}' c38-m-webdocker logs c38-m-web 2>&1 | grep -o 'setgid.*' | sort -udocker run --rm --network c38-m-net "$ALP" wget -q -T 3 -O /dev/null http://c38-m-web/; echo wget_rc=$?docker rm -f c38-m-webrunning 0setgid(101) failed (1: Operation not permitted)wget: download timed outwget_rc=1The running state therefore proves nothing: the master process is alive, but
it has no worker process left to answer. The next error names setgid, the
call that changes the process's group, so the SETGID capability. Add SETGID
and start again: the error becomes setuid(101) failed, which points to
SETUID. These two messages, not nginx's configuration, justify the last two
capabilities: the configuration only says that nginx switches accounts, while
the log says which call the kernel refuses. With CHOWN, SETGID and
SETUID, the service starts. Three measurements check its final result:
docker run -d --name c38-m-web --cap-drop ALL --cap-add CHOWN --cap-add SETUID --cap-add SETGID "$NGX"sleep 2docker exec c38-m-web wget -q -O /dev/null http://127.0.0.1/; echo wget_rc=$?docker exec c38-m-web grep ^CapEff /proc/1/statusdocker exec c38-m-web cat /proc/sys/net/ipv4/ip_unprivileged_port_startwget_rc=0CapEff: 00000000000000c10The service answers, and the exception comes down to three capabilities.
CapEff is c1, the bits of CHOWN, SETGID and SETUID and nothing else:
the kernel applies exactly the announced list.
The last line is surprising: nginx listens on port 80 without
NET_BIND_SERVICE. Docker sets net.ipv4.ip_unprivileged_port_start to 0 in
the container's network, so any process can open a low port there. The usual
advice, "drop everything except NET_BIND_SERVICE", brings nothing under
Docker. The page
Run an image as non-root measures
this setting and what changes with --sysctl or --network host.
A capability added without anything that requires it is an unjustified
exception: remove it and start again. Adding DAC_OVERRIDE "just in case"
opens access to every file without having fixed the error you read, which asked
for something else.
How do you stop a process from gaining privileges?
A setuid executable runs with the rights of its owner rather than with
those of the user who starts it, like sudo or su. A non-root process can
therefore become root by running such a binary present in the image. The
kernel's no_new_privs bit closes this path. Once set on a process, no
program it starts, nor its descendants, gains privileges through the setuid
bit or through capabilities stored in the file, and the bit can no longer be
cleared (see the
kernel documentation).
Docker sets it with --security-opt no-new-privileges=true.
docker run --rm --network none "$ALP" grep NoNewPrivs /proc/1/statusdocker run --rm --network none --security-opt no-new-privileges=true "$ALP" sh -c 'grep NoNewPrivs /proc/1/status; grep NoNewPrivs /proc/self/status; echo pid_du_shell=$$'NoNewPrivs: 0NoNewPrivs: 1NoNewPrivs: 1pid_du_shell=1The first container shows 0, the second 1. In the second one, the shell is PID
1, and grep is a child process: /proc/self designates that grep, so the
child, not PID 1. The two lines at 1 show that the kernel passes the flag on to
a descendant of the process that received it. This reading proves that the flag
is set and inherited, not that it blocks a setuid executable. To see the effect
itself, you need such an executable, which gets root without the flag and fails
with it: the second lab of the lesson provides one.
The flag does not remove anything the process already holds. A container
running as root that keeps CHOWN still changes an owner:
docker run --rm --network none --security-opt no-new-privileges=true "$ALP" sh -c 'touch /tmp/c38-m-g; chown 1000 /tmp/c38-m-g; echo chown_rc=$?'chown_rc=0no-new-privileges and --cap-drop ALL close two different paths: the first
prevents acquiring privileges, the second removes the ones the process
holds. You set both. The flag breaks whatever depends on a setuid binary
inside the container, for example sudo; a service without that dependency
notices nothing. Docker can also set this option for every container with the
daemon's no-new-privileges option (see the
dockerd reference).
How do you give access to a device without --privileged?
By default, a container only sees a minimal /dev. The option
--device host[:container[:permissions]] adds a single device, with the
permissions r (read), w (write) and m (create the node with mknod),
which the kernel enforces; with no permissions given, the container gets all
three. It is the answer to a real hardware need (a card, a reader) where you
are tempted to set --privileged, which exposes every device of the host.
Docker allows a few harmless devices by default, including /dev/zero and
/dev/null: a permission set on them cannot be measured. The measurement uses
/dev/kmsg, the kernel log, present on any Linux host and absent from the
/dev of a default container. It exposes it under another name, first
read-only (r), then with write (rw), and tries to open the node for writing
without writing anything to it.
for p in r rw; do echo "permissions=$p" docker run --rm --network none --device /dev/kmsg:/dev/c38-m-kmsg:$p "$ALP" sh -c 'stat -c "%t:%T" /dev/c38-m-kmsg; if ( : >> /dev/c38-m-kmsg ) 2>/dev/null; then echo ecriture=permise; else echo ecriture=refusee; fi'donepermissions=r1:becriture=refuseepermissions=rw1:becriture=permiseThe first line of each attempt gives the node's major and minor numbers, in
hexadecimal: 1:b corresponds to 1 and 11, those of /dev/kmsg. With r, the
kernel refuses to open it for writing; with rw, it goes through. The
permission really limits the access.
The r permission still does not give you the right to read /dev/kmsg. On
the reference VM, kernel.dmesg_restrict is 1 (a global kernel setting, read
in /proc/sys/kernel/dmesg_restrict, identical inside the container), and
reading the kernel log then requires CAP_SYSLOG, which Docker does not grant
by default. Measured with r as well as with rw, head /dev/c38-m-kmsg
answers Operation not permitted; the read only succeeds after
--cap-add SYSLOG. Keep the exact formula: --device sets the access to the
node, the capability sets what the kernel agrees to do with it.
Note also that --device grants no capability: if the service must send a
privileged command to the device, you need a justified exception, as in the
previous section.
To allow a family of devices by their numbers, for example
--device-cgroup-rule='c 42:* rmw', the --device-cgroup-rule option adds a
rule to the list of devices the kernel lets the container use (through its
cgroup). It creates no node: a device that already exists at startup is still
added with --device (see the
docker run reference).
Which settings should you never use to silence a denial?
Three settings remove protections all at once: --privileged,
--security-opt seccomp=unconfined and --security-opt apparmor=unconfined.
You never fix a denial by setting them: you find the layer that refuses and
open only that one.
Here is what --privileged changes. On Docker 29.9.2, the container shows
CapEff and CapBnd at 000001ffffffffff (every capability of the kernel),
Seccomp: 0 (no filter) and an unconfined AppArmor profile instead of
docker-default (enforce). Its /dev holds 150 entries against 15 by default
on the reference VM. It keeps NoNewPrivs: 0: you ask for that flag
separately. The lesson
Seccomp and AppArmor profiles for Docker containers
measures what each one removes and shows how to spot it in a review.
The minimal profile of this lesson rests on capabilities, the
no-new-privileges flag and devices. Three complementary protections each have
their own lesson:
- the read-only root prevents writing into the image, see Use a read-only root filesystem and stop without data loss;
- rootless mode runs Docker itself without root, see Run Docker in rootless mode;
- UID remapping (
userns-remap) shifts the container's identities, measured in Volume permissions.
On a host whose daemon enables SELinux, such as the Red Hat families, Docker
confines the container with security labels. The --security-opt label=disable
setting turns off this label-based confinement (see the
docker run reference):
you treat it like the unconfined settings above. Debian 13, the reference of
this lesson, does not enable SELinux by default, so the lesson measures no
behavior of it.
What does a minimal profile look like in a Compose file?
The file below gathers the three exceptions measured above, the
no-new-privileges flag and, as a complement, the read-only root. Each
capability carries its justification in a comment, which lets the code review
challenge it. Write it in the working directory:
cat > "$W/compose.yaml" <<'EOF'name: c38-m-profservices: web: image: nginx:1.31.3-alpine@sha256:4a73073bd557c65b759505da037898b61f1be6cbcc3c2c3aeac22d2a470c1752 cap_drop: - ALL cap_add: - CHOWN # le processus maître prépare les répertoires de cache - SETUID # les processus de travail passent au compte nginx - SETGID # idem, pour le groupe security_opt: - no-new-privileges:true read_only: true tmpfs: - /tmp - /var/cache/nginx - /var/runEOFdocker compose -f "$W/compose.yaml" up -dsleep 2docker compose -f "$W/compose.yaml" exec web grep -E '^(CapEff|NoNewPrivs):' /proc/1/statusCapEff: 00000000000000c1NoNewPrivs: 1The two values come from the kernel and are authoritative: c1 confirms the
three capabilities, 1 confirms the flag. With the read-only root, the
directories nginx writes to are declared as tmpfs, a writable in-memory
mount; the lesson on the read-only root explains how to find them.
Capabilities are fixed at start: to change this profile, edit the file and
run docker compose up -d again, which recreates the container.
How do you clean up after the measurements?
Delete the Compose project, the measurement container if it remains, the
network created for the SETGID measurement and the working directory, without
touching anything else:
docker compose -f "$W/compose.yaml" downdocker rm -f c38-m-web 2>/dev/nulldocker network rm c38-m-netcd /tmp && rm -rf "$W"docker ps -a --filter name=c38-m- --format '{{.Names}}'docker network ls --filter name=c38-m- --format '{{.Name}}'The last two commands must print nothing: no container or network from the lesson remains.
Put it into practice
The first lab starts from a small launcher that confines a program before
running it, started with Docker's default capabilities. You recreate it in its
Compose project with the only privilege its job requires, without touching the
daemon or using privileged mode, keeping the project name, its label and the
proof file. Three independent checks carry the validation: the capabilities
declared to Docker, the effective mask of PID 1 read in the kernel, and a
forbidden action that the container really tries. To find this privilege, apply
the method of the lesson: remove everything, read the error, look up the
refused action in man 7 capabilities.
The second lab features a service that starts under an ordinary account, but whose small supplied executable belongs to root with the setuid bit: running it obtains root's rights. You prevent this elevation in the running service, without modifying the binary, the host's setuid policies or the daemon. The validation compares two proofs that must agree: the flag the kernel shows for the process, and the result of a real execution of the executable.
Key points
A minimal profile is built by removing everything, then adding only what an error you read justifies, noted next to each capability.
- A container receives 14 capabilities by default, which
CapEffin/proc/1/statusshows as a mask. --cap-drop ALLsetsCapEffto zero: a root process without capabilities can no longer change an owner.- You find an exception by reading the error, looking up the action in
man 7 capabilities, adding one capability at a time and noting what requires it. - Under Docker, a service listens on port 80 without
NET_BIND_SERVICE, because Docker setsip_unprivileged_port_startto 0 in the container. no-new-privileges=truesetsNoNewPrivs: 1, passed on to descendants, and prevents gaining privileges through a setuid executable; it removes nothing the process already holds.--devicewith its permissions gives access to a single device and grants no capability.--privileged,seccomp=unconfined,apparmor=unconfinedandlabel=disableare never the way to fix a denial.- In a Compose file, commented
cap_drop,cap_addandsecurity_optdescribe the profile; theCapEffandNoNewPrivsvalues, read in the kernel, prove that it applies.
Knowledge check
The questions cover reading effective capabilities, the method for justifying
an exception, the effect of no-new-privileges and the choice of --device
over --privileged.
Knowledge check
Check what you have learned with this interactive quiz
How it works
- The timer starts when you click Start
- Multiple choice, true/false and short answer questions
- You can move between questions
- Detailed results are shown at the end
Starts the quiz and the timer
Review
(0/0)Score by domain
A domain groups several guides and gets several questions, so its score is more reliable than a per-topic score, which often rests on a single question.
Summary
Strengths
No topic passed at 80% on at least two questions yet.
Weak areas
No topic below the pass mark.
Recommended next
Hints before you try again?
Continue the course: Seccomp and AppArmor profiles for Docker containers
Continue the course: Seccomp and AppArmor profiles for Docker containers
A new full quiz with random questions
Work again only on the questions you missed