You receive an image or a docker save archive. Before running it, two questions come up: what does it contain, and who produced it? This lesson answers both, for readers who already know how to export an image and check a sha256sum checksum. You scan an image with Trivy, you write a gate that refuses one specific vulnerability through its exit code, then you sign an archive and verify it in two steps. The outputs come from Docker Engine 29.9.2 on Debian 13, with Trivy 0.76.1, OpenSSL 3.5.7 and Cosign 3.1.4.
What you will learn
- Scan a
docker savearchive with Trivy and read the report as a dated snapshot - Explain why
trivy imagereturns 0 despite critical alerts, and choose--exit-codeand--severity - Link a saved report to its image, to its package inventory, to its vulnerability database and to its date
- Say what the scanner does not see, and write a gate that refuses a named vulnerability (a CVE)
- Explain why a digest or a checksum proves integrity, not the author
- Verify a detached signature in two steps, read the SAN (the subject alternative name) of a certificate to compare its identity, place Cosign and
DOCKER_CONTENT_TRUST, then clean up what the lesson leaves on the machine, including the unencrypted private keys
Prerequisites
- Pin a base image, and deliver it offline: the digest of an image, the
docker savearchive and thesha256sumreceipt that travels through a separate channel. The lesson starts from the limit of that receipt. - A Docker Engine 29.9.2 on an
amd64host, Internet access to download the tool images and the Trivy database, and OpenSSL 3.2 or later for the signature part: according to the OpenSSL changelog (CHANGES.md, section 3.2.0 of 23 November 2023), thecodesignusage of the-purposeoption appeared there. The outputs of the lesson come from OpenSSL 3.5.7. python3, which the lesson uses to read a JSON report, and the ability to write a short Python script that runs a command withsubprocess.runand tests its exit code: the second lab asks you for a verifier written that way. This lesson does not teach it: if that gesture is new to you, the documentation of the Pythonsubprocessmodule describes it.
The tool images carry their digest, in the form image:tag@sha256:…. The scan figures (number of alerts, severities) are those of the day of the measurement: a vulnerability database changes every day, so yours will differ from ours. That is one of the ideas of the lesson.
How do you prepare the image to check?
The lesson checks a small application, billetterie, built on purpose with two flaws. Its first version, billetterie:1.0, starts from Debian 12.5, installs PyYAML 5.3.1 and copies the urllib3 1.24.1 library by hand into /app/vendor.
PyYAML 5.3.1 carries CVE-2020-14343. A CVE (Common Vulnerabilities and Exposures) is the public identifier of a known flaw; this one is critical and fixed in 5.4. The urllib3 copy is used further down to show what a scanner does not see.
All the work of the lesson happens in a dedicated folder, which the final cleanup deletes in one go. Create it and move into it before writing any file: the archives, the keys and the v11/, altere/ and cs/ subfolders live there.
mkdir ~/atelier-billetterie && cd ~/atelier-billetterieFROM python:3.9.18-slim-bookworm@sha256:aa7b73608abcfb021247bbb4c111435234a0459298a6da610681097a54ca2c2aRUN pip install --no-cache-dir PyYAML==5.3.1 \ && pip download --no-cache-dir --no-deps --dest /tmp/w urllib3==1.24.1 \ && mkdir -p /app/vendor && python -m zipfile -e /tmp/w/urllib3-1.24.1-py2.py3-none-any.whl /app/vendor \ && find /app/vendor -depth -path '*.dist-info*' -delete \ && find /tmp/w -deleteCOPY billetterie.py /app/billetterie.pyCMD ["python", "/app/billetterie.py"]The billetterie.py file is two lines long, import yaml and print(yaml.__version__). Build the image, then export it as an archive: that is the object you would deliver, and the one Trivy will read.
docker build -t billetterie:1.0 .docker save -o billetterie.tar billetterie:1.0The second version, billetterie:1.1, is the same application rebuilt on python:3.13-slim-trixie (Debian 13.7) with PyYAML 6.0.3. Its Dockerfile keeps only three instructions after the FROM: RUN pip install --no-cache-dir PyYAML==6.0.3, then the same COPY and the same CMD as version 1.0, without the urllib3 copy. Write its FROM with the index digest of the tag, read as in the lesson on pinning. Put this Dockerfile in a v11/ subfolder with a copy of billetterie.py, so as not to overwrite the one of version 1.0, then build with docker build -t billetterie:1.1 v11 and export the image the same way into billetterie11.tar.
The version 1.1 figures given below come from a build made on the day of the measurement, on the tag alone, without a digest. The python:3.13-slim-trixie tag moves: your figures may therefore differ.
Trivy runs in a container. A named volume keeps its database between two scans, otherwise every scan downloads it again. The tv function avoids repeating the docker run line: it mounts the current directory read-only on /w.
T=ghcr.io/aquasecurity/trivy:0.76.1@sha256:790fd66d1697395d8693d1acaa1ea702406a20f109b6fc7bac8db623eca6c06cdocker volume create trivy-cachetv() { docker run --rm -v trivy-cache:/root/.cache -v "$PWD":/w:ro "$T" "$@"; }This lesson scans the archive with --input, and that is the only mode measured here: the scan through the Docker socket is not replayed.
What does the Trivy report contain, and which day is it valid for?
An image scanner does two things. It builds the inventory of the packages of the image (those of the system, here Debian, and those of Python), then it compares that inventory to a vulnerability database, the public list of known flaws with the versions that fix them. Its verdict is therefore valid for one image, one database and one day: the same image scanned next month may receive other alerts, without a single one of its bytes having changed.
Run a first scan and read the summary.
tv image --quiet --input /w/billetterie.tar > scan.txtecho "code $?"head -14 scan.txtcode 0
Report Summary
┌────────────────────────────────────────────────────────────────────────────┬────────────┬─────────────────┬─────────┐│ Target │ Type │ Vulnerabilities │ Secrets │├────────────────────────────────────────────────────────────────────────────┼────────────┼─────────────────┼─────────┤│ /w/billetterie.tar (debian 12.5) │ debian │ 558 │ - │├────────────────────────────────────────────────────────────────────────────┼────────────┼─────────────────┼─────────┤│ usr/local/lib/python3.9/site-packages/PyYAML-5.3.1.dist-info/METADATA │ python-pkg │ 1 │ - │├────────────────────────────────────────────────────────────────────────────┼────────────┼─────────────────┼─────────┤│ usr/local/lib/python3.9/site-packages/pip-23.0.1.dist-info/METADATA │ python-pkg │ 7 │ - │├────────────────────────────────────────────────────────────────────────────┼────────────┼─────────────────┼─────────┤│ usr/local/lib/python3.9/site-packages/setuptools-58.1.0.dist-info/METADATA │ python-pkg │ 5 │ - │├────────────────────────────────────────────────────────────────────────────┼────────────┼─────────────────┼─────────┤Look at the Target column: one line for the system (558 alerts on Debian 12.5), then one line per Python package, named after its dist-info folder. Also remember the code displayed: 0, even though the image carries critical alerts. The next section explains why.
To date the verdict, ask Trivy for the version of the database it has just used.
tv versionVersion: 0.76.1Vulnerability DB: Version: 2 UpdatedAt: 2026-11-04 07:16:25.226375897 +0000 UTC NextUpdate: 2026-11-05 07:16:25.22637534 +0000 UTC DownloadedAt: 2026-11-04 10:40:44.919591545 +0000 UTCThe UpdatedAt line says when the database dates from, and NextUpdate announces the next one, twenty-four hours later. A report written on 4 November at 10:43 (UTC) says nothing about what the database of 5 November will know.
All packages combined, the scan of billetterie:1.0 counts 16 CRITICAL alerts, 115 HIGH, 243 MEDIUM, 184 LOW and 14 UNKNOWN. This severity scale is used to decide what you refuse, and the next section is devoted to it.
Why does Trivy return 0 despite critical alerts?
Because Trivy measures, it does not decide. Without options, trivy image prints its report and returns 0, whatever the alerts. A CI step that merely launches the scan therefore stays green, whatever it finds: nobody asked the scanner to fail. The --exit-code 1 option asks it to return 1 as soon as it finds an alert, and --severity chooses which ones count.
The following table gives the cases measured on billetterie:1.0, always on the archive and with an up-to-date database.
| Command | Exit code |
|---|---|
tv image --input … (no option) | 0, report printed |
… --exit-code 1 | 1 |
… --severity CRITICAL --exit-code 1 | 1 (16 CRITICAL alerts) |
… --severity CRITICAL --ignore-unfixed --exit-code 1 | 1 |
… --severity UNKNOWN --exit-code 1 | 1 (14 UNKNOWN alerts) |
… -f json | 0 |
missing archive, with --exit-code 1 | 1 |
Three lines need an explanation. The --severity option filters what the report displays, and also what counts for the exit code. An alert hidden by the filter never makes the scan fail: that is intended, but the policy must therefore say which severity refuses.
The --ignore-unfixed option ignores the alerts for which no fix is published. It changes nothing here, because the image keeps alerts that do have a fix.
The last line of the table hides a trap: a runtime error also returns 1 with --exit-code 1. Any runtime error, for example a missing archive, produces the same code as a refused image. A CI step that only looks at that code can no longer tell "the image is vulnerable" from "the scan did not happen". The gate written below settles this with a code 2 for the error.
The threshold also changes the verdict on the fixed image. Here are the codes measured on billetterie:1.1.
| Command | Exit code |
|---|---|
--severity CRITICAL --exit-code 1 | 0 (no CRITICAL alert) |
--severity HIGH,CRITICAL --exit-code 1 | 1 (45 HIGH alerts) |
no filter, --exit-code 1 | 1 |
--severity HIGH,CRITICAL --ignore-unfixed --exit-code 1 | 1 |
This image passes a gate set on CRITICAL and fails on HIGH. No threshold is right by nature: it is a policy decision, and you are the one who writes it.
How do you link a report to its image?
A report kept as evidence must say which image it is about, with which tool, and when. Ask Trivy for a JSON report, then read its identification fields.
tv image --quiet -f json --input /w/billetterie.tar > rapport.jsonpython3 -I -c "import json;d=json.load(open('rapport.json'));print(d['CreatedAt'],d['Trivy']['Version'],d['Metadata']['ImageID'])"2026-11-04T10:43:31.448002943Z 0.76.1 sha256:ded9535d5d01f1de3b16e05246afd485e0ed5393b7706a98534b28c3f2c08be2The report carries the scan date (CreatedAt), the scanner version (Trivy.Version) and the image identifier (Metadata.ImageID). It does not carry the date of the database: keep the output of tv version -f json next to it, it contains UpdatedAt and NextUpdate. The sarif, cyclonedx and spdx-json formats also exist and each returns 0.
To judge afterwards that a saved report is still true, run a fresh scan of the same image. If the image, the Trivy version and the database are the same, the alerts must be the same too. A difference says that the report has aged, or that it does not talk about this image.
A trap lurks here, with the containerd image store of Docker 29.9.2. Compare this identifier to the one Docker gives for the same image.
docker image inspect billetterie:1.0 --format '{{.Id}}'sha256:b9c499efc7bb3abb3604a9459ddf5fdb75bac7bdbe6fbbc9196bc023e008c4feThe two values differ, and yet it is the same image. The Docker Id is here the digest of the OCI index of the image, the document that references its variants. Trivy reports that of its configuration, the document that describes its layers and its startup command (Read an OCI image (in French) details these objects). The two are not comparable: do not look for the Docker Id in the report.
These identifiers also change at every build of the image: two builds of the same Dockerfile gave us two different Id values, so yours will not look like those of the page.
To tie a report to the scanned object, keep next to it the sha256sum checksum of the archive you gave to Trivy. Two other fingerprints complete the link: that of the package inventory Trivy compared, and that of the vulnerability database it used. On Debian, the inventory is the /var/lib/dpkg/status file of the image, and the database is the trivy.db file of the cache volume.
docker run --rm --entrypoint sha256sum billetterie:1.0 /var/lib/dpkg/statusdocker run --rm --entrypoint sha256sum billetterie:1.1 /var/lib/dpkg/statusdocker run --rm --entrypoint sha256sum -v trivy-cache:/root/.cache:ro "$T" /root/.cache/trivy/db/trivy.db1a0cafff33a375c85d50527023ceaae0885174d465c27b1b82a08dfd3a75db20 /var/lib/dpkg/status549d2ac7b781004351ab05654edabef851dfa81df458a3680bfd0db4b8e3ea09 /var/lib/dpkg/statusdc46f80922f985bb63542481d71bacd708893c48b926a4eb2a581929455a43a0 /root/.cache/trivy/db/trivy.dbThe first two lines show that the two versions of the application do not have the same inventory. The third is the fingerprint of the database of 4 November 2026 (UpdatedAt 07:16 UTC), a file of 1,693,241,344 bytes: your database of the day gives another value.
Why these two fingerprints in addition to the date? Because a date names a publication, not a content: a database republished or rebuilt on the same day may carry the same UpdatedAt date with a different content, and only the fingerprint of trivy.db tells them apart.
Likewise, the image identifier says which image was scanned, while the fingerprint of /var/lib/dpkg/status says which Debian package inventory was compared to the database. With these fingerprints and the date, a fresh scan shows exactly what moved. This inventory fingerprint covers only the Debian packages: the Python packages are read through their dist-info folders, which it does not contain.
What remains is the validity period. A report older than the duration set by your policy stops being evidence: the first lab of the lesson keeps twenty-four hours, which matches the rhythm of the database. The duration is a choice, but you have to write one down.
What does the scanner not see?
An inventory scanner only sees what the package manager has declared. The report of billetterie:1.0 saw PyYAML, installed by pip, because pip leaves a dist-info folder that records it. It saw nothing of urllib3, copied by hand without that folder.
Check it in the report.
python3 -I -c "import json;d=json.load(open('rapport.json'));print(any(v['PkgName']=='urllib3' for r in d['Results'] for v in r.get('Vulnerabilities',[])))"FalseThe answer is False: no alert on urllib3, even though the library is in the image. This silence does not prove that the library is sound, it proves that the scanner does not know it. A copied dependency, a binary dropped into the image or a file added outside the package manager escape this check.
A second scanner changes nothing if it reads the same inventory. debsecan, the Debian CVE scanner, reads the state of dpkg, the system package manager, and therefore knows no pip package. On the dpkg inventory of billetterie:1.0, it listed 424 CVEs with a database frozen on a given day, and returned 0. This total will not reproduce as is on your machine, since your database will be that of another day. Like Trivy without --exit-code, it informs without deciding.
The two totals differ, 558 Debian alerts for Trivy and 424 CVEs for debsecan. Each verdict is that of one tool, one database and one day: do not compare the totals of two tools without caution.
The inventory extracted from the image is also the raw material of an SBOM, the list of the components of a piece of software. Trivy can write it (-f cyclonedx), but producing, using and distributing an SBOM is a separate subject: see SBOM: the inventory of what you ship, measured with Syft and the guide to Syft (in French). The Trivy guide details the other targets of the same tool, and the page on Kubernetes image scanning (in French) compares Trivy to Grype.
How do you write a gate that refuses a specific CVE?
A gate is a small script that scans the image at the time of the decision, applies a written policy and propagates the verdict through its exit code. Here the policy is deliberately narrow: refuse any image that carries CVE-2020-14343.
Trivy 0.76.1 can filter its results with a policy written in the Rego language, through the --ignore-policy option ("specify the Rego file path to evaluate each vulnerability", says its help); that route is outside the scope of the lesson and is not replayed. No option measured here refuses a named CVE through an exit code: the script therefore reads the JSON report and looks for the identifier.
#!/usr/bin/env bash# usage: barriere.sh ARCHIVE.tar CVE RAPPORT.json (variable T: Trivy image)set -uif [ $# -ne 3 ] || [ -z "${T:-}" ]; then echo "ERREUR: usage: barriere.sh ARCHIVE.tar CVE RAPPORT.json, avec T defini" >&2 exit 2fidocker run --rm -v trivy-cache:/root/.cache -v "$(dirname "$1")":/w:ro "$T" \ image --quiet -f json --input "/w/$(basename "$1")" > "$3" || exit 2if grep -q "\"VulnerabilityID\": \"$2\"" "$3"; then echo "REFUS: $2 presente" exit 1fiecho "ACCEPTE: $2 absente ($(grep -c '"VulnerabilityID"' "$3") autres alertes conservees)"The guard at the start returns 2 when the number of arguments is not three or when T is not defined. Without it, set -u would stop the script with code 1 when T is missing, that is, the code of a refusal, and with code 2 when the report argument is missing (codes measured by removing the guard).
The script therefore has three codes. If the scan fails, || exit 2 returns 2: the error is told apart from the refusal. If the CVE is present, the script returns 1. Otherwise it returns 0 and prints the number of remaining alerts, because accepting an image does not mean it has no vulnerability.
First make it executable with chmod +x barriere.sh, without which the shell refuses to run it (Permission denied). Then run it on the five cases, exporting T so that the script reads it. The last two cases remove T, then an argument.
export T./barriere.sh "$PWD/billetterie.tar" CVE-2020-14343 r10.json; echo "code $?"./barriere.sh "$PWD/billetterie11.tar" CVE-2020-14343 r11.json; echo "code $?"./barriere.sh "$PWD/absent.tar" CVE-2020-14343 rx.json 2>/dev/null; echo "code $?"(unset T; ./barriere.sh "$PWD/billetterie.tar" CVE-2020-14343 r.json; echo "code $?")./barriere.sh "$PWD/billetterie.tar" CVE-2020-14343; echo "code $?"REFUS: CVE-2020-14343 presentecode 1ACCEPTE: CVE-2020-14343 absente (193 autres alertes conservees)code 0code 2ERREUR: usage: barriere.sh ARCHIVE.tar CVE RAPPORT.json, avec T definicode 2ERREUR: usage: barriere.sh ARCHIVE.tar CVE RAPPORT.json, avec T definicode 2Read the five results in order: the vulnerable image is refused (code 1), the fixed image is accepted (code 0), and a missing archive, a missing T variable or a missing argument return 2, a code that neither the refusal nor the acceptance uses. The accepted image keeps 193 other alerts (185 on Debian and 8 on the Python binary): the script neither filters nor rewrites them.
The report remains readable as is, and it is the one you keep as evidence, with the date, the Trivy version and the checksum of the archive.
An accepted image can then change its label. A second tag set with docker tag, for example billetterie:1.1-validee, tells the rest of the chain that it has passed the gate, and the saved report is the proof of that passage.
Why does a checksum not tell who produced the archive?
The scan answers the first question, what the image contains. The second, who produced it, requires something else. The digest of an image and the sha256sum checksum of an archive prove integrity: the bytes received are those that were measured. They say nothing about the author, because whoever modifies the archive can also publish the checksum of their version.
Produce the archive of billetterie:1.1, its checksum, then a copy altered by one byte.
docker save -o livraison.tar billetterie:1.1sha256sum livraison.tar > livraison.sha256mkdir altere && cp livraison.tar livraison.sha256 altere/printf 'x' >> altere/livraison.tar(cd altere && sha256sum -c livraison.sha256 2>&1 | tail -1)sha256sum: WARNING: 1 computed checksum did NOT matchThe alteration is detected against the old checksum. Now imagine that the attacker also publishes their own checksum next to their archive.
(cd altere && sha256sum livraison.tar > livraison.sha256 && sha256sum -c livraison.sha256)livraison.tar: OKThe verification passes: the checksum proves that the archive has not moved since it was measured, not that it comes from the right person. You need a mechanism that ties the archive to an identity an attacker cannot give themselves. That is the role of a signature.
How do you sign an archive with a local authority?
A digital signature associates bytes with a private key. The recipient verifies with the certificate of the signer, a document signed by a certificate authority (CA) that states "this key belongs to this identity". For the demonstration, the lesson builds a local CA with OpenSSL, with no external service. In production, the CA is that of your organization, or a public service such as Sigstore.
Create the CA, then three certificates: that of the delivery team (livreur, identity livreur@billetterie.lab), that of an intern issued by the same CA (another identity), and a self-issued certificate that claims the identity of the delivery without being signed by the CA. The identity of each certificate is carried by its subjectAltName field (SAN, the subject alternative name), here an email address. For the creation of the keys, the certificate signing requests (CSR) and the CA, the guide Generate TLS certificates with openssl (in French) details each option.
openssl req -x509 -newkey rsa:2048 -nodes -days 2 -keyout autorite.key -out autorite.crt \  -subj '/CN=atelier billetterie CA' \  -addext 'basicConstraints=critical,CA:TRUE' \  -addext 'keyUsage=critical,keyCertSign,cRLSign'
mk() {  openssl req -newkey rsa:2048 -nodes -keyout "$1.key" -out "$1.csr" -subj "/CN=$1"  printf '%s\n' "subjectAltName=$2" 'basicConstraints=critical,CA:FALSE' \    'keyUsage=critical,digitalSignature' 'extendedKeyUsage=codeSigning' > "$1.ext"  openssl x509 -req -in "$1.csr" -CA autorite.crt -CAkey autorite.key -CAcreateserial \    -out "$1.crt" -days 2 -extfile "$1.ext"}mk livreur email:livreur@billetterie.labmk stagiaire email:stagiaire@billetterie.lab
openssl req -x509 -newkey rsa:2048 -nodes -days 2 -keyout usurpateur.key -out usurpateur.crt \  -subj '/CN=usurpateur' -addext 'subjectAltName=email:livreur@billetterie.lab' \  -addext 'basicConstraints=critical,CA:FALSE' \  -addext 'keyUsage=critical,digitalSignature'
The mk function creates a key and a certificate signing request for each identity, then has the CA sign it. The usurpateur certificate shows the same address as livreur, but no authority signed it. The certificates last two days: this is a demonstration, and the short duration makes it possible to show expiration further down.
Sign the archive with the key of livreur. The signature is detached: it lives in a file next to the archive.
openssl dgst -sha256 -sign livreur.key -out livraison.sig livraison.tarls -l livraison.sigThe command returns 0 and livraison.sig weighs 256 bytes, the size of a 2048-bit RSA signature. Also prepare the signatures that the refusal cases need, with the same command: the intern's on the same archive (stagiaire.sig, with stagiaire.key) and that of the self-issued certificate (usurpateur.sig, with usurpateur.key).
How do you verify a signature in two steps?
A signature is verified in two steps. The first checks the certificate. Does its certification chain, that is, the series of certificates that links it to the authority you trust, really end at that authority? And is the identity exactly the one the policy expects? The second checks the signature itself, computed on the bytes of the archive. Both are necessary, and neither replaces the other.
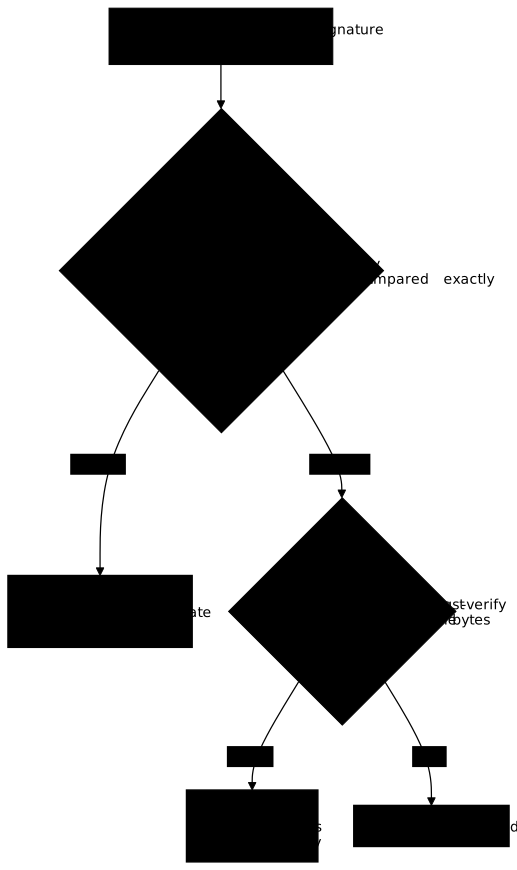
Look at the two diamonds: each has a refusal exit, and only one route leads to acceptance. The following script writes this diagram. Mind the name of the usage, codesign: with OpenSSL 3.5, -purpose codesigning answers Invalid purpose codesigning.
#!/usr/bin/env bash# usage: controle-signature.sh ARCHIVE SIGNATURE CERTIFICATE IDENTITY[ $# -eq 4 ] || { echo "REFUS: 4 arguments attendus"; exit 2; }arch=$1; sig=$2; cert=$3; id=$4err=$(mktemp) && pub=$(mktemp) || { echo "REFUS: fichier temporaire impossible"; exit 1; }trap 'rm -f "$err" "$pub"' EXITopenssl verify -CAfile autorite.crt -purpose codesign -verify_email "$id" "$cert" \ >/dev/null 2>"$err" || { echo "REFUS chaine/identite: $(tail -1 "$err")"; exit 1; }openssl x509 -in "$cert" -pubkey -noout > "$pub" 2>"$err" && [ -s "$pub" ] \ || { echo "REFUS extraction de la cle publique: $(tail -1 "$err")"; exit 1; }openssl dgst -sha256 -verify "$pub" -signature "$sig" "$arch" >"$err" 2>&1 || { if grep -q 'Verification failure' "$err"; then echo "REFUS signature des octets" else echo "REFUS erreur d'outil: $(tail -1 "$err")"; fi exit 1; }echo "OK $id"The first openssl verify carries the -verify_email option: without it, it validates the chain without looking at the identity.
The temporary files come from mktemp, and the trap deletes them on exit, whatever the outcome. The script also refuses any tool error: openssl dgst -verify returns 1 both for a wrong signature and for a missing file, and only the Verification failure message tells the first case apart.
Make the script executable (chmod +x controle-signature.sh), run it from the folder that contains autorite.crt, then replay the six cases of the table, with livreur@billetterie.lab as the expected identity, except for the last one.
| Case | Script output | Code |
|---|---|---|
Archive signed by livreur | OK livreur@billetterie.lab | 0 |
| One byte added to the archive | REFUS signature des octets | 1 |
| Certificate and signature of the intern (same authority, other identity) | REFUS chaine/identite: error stagiaire.crt: verification failed | 1 |
livreur certificate with the intern's signature (other key) | REFUS signature des octets | 1 |
| Self-issued certificate that claims the identity | REFUS chaine/identite: error usurpateur.crt: verification failed | 1 |
Different expected identity (autre@billetterie.lab) | REFUS chaine/identite: error livreur.crt: verification failed | 1 |
Each refusal falls on the step that detects it. The intern holds a valid certificate from the same authority, so passes the chain, but not the identity. The self-issued certificate fails at the chain, despite the copied address. A signature from another key, or on modified bytes, is only detected in the second step.
Tool errors are refused too, with code 1. With a missing archive, the script writes REFUS erreur d'outil: followed by the last error line of OpenSSL, which begins with a hexadecimal identifier (noted [pid] in the OpenSSL 3.5 documentation) specific to each run. With a missing signature, the message is of the same kind. A missing certificate is refused from the first step, with REFUS chaine/identite:.
What remains is the failure of the public key extraction. By replacing openssl x509 with a command that fails, we saw the script write REFUS extraction de la cle publique: followed by the message of that command, and return 1. The two temporary files had disappeared from /tmp after each attempt.
The intern's case shows why the -verify_email option matters. Without it, the chain accepts their certificate; with it, OpenSSL says why it refuses.
openssl verify -CAfile autorite.crt -purpose codesign stagiaire.crtopenssl verify -CAfile autorite.crt -purpose codesign -verify_email livreur@billetterie.lab stagiaire.crtstagiaire.crt: OKCN=stagiaireerror 63 at 0 depth lookup: email address mismatcherror stagiaire.crt: verification failedThe first command returns 0 and the second 2. A valid certificate from a trusted authority is therefore not enough: the identity of the signer decides.
The second step speaks less clearly. On an altered archive, openssl dgst -verify writes Verification failure and returns 1, whereas a valid signature writes Verified OK and returns 0.
Finally, an expired certificate is refused at the chain. Replay the verification with a date four days in the future, using -attime: OpenSSL answers certificate has expired and returns 2. Expiration limits how long a stolen key stays useful.
openssl verify -CAfile autorite.crt -purpose codesign -attime $(( $(date +%s) + 4*86400 )) livreur.crtHow do you read the SAN of a certificate and compare the identity exactly?
The -verify_email option only covers email addresses. According to the OpenSSL documentation, -verify_hostname compares a DNS name and -verify_ip an IP address, and no option compares a URI. On a certificate whose identity is a URI, -verify_email answers email address mismatch (code 2) and -verify_hostname answers hostname mismatch (code 2): for this case, you read the SAN yourself and compare it to the expected identity.
Create three certificates with the mk function defined in the section "How do you sign an archive with a local authority?". uri-livreur carries the expected identity, uri-long carries a URI that contains it followed by a suffix, and double carries two entries. First validate their chain, without an identity option: the chain does not look at the name, and all three are accepted.
mk uri-livreur URI:https://billetterie.lab/livreurmk uri-long URI:https://billetterie.lab/livreur-stagiairemk double "URI:https://billetterie.lab/stagiaire,URI:https://billetterie.lab/livreur"for c in uri-livreur uri-long double; do openssl verify -CAfile autorite.crt -purpose codesign "$c.crt"doneopenssl x509 -in double.crt -noout -ext subjectAltNameuri-livreur.crt: OKuri-long.crt: OKdouble.crt: OKX509v3 Subject Alternative Name: URI:https://billetterie.lab/stagiaire, URI:https://billetterie.lab/livreurThe last command reads the SAN. Each entry carries its type (URI:, email: or DNS:), and several entries follow one another on the same line, separated by a comma. The following script splits this line and looks for the expected entry with an exact comparison: grep -Fx treats the pattern as fixed text (-F) and requires it to occupy the whole line (-x). The splitting assumes that no entry contains a comma.
#!/usr/bin/env bash# usage: identite-san.sh CERTIFICATE EXPECTED_ENTRY (e.g. URI:https://billetterie.lab/livreur)[ $# -eq 2 ] || { echo "REFUS: 2 arguments attendus"; exit 2; }cert=$1; attendu=$2san=$(openssl x509 -in "$cert" -noout -ext subjectAltName 2>/dev/null) \ || { echo "REFUS: aucun SAN lisible dans $cert"; exit 1; }if printf '%s\n' "$san" | tail -n +2 | tr ',' '\n' | sed 's/^ *//' | grep -Fxq -- "$attendu"; then echo "OK $attendu"else echo "REFUS: $attendu absent des SAN" exit 1fiTwo traps are measured with these certificates. The first is the substring: a URI that contains the expected identity is not the expected identity, and a grep -q 'billetterie.lab/livreur' on the SAN accepts uri-long, whereas the exact comparison refuses it. The second is the multiple SAN: a certificate can carry several identities, and a check that only reads the first entry wrongly refuses double, whose expected identity is the second.
| Certificate | identite-san.sh | Naive grep on a substring | First entry only |
|---|---|---|---|
uri-livreur (expected URI) | OK, code 0 | accepted | accepted |
uri-long (longer URI) | REFUS, code 1 | wrongly accepted | not measured |
double (two entries) | OK, code 0 | accepted | wrongly refused, code 1 |
stagiaire.crt (email SAN) | REFUS, code 1 | not measured | not measured |
autorite.crt (no SAN) | REFUS, code 1 | not measured | not measured |
For autorite.crt, OpenSSL answers No extensions in certificate with code 0: it is the script that refuses, because the expected entry is absent. A complete verifier chains the chain check (openssl verify -purpose codesign), this exact comparison of the identity, then the signature of the bytes. The lab at the end of the lesson asks for this verifier written in Python: the reasoning is that of these scripts, and you write the code yourself. These scripts split text to stay short; a production verifier is better off reading the SANs with a real X.509 library rather than splitting the output of openssl, which this lesson does not measure.
Where do Cosign and DOCKER_CONTENT_TRUST fit?
The previous gesture signs an archive with basic tools. Cosign does the same job with a dedicated format, and can also sign an image in a registry. To place the tool, here is the same archive signed with a local Cosign 3.1.4 key pair, with no external service. Since the Cosign image is non-root, the command runs it with your user ID.
C=ghcr.io/sigstore/cosign/cosign:v3.1.4@sha256:0f06154836d2de34f887a5c273506d52ca43edaa1d9e53e6510fa78a48f69c2dexport COSIGN_PASSWORD='mot-de-passe-d-essai'mkdir -p cs && cp livraison.tar cs/ && cp altere/livraison.tar cs/altere.tarco() { docker run --rm --user "$(id -u):$(id -g)" -e HOME=/tmp -e COSIGN_PASSWORD \ -v "$PWD/cs":/w -w /w "$C" "$@"; }co generate-key-pairco sign-blob --yes --key cosign.key --use-signing-config=false --tlog-upload=false \ --bundle livraison.bundle livraison.tarco verify-blob --key cosign.pub --bundle livraison.bundle --insecure-ignore-tlog livraison.tarco verify-blob --key cosign.pub --bundle livraison.bundle --insecure-ignore-tlog altere.tarVerified OKError: failed to verify signature: could not verify message: invalid signature when validating ASN.1 encoded signatureThe original archive is verified (code 0) and the altered archive is refused (code 1), as with OpenSSL. Cosign adds a WARNING: Skipping tlog verification is an insecure practice warning before each result, and repeats the error message on a second line; the output above keeps only the essentials. Two details of version 3: --tlog-upload=false is only accepted with --use-signing-config=false, and verification without --insecure-ignore-tlog fails with not enough verified log entries from transparency log: 0 < 1, because Cosign expects by default a proof of inclusion in a public transparency log. The --insecure-ignore-tlog option is acceptable for a local test, never for a delivery. The password of the key is also a test one, never that of a delivery key.
The mode that makes Cosign strong, keyless signing (no key to keep, through an ephemeral certificate tied to an OIDC identity), and the signing of an image directly in a registry are not replayed in this lesson. They belong to the DevSecOps course: see Cosign: sign and verify your container images, Sigstore and, on the cluster side, Kubernetes supply chain security.
One last question comes up often: does DOCKER_CONTENT_TRUST=1 protect a docker pull? On Docker 29.9.2, in this test, the variable changed nothing. The two docker pull commands below, with the variable set, returned 0 with no error or warning, and so did a docker run of a local image.
# ❌ tags without a digest: we observe precisely what the engine lets throughDOCKER_CONTENT_TRUST=1 docker pull alpine:3.19.1DOCKER_CONTENT_TRUST=1 docker pull busybox:1.36.1The images downloaded normally, and the engine displayed no verification message. A second finding points the same way. The docker trust command, which is used to sign and inspect the signatures of this mechanism, answers on this Docker 29.9.2 installation:
docker trust inspect alpinedocker: unknown command: docker trust
Run 'docker --help' for more informationThe command returns 1, and docker trust alone answers the same way. The engine therefore gives you neither a tool to publish signatures nor a tool to read them, and the variable lets everything through without checking anything: do not count on it to refuse an unsigned image. Signature verification is up to you, as in this lesson, or to the policy of a cluster.
How do you clean up what the lesson leaves on the machine?
The lesson leaves four things on the machine: the ~/atelier-billetterie folder with its files, Docker images, the trivy-cache volume and build cache. In the folder there are private keys that the openssl req -nodes commands write without encrypting them. The trivy-cache volume is the heaviest, since its single trivy.db file weighs 1,693,241,344 bytes. The keys are the most sensitive element: an unencrypted private key, left on the disk, lets whoever gets hold of it sign in place of its owner.
cd ~find ~/atelier-billetterie -deletedocker rmi billetterie:1.1-validee billetterie:1.1 billetterie:1.0docker rmi alpine:3.19.1 busybox:1.36.1docker rmi ghcr.io/aquasecurity/trivy@sha256:790fd66d1697395d8693d1acaa1ea702406a20f109b6fc7bac8db623eca6c06c ghcr.io/sigstore/cosign/cosign@sha256:0f06154836d2de34f887a5c273506d52ca43edaa1d9e53e6510fa78a48f69c2ddocker volume rm trivy-cachedocker builder prune -f | tail -1First leave the folder with cd ~, then find ... -delete deletes that folder alone and its contents, without touching the rest of your disk. The two labels of the 1.1 image are removed together, billetterie:1.1-validee included: docker rmi prints Untagged: for each label, then Deleted: when the image disappears. In our replay, from a state where the whole lesson had been followed, each of these commands returned 0. If you did not set the billetterie:1.1-validee label or pull the Cosign image, docker rmi answers No such image for them and returns 1, while still removing the others: this error is harmless. docker volume rm repeats the name of the volume, and docker builder prune -f ends with the reclaimed space (Total: followed by 399.7MB on our side). Mind that this last command empties the build cache of the whole machine, not only that of the lesson; skip it if you build other images here.
Then check with docker images -a -q, docker ps -a -q and docker volume ls -q: the three list nothing any more. On our side, ls ~ showed only the file that already belonged to the account, and docker system df reported 0 images.
Practice
The first lab takes up the gate of the lesson, with a scan done offline. You work with debsecan and a Debian database frozen at a given date, so that the result does not depend on the state of the Internet. The scan script refuses one specific CVE, the fixed image receives a candidate tag, and you write the gate that returns its verdict through its exit code. The validation compares your reports to a fresh scan (image, database, alerts) and refuses evidence older than twenty-four hours.
The second lab takes up the verifier of the lesson. The archive and its detached signature are ready, the verifier refuses everything because its policy is missing, and you write it: it must verify the chain up to the approved authority, the exact identity and the signature of the bytes. The validation generates fresh signatures and expects the approved signer to be accepted, and altered bytes, another identity from the same authority, another key and a self-issued certificate to be refused. The identity expected by the lab is not that of the lesson: the statement specifies it, and the verifier is written in Python.
Key points
- A scan compares a package inventory to a dated vulnerability database: its verdict is valid for one image, one database and one day.
- A useful report is linked to its object: scan date, Trivy version, image identifier, checksum of the scanned archive, database date, plus two fingerprints, that of the scanned package inventory (
/var/lib/dpkg/status) and that of the database (trivy.db), because the same database date can carry two contents. It stops being evidence beyond the duration set by the policy. - With the containerd store, the Docker
Idis the digest of the index, whereas Trivy reports that of the configuration: the two cannot be compared. - Without
--exit-code,trivy imagereturns 0 even with critical alerts. With--exit-code 1,--severityfilters what is displayed and what counts for the code, and a runtime error also returns 1. - A hand-written gate tells the refusal (1) from the error (2), including the usage error (missing variable or argument), and keeps all the alerts in the report: accepting a fixed image does not declare it free of vulnerabilities.
- The scanner only sees what the package manager has declared: a library copied without
dist-infostays invisible, anddebsecanonly readsdpkg. - A digest or a SHA-256 checksum proves integrity, not the author: whoever modifies the archive can republish the checksum.
- A signature is verified in two steps, the chain and the exact identity, then the bytes. Without
-verify_email, the chain accepts the certificate of an intern of the same authority. That option only covers email: for a URI, you read the SAN and compare it to the identity exactly, entry by entry, with no substring. - Cosign does the same gesture for the images of a registry, and
DOCKER_CONTENT_TRUST=1produced no effect and no message on Docker 29.9.2, wheredocker trustdoes not exist. - The lesson ends with the removal of the working folder (unencrypted private keys included), of the images, of the
trivy-cachevolume and of the build cache.
Knowledge check
Check that the essentials of this lesson have stuck. The questions cover only what has just been explained here.
Knowledge check
Check what you have learned with this interactive quiz
How it works
- The timer starts when you click Start
- Multiple choice, true/false and short answer questions
- You can move between questions
- Detailed results are shown at the end
Starts the quiz and the timer
Review
(0/0)Score by domain
A domain groups several guides and gets several questions, so its score is more reliable than a per-topic score, which often rests on a single question.
Summary
Strengths
No topic passed at 80% on at least two questions yet.
Weak areas
No topic below the pass mark.
Recommended next
Hints before you try again?
Continue the course: Promote the same artifact between two environments
A new full quiz with random questions
Work again only on the questions you missed