When you remove a Docker container with docker rm, the files it wrote disappear with it. They sit in a writable layer that belongs to that container alone, and Docker destroys it along with the container. To keep a piece of data, you place it in a mount: a directory of the container whose content is stored somewhere other than in that layer.
Docker offers three mounts. The named volume is a space that Docker manages for you. The bind mount exposes a path of your machine. The tmpfs keeps files in RAM and retains nothing.
This lesson is for a beginner who knows how to start and remove a container. You will see the data loss, try each mount, then read what Docker really mounted. It does not cover access rights on a volume, which the lesson on volume permissions covers.
What you will learn
- Observe that a file written in a container disappears with it, and know where it lived.
- Create a named volume and check that its data survives a new container.
- Mount a host directory with a bind mount, and a space in memory with tmpfs.
- Read a mount back with
docker volume inspectand the.Mountsfield ofdocker container inspect. - Recognize an anonymous volume and clean it up with
docker rm -v. - Mount a source read-only.
Prerequisites
You need a Linux host with Docker Engine 29.9.2 and an account that runs docker without sudo. You must know how to use docker run, docker ps and docker rm, which the lesson start a container and choose what it runs teaches. The page also uses docker exec, which runs a command in a container that is already running. The commands that read Docker's files on the host's disk require sudo.
All the results shown come from Docker 29.9.2, installed from the official repository on Debian 13. The two images used are pinned by their SHA-256 digest, which identifies an image without ambiguity. These variables save you from retyping it in every command:
ALPINE='alpine:3.24@sha256:be2656061b536c1883c4034790e21d0a09c5aaaf51968b89368a3c0371ea2c9a'DEBIAN='debian:13-slim@sha256:f6b08b09a05725f9431502d3b5714f5c4576e82c1a84fa1debe0c24a7e0c3ec4'These variables only exist in the terminal where you type them. If you open another terminal, type them again.
What becomes of a file written in a container?
A file written in a container stays in its writable layer, and it disappears when you remove the container. An image is a stack of read-only layers. When Docker starts a container, it puts an empty layer on top where the container can write, and which belongs to that container alone. All its writes go into this layer. The container sees the whole set of layers as a single root.
Stopping the container leaves the layer intact. Removing the container destroys the layer.
The diagram shows this stack in cross-section. At the bottom, the image layers are shared and never change. Above them, the writable layer belongs to a single container, takes up space on the host's disk and disappears with it. At the very top, the container sees the whole as a single root.
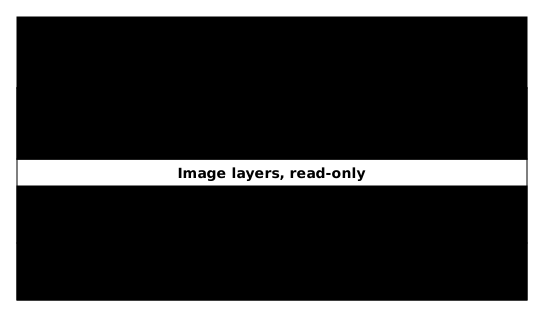
Try it on an example. The container atelier-1 writes a file, then you ask Docker for the list of what changed:
docker run -d --name atelier-1 "$ALPINE" sleep 3600docker exec atelier-1 sh -c 'echo "note du quai" > /carnet-de-bord.txt'docker diff atelier-1docker diff lists the changes of the writable layer compared with the image. A flags an added file, C a changed file and D a deleted file. You should see a single line, the one for your file:
A /carnet-de-bord.txtStop then restart the container, and read the file again:
docker stop atelier-1docker start atelier-1docker exec atelier-1 cat /carnet-de-bord.txtatelier-1atelier-1note du quaiThe first two lines are the names that docker stop and docker start repeat. The last is the content of the file. It is still there, because a restart keeps the layer. Now remove the container, create another one with the same name and look for the file:
docker rm -f atelier-1docker run -d --name atelier-1 "$ALPINE" sleep 3600docker exec atelier-1 cat /carnet-de-bord.txtcat: can't open '/carnet-de-bord.txt': No such file or directoryThis time cat fails. The new container received a fresh writable layer, and the old one disappeared with atelier-1. The name and the image are the same, but the file no longer exists. Mounts exist to avoid this loss.
Where does the writable layer live on the machine?
It is on the host's disk, in a directory that Docker manages, and you can find it. Two mechanisms can stack the layers and present them to the container as a single root. The classic storage driver is built into Docker. The snapshotter belongs to the containerd image store, a component that Docker can use to manage images and containers.
Both can rely on the same Linux kernel feature, called overlay, which superimposes directories. What changes is who manages the layers and where they are kept: under /var/lib/docker for the classic driver, under /var/lib/containerd for a snapshotter. A fresh Docker 29.9.2 installation uses the containerd store by default. An older installation may still use the classic driver.
Rather than assume, ask your Docker what it uses:
docker info --format '{{.Driver}}'docker info --format '{{.DriverStatus}}'docker info --format '{{.DockerRootDir}}'The first command prints the driver name, on a single line. The second prints its details. If you read a type io.containerd.snapshotter.v1 there, that name is the one of a snapshotter of the containerd store. Without this type, your Docker uses the classic driver. The third command prints the directory where Docker keeps its data.
Note the name on the first line. The paths below contain it, and the examples write <driver> in its place: replace it with what you read. If your Docker uses the classic driver, your directories will differ, but the method stays the same.
To find where a specific file is stored, write one with a name that nothing else carries, then look for it on the host. Depending on the store, the layers are under Docker's directory or under containerd's. Search both.
docker exec atelier-1 sh -c 'echo "trace unique" > /repere-unique.txt'sudo find /var/lib/docker /var/lib/containerd -name 'repere-unique.txt' 2>/dev/nulldocker container inspect --size --format '{{.SizeRw}}' atelier-1The last field, .SizeRw, gives the size of the writable layer in bytes. The output below shows 8192 bytes, far more than the few bytes written. Do not read this value as the size of the file: it only shows that the layer takes up space on the disk.
/var/lib/docker/rootfs/<driver>/306ebebfb18feced2994716736f64a48c4053fd348b32cef38dd61b8cf890741/repere-unique.txt/var/lib/containerd/io.containerd.snapshotter.v1.<driver>/snapshots/108/fs/repere-unique.txt8192The search finds the file in two places, which do not play the same role.
The first, under /var/lib/docker/rootfs/<driver>/, carries the container's full identifier. It is the mount point, the merged view that the container sees as its root. It holds the container's whole file system, not just your writes.
The second, under /var/lib/containerd/io.containerd.snapshotter.v1.<driver>/snapshots/, is a snapshot of the containerd store. Its number, 108 here, changes from one machine to another. It is the writable layer itself, the directory that holds only the differences. In both cases these are host directories, so the data takes up space on its disk.
Do not guess which is which, ask the kernel. findmnt prints the options of the container's overlay mount. Overlay is the kernel feature that stacks directories, mentioned above, and its upperdir= option designates the writable layer. Replace <driver> with the name you noted earlier and <full-id> with the container's full identifier, which docker container inspect --format '{{.Id}}' atelier-1 gives:
sudo findmnt -no TARGET,OPTIONS -T /var/lib/docker/rootfs/<driver>/<full-id>On another run, with another container that had written a single file, the options contained upperdir=/var/lib/containerd/io.containerd.snapshotter.v1.<driver>/snapshots/223/fs, and workdir= pointed to the neighboring work directory. The numbers 108 and 223 therefore come from two runs and two different containers. Yours will be different again.
These options describe how overlay assembles the container's root. The lowerdir entries are the image layers, read-only. The upperdir receives the container's writes. The workdir is a working directory internal to overlay, so you have nothing to read in it. The diagram places them relative to what the container sees. Notice that the container's root is not one more directory: it is the assembly of the upperdir and the lowerdir entries.
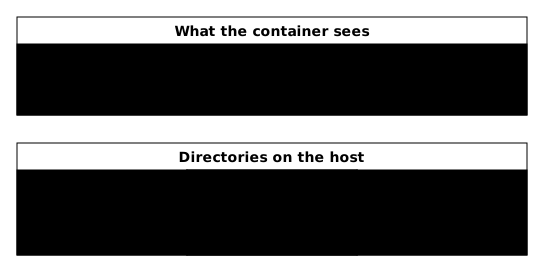
To check that the upperdir really is the writable layer, compare two listings: sudo ls -A <upperdir-path>, where you paste the path found after upperdir=, then sudo ls -A /var/lib/docker/rootfs/<driver>/<full-id>, the root of the mount point. On the other run, the one whose container had written a single file, the first listing showed only that file, and the second showed the image's files as well. The upperdir therefore holds only your writes, and the mount point shows the merged view.
These directories are an internal detail of Docker. Reading them to understand is useful. Writing to them by hand is not, because Docker may move or reorganize them without warning.
Clean up this container before going on:
docker rm -f atelier-1What are the three mounts and how do they differ?
A mount plugs an outside location into a directory of the container. Everything the container writes in that directory goes outside, not into the writable layer.
There are three kinds of mounts. The named volume is a space that Docker creates and manages in its own data directory, and that you designate by a name. The bind mount is a directory or a file of your machine, that you designate by its path. The tmpfs is a space in the host's RAM, which disappears when the container stops.
The diagram shows where a write goes depending on the directory it lands in. A named volume and a host path survive the container. The host's memory (tmpfs) and the writable layer disappear with it.
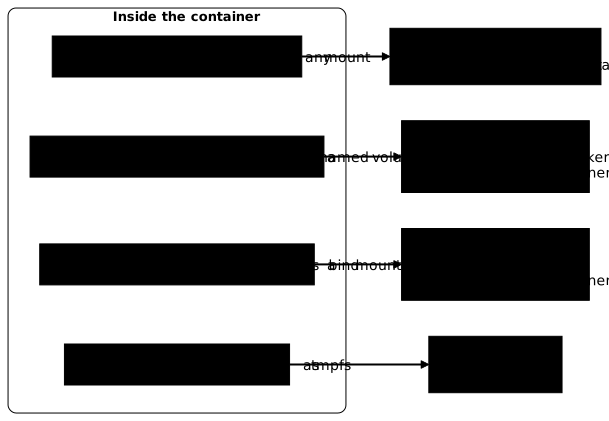
Docker offers two syntaxes for mounting. The --mount option is explicit: you write key=value pairs separated by commas (type=, source=, target=). The -v option (or --volume) is shorter: three fields separated by colons, source:target:options. They describe the same mounts. The lesson uses --mount because it reads better, and shows -v next to it, since you will meet it everywhere.
| Mount | Where the data lives | Survives docker rm | When to choose it |
|---|---|---|---|
| Named volume | In the space managed by Docker | Yes | Application data: database, uploads |
| Bind mount | At the host path you give | Yes | Share a configuration file or code with the host |
| tmpfs | In the host's memory | No | Temporary or sensitive data that must not touch the disk |
Two rules prevent data loss. First, take any valuable data out of the writable layer before removing the container. docker cp copies it to the host, as the lesson inspect a running container explains. After docker rm, it is too late.
Second, declare your mounts in the docker run itself. A mount cannot be added to an existing container. To give one to a container that already exists, you must recreate it with the mount. So think about the data before the first launch.
How do you keep data with a named volume?
A named volume lives independently of the containers that use it. That is what makes it suited to data you do not want to lose. To see it, create the volume, mount it in a container, write into it, then remove the container. Then mount the same volume in a new container: the data is there.
docker volume create registre-escaledocker run --rm --mount type=volume,source=registre-escale,target=/donnees "$ALPINE" \ sh -c 'echo "escale de Brest" > /donnees/journal.txt'The --rm option removes the container as soon as it exits. If the data survives this removal, it is therefore the volume that carries it. A second, brand-new container mounts the same volume with the short form -v:
docker run --rm -v registre-escale:/donnees "$ALPINE" cat /donnees/journal.txtescale de BrestBoth commands use the same volume, one with --mount, the other with -v. The second container reads the file written by the first, which no longer exists. Note that docker volume create is not required: if the named volume does not exist, docker run creates it on first use.
What do you see when you inspect a volume?
docker volume inspect describes the volume itself. You read its name, its driver, its scope, its creation date and its Mountpoint, the host directory where Docker stores its data.
docker volume lsdocker volume inspect registre-escaleDRIVER VOLUME NAMElocal registre-escale[ { "CreatedAt": "2026-11-02T07:05:51Z", "Driver": "local", "Labels": null, "Mountpoint": "/var/lib/docker/volumes/registre-escale/_data", "Name": "registre-escale", "Options": null, "Scope": "local" }]The Driver field is local for an ordinary volume: the data is on the host. The Mountpoint is an internal detail of Docker, like the writable layer. It tells you where the bytes are, not where to edit them by hand.
Does an empty volume receive the image's content?
An empty named volume, mounted on a directory that the image already fills, first receives a copy of that content. The test below shows it on Docker 29.9.2.
This copy only happens on the first use of an empty volume, and never for a bind mount. To check it, use a Debian image whose /etc/skel directory contains files:
docker run --rm "$DEBIAN" ls -A /etc/skeldocker run --rm -v modele-skel:/etc/skel "$DEBIAN" ls -A /etc/skelThe second command creates the modele-skel volume on the fly. It prints the content of the directory mounted on this empty volume. Both commands print the same list of three files: the volume therefore received a copy of the image's content.
.bash_logout.bashrc.profile.bash_logout.bashrc.profileHow do you share a host directory with a bind mount?
A bind mount exposes a directory or a file of the host inside the container. Both see the same bytes, and a change made on one side is immediately visible on the other. You use it to give a configuration file to a container, or so that it reads code that you edit on the host.
Prepare a directory and a file, then mount them:
mkdir -p "$HOME/escale/config"echo 'port=8080' > "$HOME/escale/config/reglages.conf"docker run --rm --mount type=bind,source="$HOME/escale/config",target=/etc/escale "$ALPINE" \ cat /etc/escale/reglages.confport=8080The container prints the content of the file you created on the host.
The equivalent short form is -v "$HOME/escale/config:/etc/escale". The two syntaxes behave differently when the source does not exist. With --mount, Docker refuses to start the container. With -v, it creates the directory for you. Try both:
docker run --rm --mount type=bind,source="$HOME/escale/absent",target=/x "$ALPINE" truedocker run --rm -v "$HOME/escale/absent:/x" "$ALPINE" truels -ld "$HOME/escale/absent"docker: Error response from daemon: invalid mount config for type "bind": bind source path does not exist: /home/student/escale/absent
Run 'docker run --help' for more informationdrwxr-xr-x 2 root root 4096 Nov 2 07:05 /home/student/escale/absentThe first command fails with bind source path does not exist. The second succeeds without a word, and ls shows the directory that -v created, which belongs to root. With -v, a typo in the path silently creates a directory. --mount reports the error, which is why the lesson prefers it.
The bind mount has another trap: it hides the content the image had at that location. Mount an empty directory on /etc/skel and the command prints nothing, because the host directory takes the place of the image's one.
mkdir -p "$HOME/escale/vide"docker run --rm -v "$HOME/escale/vide:/etc/skel" "$DEBIAN" ls -A /etc/skel(no output: the directory is empty)How do you keep a working area in memory with tmpfs?
A tmpfs mount gives the container a directory that lives in the host's RAM. Nothing is written to disk, and everything disappears when the container stops. It suits temporary files, throwaway caches and sensitive data that you do not want to persist. It exists only on Linux, and two containers cannot share it.
docker run -d --name atelier-2 \ --mount type=tmpfs,target=/espace,tmpfs-size=16m "$ALPINE" sleep 3600docker exec atelier-2 sh -c 'echo "brouillon" > /espace/note.txt && df -h /espace'The tmpfs-size=16m option limits the space to 16 MB. The df prints a tmpfs file system of 16 MB, mounted on /espace.
Filesystem Size Used Available Use% Mounted ontmpfs 16.0M 4.0K 16.0M 0% /espaceRestart the container and read the directory again. docker restart prints the container's name, then ls finds nothing:
docker restart atelier-2docker exec atelier-2 ls -A /espaceatelier-2The directory is empty: the tmpfs does not even survive a restart. The short form is --tmpfs /espace, which also accepts options such as the size.
How do you see what Docker really mounted?
To know what a container mounted, read the .Mounts field of docker container inspect. It lists each mount with its type, source, destination and mode. It shows what Docker really mounted, which may differ from the command you think you typed.
docker container inspect --format \ '{{range .Mounts}}{{.Type}} {{.Source}} -> {{.Destination}} (RW={{.RW}}){{"\n"}}{{end}}' atelier-2tmpfs -> /espace (RW=true)Each line gives four pieces of information. Type is volume, bind or tmpfs. Source is the host directory for a bind mount and the Mountpoint for a volume. It stays empty for a tmpfs, as in the output above. Destination is the path in the container. RW is true if writing is allowed and false for a read-only mount.
To read the full definition of a mount, use {{json .Mounts}}. The Name field, present for a volume, is the one that docker volume inspect accepts.
Clean up the container from this test:
docker rm -f atelier-2What is an anonymous volume and how do you remove it?
An anonymous volume is a volume that Docker creates without you giving it a name. It gets a 64-character identifier. It appears when you mount a path without a source (-v /donnees) or when the image declares a VOLUME instruction. docker rm does not remove it unless you ask. It then piles up in the list of volumes, and since it has no name, you no longer know what it was for.
docker run -d --name atelier-3 -v /donnees "$ALPINE" sleep 3600docker volume lsdocker rm -f atelier-3docker volume ls --filter dangling=trueThe --filter dangling=true option lists the volumes that no container uses anymore. It does not tell anonymous volumes from named ones: modele-skel and registre-escale, created by the previous examples, appear in it too. The volume of atelier-3 is the one whose name is a 64-character identifier.
DRIVER VOLUME NAMElocal 540840ac5174fc20c40bcbedde7ef9904f1a891d6470da9b6e4a170ca376324flocal modele-skellocal registre-escaleatelier-3DRIVER VOLUME NAMElocal 540840ac5174fc20c40bcbedde7ef9904f1a891d6470da9b6e4a170ca376324flocal modele-skellocal registre-escaleIn the output, the first listing was taken while atelier-3 was running: next to the two named volumes, it already shows the anonymous volume, which only its 64-character identifier designates. The atelier-3 line is the name that docker rm -f repeats. The second listing still contains the anonymous volume: the container is removed, but its volume remains. To remove the volume along with the container, add -v to docker rm:
docker run -d --name atelier-4 -v /donnees "$ALPINE" sleep 3600docker rm -f -v atelier-4docker volume ls --filter dangling=trueatelier-4DRIVER VOLUME NAMElocal 540840ac5174fc20c40bcbedde7ef9904f1a891d6470da9b6e4a170ca376324flocal modele-skellocal registre-escaleThe atelier-4 line is the name that docker rm repeats, and no new volume appears in the list. The -v option of docker rm removes the anonymous volumes attached to the container, never a named volume.
To remove those already lying around, use docker volume prune, which removes unused volumes. On Docker 29.9.2, docker volume prune -f removed the anonymous volume of atelier-3 and kept modele-skel and registre-escale.
The --all option extends the removal to unused named volumes. The command announces it in its warning (This will remove all local volumes not used by at least one container).
The command does not print the list before asking for confirmation. So first run docker volume ls --filter dangling=true, read the list, and only then docker volume prune.
Give a name to any volume that matters. With a name, you find the data, you inspect it and you remove it on purpose. An anonymous volume gets lost in the list.
How do you mount a source read-only?
Add readonly to --mount (or ro at the end of -v) so that the container reads the source without being able to change it. This is the right setting for a configuration, certificates or code that the container must never change. An error in the application, or an intrusion, then cannot touch the source.
docker run --rm \ --mount type=bind,source="$HOME/escale/config",target=/etc/escale,readonly \ "$ALPINE" sh -c 'cat /etc/escale/reglages.conf; echo "port=9999" >> /etc/escale/reglages.conf'The container reads the file, then the write is refused. With the short form, write -v "$HOME/escale/config:/etc/escale:ro".
port=8080sh: can't create /etc/escale/reglages.conf: Read-only file systemYou also check it by inspection: the mount's RW field is false. If a write is refused in a volume you thought was open, read this field first. The lesson on volume permissions explains how to tell it apart from the other causes.
"Read-only" applies to the mount only. The container can still write elsewhere, in its own layer.
How do you clean up what this lesson created?
The atelier-* containers are already removed. The examples leave the registre-escale and modele-skel volumes, the escale directory under your home directory and, if you did not run docker volume prune, the anonymous volume of atelier-3. The following commands remove the two named volumes and the directory, then list the remaining volumes. If you skipped an example, the command that targets the missing object prints a harmless error.
docker volume rm registre-escale modele-skeldocker volume ls --filter dangling=truerm -r "$HOME/escale"The escale/absent directory was created by Docker, so it belongs to root. Run from a terminal, rm -r then asks "rm: remove write-protected directory" for this subdirectory. Answer y: the removal succeeds, because escale, the directory that contains it, belongs to you and it is that directory that authorizes the removal of an entry. Without an answer, the absent subdirectory stays in place.
If the last list still shows anonymous volumes left from your tests, remove them one by one with docker volume rm and their identifier. Do not use docker volume prune on a machine that hosts work other than yours.
Putting it into practice
The first lab provides a container that writes its data in its own layer. You recreate it with three mounts: a named volume for the data, a read-only host directory and a space in memory. You must not lose what the layer contained. The validation then checks the state of the machine: for each mount, it compares what the inspection declares with what the container can really do.
The second lab extends the first half of the lesson. You identify Docker's storage driver, you find a container's writable layer on the disk and you observe that a file written in the container is readable there and takes up space. There is nothing to copy from this page. The values to find are those of your Docker installation, which you read with the commands of the first half of the lesson.
Key takeaways
A container writes into a writable layer that belongs to it. A restart keeps it, removing the container destroys it, and a container recreated under the same name starts from an empty layer. This layer is on the host's disk, in a directory that Docker manages. docker diff and docker container inspect --size let you measure it without touching it.
For data to survive, mount it outside this layer. The named volume suits application data: Docker manages it and it lives independently of the containers. The bind mount exposes a host path and hides what the image had at that location. The tmpfs keeps everything in memory and does not survive a restart.
For a bind mount, prefer --mount to -v. When the source does not exist, --mount refuses to start, whereas -v silently creates a directory that belongs to root. To read what a container mounted, look at the .Mounts field of docker container inspect, where RW is false for a read-only mount. To read the volume itself, use docker volume inspect.
An anonymous volume has no name and piles up. docker rm -v removes it with the container, but the safest course is to name any volume that matters. Mounting a source read-only, with readonly or ro, protects the source without preventing the container from writing in its own layer.
Knowledge check
Check that the essentials of this lesson are in place. The questions only cover what has just been explained here.
Knowledge check
Check what you have learned with this interactive quiz
How it works
- The timer starts when you click Start
- Multiple choice, true/false and short answer questions
- You can move between questions
- Detailed results are shown at the end
Starts the quiz and the timer
Review
(0/0)Score by domain
A domain groups several guides and gets several questions, so its score is more reliable than a per-topic score, which often rests on a single question.
Summary
Strengths
No topic passed at 80% on at least two questions yet.
Weak areas
No topic below the pass mark.
Recommended next
Hints before you try again?
Continue the course: Docker volume permissions: three common causes of an access denied
A new full quiz with random questions
Work again only on the questions you missed