Signing an image with Cosign means placing, in the registry, a cryptographic proof that binds a digest to a private key; verifying means checking that proof with the matching public key. This lesson is aimed at anyone preparing the CKS (Certified Kubernetes Security Specialist) or the KCSA (Kubernetes and Cloud Native Security Associate) who already knows how to pin an image by its digest. It shows, with cosign 3.1.3, how to generate the keys, sign, publish the public key in the cluster and prove that verification can also refuse.
Keyless mode, the Sigstore ecosystem and use cases outside Kubernetes are covered in Cosign: signing and verifying your container images and in Sigstore: keyless signing for the supply chain. This page is limited to key-based signing and its use in a cluster.
What you will learn
- Say what an image signature proves and what it does not prove
- Generate a key pair and keep the private key outside the cluster
- Sign a digest and find the signature in the registry
- Publish the public key in a ConfigMap
- Verify an image and read the three exit codes
- Say how admission relies on the signature, and diagnose a failure
Prerequisites
- Know how to pin an image by its digest: Kubernetes supply chain security
- A Kubernetes cluster with kubectl configured
- A registry you can push an image to: a local registry is enough, started with Docker on your workstation
- The
cranetool (Crane), which reads an image's digest in a registry: its verified installation is given below, along with an alternative withoutcrane - Internet access from the signing machine: cosign's default signing contacts a public Sigstore service (see the signing section)
What does an image signature prove?
A signature proves two things: authenticity (the image was indeed published by the holder of the private key) and integrity (its content has not changed since). It does not prove the absence of vulnerabilities: a signed image can contain critical CVEs, and it is the scan, described in Scanning Kubernetes images, that looks for them.
A signature is only worth the key that verifies it. If anyone can obtain the private key, the signature no longer distinguishes your image from a third party's. Hence the rule of this lesson: the private key stays on the signing machine and never enters a cluster object, whereas the public key is meant to be published.
Cosign, from the Sigstore project, is the usual signing tool in the container ecosystem. The commands on this page were played with cosign 3.1.3 and crane 0.22.1, a small command-line tool for querying registries.
How do you sign an image with Cosign?
Signing takes three gestures: install cosign, generate a key pair, then sign the image's digest. The signature is pushed to the registry, next to the image: you therefore need a registry you are allowed to write to. A throwaway local registry is enough, and the commands can be replayed on your workstation without an account at any provider. One exception: with cosign 3.1.3, the default signing also publishes an entry in Sigstore's public Rekor log, which requires network access (details in the section "Signing the digest, not the tag").
# A throwaway registry on the workstationdocker run -d --name registre -p 127.0.0.1:5555:5000 \ registry:3@sha256:ddf754342cfc8acc51a56d5d0ab6af06826461864460636d8bd5c546dab2a7b8You then need two images in this registry: lab-signe:1.0.0, which you will sign, and lab-non-signe:1.0.0, which will never be signed and will be used to trigger exit code 10. Both come from public images pinned by digest, copied under another name into the local registry.
docker pull gcr.io/distroless/static-debian12@sha256:afa5c872c891853ca7fcf1f12c3edb23f7eeef36189728842dd51042ff57f7abdocker tag gcr.io/distroless/static-debian12@sha256:afa5c872c891853ca7fcf1f12c3edb23f7eeef36189728842dd51042ff57f7ab localhost:5555/lab-signe:1.0.0docker push localhost:5555/lab-signe:1.0.0
docker pull nginx@sha256:8541484afbc9c8a5a8a99b379568ebbc957f658583ec9448fc43104229c03cf8docker tag nginx@sha256:8541484afbc9c8a5a8a99b379568ebbc957f658583ec9448fc43104229c03cf8 localhost:5555/lab-non-signe:1.0.0docker push localhost:5555/lab-non-signe:1.0.0
Each docker push ends with a line 1.0.0: digest: sha256:… size: …: this digest is the registry's, and it is the one you will sign. Note the one for each image.
Installing cosign with checksum verification
A supply chain tool is downloaded with the same precautions as kubectl in the lesson Kubernetes supply chain security: pinned version and verified checksum. The block compares the binary's SHA-256 checksum with the one Sigstore publishes in the cosign_checksums.txt file of each release, before making it executable.
COSIGN_VERSION=3.1.3base="https://github.com/sigstore/cosign/releases/download/v${COSIGN_VERSION}"curl -sSfLO "${base}/cosign-linux-amd64"curl -sSfLO "${base}/cosign_checksums.txt"grep " cosign-linux-amd64$" cosign_checksums.txt | sha256sum -c -chmod +x cosign-linux-amd64 && sudo mv cosign-linux-amd64 /usr/local/bin/cosignThe sha256sum -c - line must answer cosign-linux-amd64: OK. Without that OK, do not make the binary executable.
Installing crane with checksum verification, or doing without it
crane is not installed with the cluster or with Docker, and it is not taught elsewhere in this course: you install it with the same discipline as cosign. The go-containerregistry project publishes, for each release, an archive and a checksums.txt file. The block pins version v0.22.1 and only places the binary in the PATH if the checksum matches. The archive name is the one from the Crane page; other architectures are listed on the project's releases page.
VERSION=v0.22.1ARCHIVE=go-containerregistry_Linux_x86_64.tar.gzBASE="https://github.com/google/go-containerregistry/releases/download/${VERSION}"curl -fsSL -o "$ARCHIVE" "${BASE}/${ARCHIVE}"curl -fsSL -o checksums.txt "${BASE}/checksums.txt"grep " ${ARCHIVE}$" checksums.txt | sha256sum --check -tar -xzf "$ARCHIVE" cranesudo install -m 0755 crane /usr/local/bin/cranerm -f crane "$ARCHIVE" checksums.txtThe sha256sum --check - line must answer go-containerregistry_Linux_x86_64.tar.gz: OK. Without that OK, extract nothing. You can also do without crane: the digest that docker push prints at the end of each upload (previous step) is the one to sign; in that case, replace each crane digest call in the following sections with the digest you noted.
Generating the key pair
cosign generate-key-pair writes two files to the current directory: cosign.key (private) and cosign.pub (public). The tool asks for a passphrase, which protects cosign.key. To supply it without a dialogue, for example in a script, the COSIGN_PASSWORD variable does the job, even empty in a lab.
cosign generate-key-pairCheck that both files exist with ls cosign.*. cosign.key must never leave your vault: in this lesson's lab, it stays on the signing machine, and the cleanup removes it.
Signing the digest, not the tag
A tag can be reassigned to another image: so you sign the digest. crane digest resolves it, then cosign sign signs that precise digest.
crane digest localhost:5555/lab-signe:1.0.0# sha256:afa5c872c891853ca7fcf1f12c3edb23f7eeef36189728842dd51042ff57f7abcosign sign --key cosign.key --allow-http-registry \ localhost:5555/lab-signe@sha256:afa5c872c891853ca7fcf1f12c3edb23f7eeef36189728842dd51042ff57f7abThe digest above is the one read on the lab-signe:1.0.0 image of the trial. If crane digest prints a different one on your side (depending on how your Docker pushes the image to the registry), carry over the one you read into the cosign sign command.
The --allow-http-registry option exists only for this local registry without TLS: do not copy it to a production registry.
With its default signing configuration, cosign 3.1.3 also publishes an entry in Rekor, Sigstore's public transparency log. The signing machine must therefore reach the Internet, and this entry is public and cannot be erased. To publish nothing, for example in an isolated environment, the workaround is a signing configuration without a log: it is described in the troubleshooting section.
Signing by tag (lab-signe:1.0.0) also works, but the signature is attached in any case to the digest the tag points to at that moment. If the tag moves, the signature does not follow, and that is precisely what you want.
Where does the signature live, and how do you find it?
The signature is not in the image: it is a separate artifact, pushed to the same repository under a tag derived from the digest. The diagram follows the exchange over time: look at what the workstation pushes to the registry, then what the verifier asks it for again.
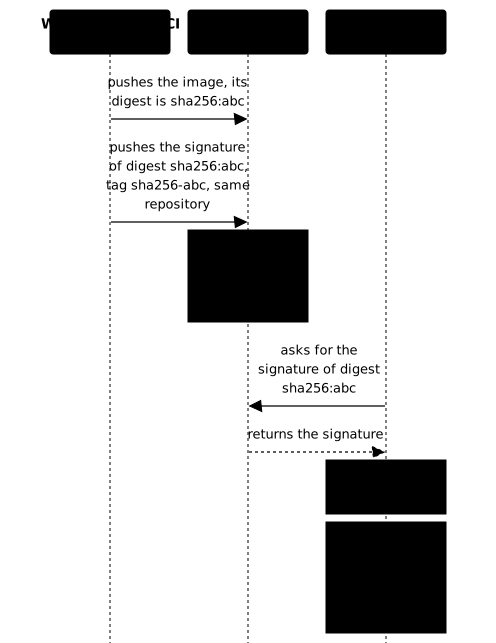
After signing, the repository therefore holds two tags. This command lists them, and crane ls localhost:5555/lab-signe gives the same information:
curl -s http://localhost:5555/v2/lab-signe/tags/list{"name":"lab-signe","tags":["1.0.0","sha256-afa5c872c891853ca7fcf1f12c3edb23f7eeef36189728842dd51042ff57f7ab"]}The second tag is the signature. With cosign 3.x, it is stored as an artifact that references the image, following the OCI 1.1 specification (the one that defines container registries).
A registry without the Referrers API, the one that lists the artifacts attached to an image, stores this artifact under the tag sha256-<digest>, as here. A registry that exposes this API may not show this tag. This tag is no longer suffixed .sig by default: many articles still say otherwise, and a test that looked for .sig would wrongly declare that no signature exists.
Two practical consequences. Copying an image from one registry to another does not carry its signature, unless you also copy that artifact: a verification that fails after a registry migration may have this cause. And since the tag is derived from the digest, re-signing a rebuilt image produces a new artifact, the old one staying in place.
How do you publish the public key in the cluster?
For the cluster, or a third party, to verify your images, the public key must be readable in the cluster. It is published in a ConfigMap: here cosign-pub-key, in the chaine-signature namespace (the lab's, to be created with kubectl create namespace chaine-signature if it does not exist), under the cosign.pub key. The name of this key matters, because it is under this name that tools read it back.
kubectl -n chaine-signature create configmap cosign-pub-key \ --from-file=cosign.pub=cosign.pubNever publish the private key cosign.key, neither in a ConfigMap nor in a Secret: anyone who read it could sign in your place, and the signature would then have no value at all.
To verify as a third party would, read the key back from the cluster rather than from your local file:
kubectl -n chaine-signature get configmap cosign-pub-key \ -o jsonpath='{.data.cosign\.pub}' > cosign-du-cluster.pubThe resulting file starts with -----BEGIN PUBLIC KEY-----. If it is empty, the ConfigMap's key name is the first suspect.
How do you check that the signature really protects?
A verification that succeeds does not yet prove that the signature protects: you must also see it fail when it should. A chain that accepts everything looks like a chain that works. The three situations in the table were played on the local registry with cosign 3.1.3 and return three different exit codes. The following command verifies the signed image with the right public key.
cosign verify --key cosign.pub --allow-http-registry \ localhost:5555/lab-signe@sha256:afa5c872c891853ca7fcf1f12c3edb23f7eeef36189728842dd51042ff57f7abecho "exit code: $?"To trigger the other two cases, generate a second key pair in another directory, so as not to overwrite the first, and verify the same image with that public key. Then verify the lab-non-signe:1.0.0 image, which nobody signed, with the right key (replace <digest-non-signe> with the digest noted at docker push, or with the output of crane digest localhost:5555/lab-non-signe:1.0.0). Each time, echo prints the exit code.
mkdir autre-cle && (cd autre-cle && cosign generate-key-pair)cosign verify --key autre-cle/cosign.pub --allow-http-registry \  localhost:5555/lab-signe@sha256:afa5c872c891853ca7fcf1f12c3edb23f7eeef36189728842dd51042ff57f7abecho "exit code: $?"
cosign verify --key cosign.pub --allow-http-registry \  localhost:5555/lab-non-signe@<digest-non-signe>echo "exit code: $?"
With the right key, cosign details what it checked: the claims carried by the signature, their trace in the transparency log (verified offline), then the signature itself against the given public key.
Verification for localhost:5555/lab-signe@sha256:afa5c872c891853ca7fcf1f12c3edb23f7eeef36189728842dd51042ff57f7ab --The following checks were performed on each of these signatures: - The cosign claims were validated - Existence of the claims in the transparency log was verified offline - The signatures were verified against the specified public key| Situation | Exit code | Message |
|---|---|---|
| Valid signature | 0 | the detail of the checks above |
| Wrong public key | 1 | no matching attestations: failed to verify log inclusion (verification with the Rekor log) |
| Unsigned image | 10 | no signatures found |
The distinction between 1 and 10 can be put to use. An unsigned image (10) signals an omission in the build chain; a signature that does not match the key (1) signals an identity problem. These two incidents do not call for the same response, and a script must test the exit code, not the text of the message. The message for a wrong key also depends on the verification configuration: with the default configuration, which checks inclusion in Rekor, it is no matching attestations: failed to verify log inclusion, whereas the Cosign guide, which verifies without a log, shows accepted signatures do not match threshold. The exit code stays the same.
Cosign also reserves codes 11, 12 and 13 for other verification failures: a nonexistent tag (11), no matching signature (12) and a certificate missing from the signature (13). For a wrong key, cosign 3.1.3 returned code 1, not 12. To refuse an image, therefore test for a code different from zero, and keep 10 to recognise the unsigned image.
When the trials are over, clean up: delete cosign.key, cosign.pub, cosign-du-cluster.pub and the autre-cle folder (the second key pair), then the signing-config.json file if you created it. Then delete the lab's namespace, which also removes the cosign-pub-key ConfigMap, and finally the throwaway registry.
rm -rf cosign.key cosign.pub cosign-du-cluster.pub autre-cle signing-config.jsonkubectl delete namespace chaine-signaturedocker rm -f registreHow does the cluster rely on the signature?
Cosign blocks nothing in the cluster: it answers one question, "is this signature valid for this key". It is admission, the control Kubernetes applies to every object before accepting it, that turns this answer into a refusal. In practice, a Kyverno policy verifies each image's signature before creating the Pod: see Kyverno for the image verification policy, and Admission controllers (in French) for the general mechanism.
Verification in Kubernetes with ImagePolicyWebhook
ImagePolicyWebhook is a historical admission controller, disabled by default, which delegates the authorisation decision to an external backend. It is still documented and useful for understanding image control mechanisms, but on recent clusters you rather meet generic admission webhooks (ValidatingAdmissionWebhook) or policy engines such as Kyverno.
One architecture point changes how to assess it: ImagePolicyWebhook decides nothing by itself. It forwards the request to an external service, reachable over TLS, which allows or refuses. The real security of the setup is therefore that of this backend, its availability and its rules, not that of the Kubernetes controller, which merely relays.
The diagram follows a Pod creation request: look at what the plugin does (it relays), what the backend does (it answers), and what happens when the backend does not answer.
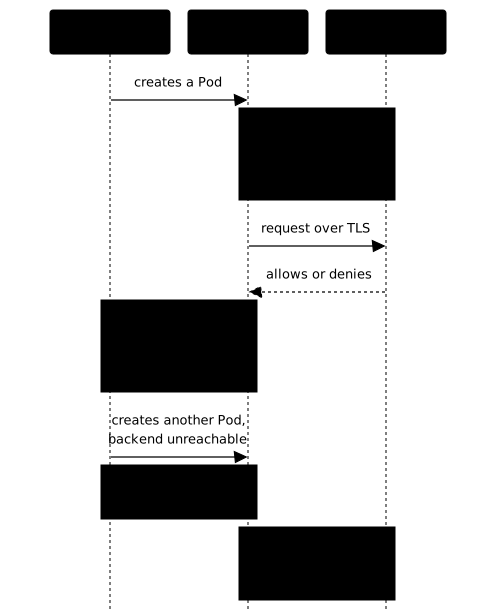
The demonstration below takes two configuration files and a change to the API server manifest, to be made on every control plane node. In /etc/kubernetes/manifests/kube-apiserver.yaml, the first flag enables the plugin and the second says where to read its configuration.
Since the API server is a Pod, the /etc/kubernetes/admission/ folder must be mounted into it, otherwise it will never see these files and will loop at startup. A mistake here prevents the API server from restarting: keep a copy of the manifest outside the manifests folder before modifying it, for example with sudo cp /etc/kubernetes/manifests/kube-apiserver.yaml /root/kube-apiserver.yaml.sauvegarde.
The Kubernetes documentation asks you to enable the imagepolicy.k8s.io/v1alpha1 API group with --runtime-config=imagepolicy.k8s.io/v1alpha1=true, to be added to the same command list. The excerpt below does not carry it: add it if the API server does not apply the policy.
spec: containers: - command: - kube-apiserver # ... other flags ... - --enable-admission-plugins=NodeRestriction,ImagePolicyWebhook - --admission-control-config-file=/etc/kubernetes/admission/admission-config.yaml volumeMounts: # ... existing mounts ... - mountPath: /etc/kubernetes/admission name: admission-config readOnly: true volumes: # ... existing volumes ... - name: admission-config hostPath: path: /etc/kubernetes/admission type: DirectoryOrCreateapiVersion: apiserver.config.k8s.io/v1kind: AdmissionConfigurationplugins: - name: ImagePolicyWebhook configuration: imagePolicy: kubeConfigFile: /etc/kubernetes/admission/webhook-kubeconfig.yaml allowTTL: 50 denyTTL: 50 retryBackoff: 500 defaultAllow: false # Block if the webhook is unreachableThe second file is an ordinary kubeconfig: it tells the API server where to reach the backend and with which certificate authority to recognise it. It points to an address where no backend listens, which the demonstration that follows does not require you to fix. In a real setup, it is this backend, not ImagePolicyWebhook, that would call a verification such as cosign verify.
apiVersion: v1kind: Configclusters: - name: image-policy cluster: certificate-authority: /etc/kubernetes/pki/ca.crt server: https://127.0.0.1:9443/verifycontexts: - name: image-policy context: cluster: image-policy user: kube-apiservercurrent-context: image-policyusers: - name: kube-apiserver user: {}Replayed on a kind cluster (Kubernetes in Docker) running Kubernetes 1.37, the API server came back in 33 seconds with these three files. Since no backend listens on that port, the first Pod creation was refused:
Error from server (Forbidden): pods "demo-ipw" is forbidden: Post "https://127.0.0.1:9443/verify?timeout=30s": dial tcp 127.0.0.1:9443: connect: connection refusedThis is the expected behaviour of defaultAllow: false: the message names the cause, the unreachable backend, and nothing gets through until it answers. A production cluster must therefore monitor the availability of this backend like that of the API server itself.
When the demonstration is done, roll back: this configuration refuses every Pod as long as no backend listens. Put back the saved manifest, wait for the API server to answer again (kubectl get --raw /readyz must print ok), then check that a Pod can be created. Finally remove the /etc/kubernetes/admission folder, now useless since the original manifest no longer mounts it.
sudo cp /root/kube-apiserver.yaml.sauvegarde /etc/kubernetes/manifests/kube-apiserver.yamlkubectl get --raw /readyzkubectl run retour --image=nginx:1.31.3@sha256:8541484afbc9c8a5a8a99b379568ebbc957f658583ec9448fc43104229c03cf8kubectl delete pod retoursudo rm -r /etc/kubernetes/admissionAs long as kubectl get --raw /readyz does not answer ok, give the kubelet time to restart the API server before creating the Pod.
Key-based or keyless signing?
Cosign offers two signing modes. Key-based signing, the one this lesson details, is explicit: you see what you generate and what you verify. It does leave you a long-lived private key to protect and rotate: if it leaks, a third party can sign in your place.
Keyless signing removes that problem by relying on an OIDC identity (OpenID Connect, an authentication protocol), that of your GitHub Actions or GitLab CI run, and on an ephemeral certificate. It suits an automated build chain that has an OIDC provider. Keep key-based signing to understand the mechanism and for isolated environments where no OIDC provider is reachable; in that case, without access to Sigstore's public services, sign with a signing configuration without a log (see the troubleshooting section). The Cosign guide details both.
Troubleshooting
When a verification fails, the exit code and the message almost always say where to look. The table starts from the observed symptom.
| Symptom | Likely cause | Solution |
|---|---|---|
no signatures found, code 10 | Image never signed, or signature not copied with the image during a registry migration | Sign the digest, or also copy the signature artifact |
no matching attestations, code 1 | Wrong public key, or image re-signed with another key | Check the key; sign and verify on the same digest |
A test looks for a .sig tag and finds none | With cosign 3.x, the signature tag is sha256-<digest> | Look for sha256-<digest> |
--tlog-upload=false refused, or a signature that must not be published in Rekor | Cosign 3.x refuses this option with its default signing configuration, which publishes to Rekor, and asks for a configuration without a log service | Create an empty signing configuration and pass it with --signing-config (commands below the table) |
Pod refused with connection refused | ImagePolicyWebhook backend unreachable with defaultAllow: false | Restore the backend: it is the default refusal doing its job |
| Key not found in the ConfigMap | The ConfigMap key is not named cosign.pub | Recreate the ConfigMap with --from-file=cosign.pub=… |
To sign without publishing anything in Rekor, follow the method of the Cosign guide: cosign signing-config create writes a configuration without any public service, which cosign sign receives with --signing-config (the -y option avoids the confirmation prompt). Since no log was used, verification requires --insecure-ignore-tlog=true.
cosign signing-config create --out signing-config.json   # no public service
cosign sign --key cosign.key --signing-config signing-config.json \  --allow-http-registry -y \  localhost:5555/lab-signe@sha256:afa5c872c891853ca7fcf1f12c3edb23f7eeef36189728842dd51042ff57f7ab
cosign verify --key cosign.pub --insecure-ignore-tlog=true --allow-http-registry \  localhost:5555/lab-signe@sha256:afa5c872c891853ca7fcf1f12c3edb23f7eeef36189728842dd51042ff57f7ab
In this variant, verification no longer checks inclusion in a log: the public key alone commits the trust.
Put it into practice
The lab starts from a local registry mounted on the node, which holds two unsigned images, appli/web:1.0 and appli/outil:1.0. You generate a key pair, sign appli/web:1.0 and publish the public key in the cosign-pub-key ConfigMap of the chaine-signature namespace. Three tests read the state, never the commands typed: the public key is in the ConfigMap with no trace of the private key, the signature is pushed to the registry, and the key taken from the ConfigMap accepts the signed image and refuses the other one.
Key points
- A signature proves authenticity and integrity, not the absence of vulnerabilities: the scan remains necessary.
- The private key stays on the signing machine and never enters a cluster object; only
cosign.pubis published, in thecosign-pub-keyConfigMap. - You sign the digest resolved with
crane digest, never the tag. - Cosign 3.1.3's default signing publishes a public entry in Rekor; to publish nothing, sign with
--signing-config. - The signature is a separate artifact, in the same repository, under the tag
sha256-<digest>with cosign 3.x; copying an image does not copy it. - A verification is proved by its refusal: 0 if the signature is valid, 1 if the key is wrong, 10 if the image is unsigned.
- The cluster relies on the signature at admission (Kyverno, ImagePolicyWebhook); ImagePolicyWebhook relays to a backend on which all the security depends, and
defaultAllow: falserefuses when it is unreachable. - Keyless signing avoids keeping a long-lived key when an OIDC provider is available; key-based signing serves to understand the mechanism and for isolated environments.
Test your knowledge
These questions ask you to predict the exit code of a verification, to choose what to sign and to diagnose a verification or admission failure.
Knowledge check
Check what you have learned with this interactive quiz
How it works
- The timer starts when you click Start
- Multiple choice, true/false and short answer questions
- You can move between questions
- Detailed results are shown at the end
Starts the quiz and the timer
Review
(0/0)Score by domain
A domain groups several guides and gets several questions, so its score is more reliable than a per-topic score, which often rests on a single question.
Summary
Strengths
No topic passed at 80% on at least two questions yet.
Weak areas
No topic below the pass mark.
Recommended next
Hints before you try again?
Continue the course: Container security: images, clusters, runtime
Continue the course: Scanning Kubernetes images with Grype, Trivy and CVEs
A new full quiz with random questions
Work again only on the questions you missed