You have already created a kind cluster, launched a Deployment and read the state of the cluster with kubectl get. This lesson explains what happened on the other side: which components handled your commands, in which order, and where the cluster keeps what you asked of it. You will follow a Pod from kubectl create deployment to the running container, then delete that Pod to watch another component recreate it.
What you will learn
- Name the components of the control plane and of the Nodes and state the role of each.
- Trace the path of a Pod from the
kubectlcommand to the container. - Explain why a deleted Pod is recreated.
- Say how Pods reach each other, without configuring a network plugin.
The outputs in this lesson come from the four-node kind cluster demo created in First cluster. If you no longer have it, recreate it with the multi-node section of that same lesson. The random Pod names (web-6d8c9555f7-5bfjp) will be different on your machine. The basic vocabulary (Pod, Node, Deployment) is in Key concepts.
What parts is a Kubernetes cluster made of?
A Kubernetes cluster is made of two roles: a control plane that makes the decisions, and worker Nodes that run your containers. A Node is a machine, physical or virtual, that belongs to the cluster, and the control plane runs on a Node too: on kind, demo-control-plane shows up in kubectl get nodes next to the three workers. On kind, each Node is a Docker container, but the principle is the same.

On the diagram, look at the split between the top and the bottom: the top decides, the bottom executes. This split has a practical consequence: you add worker Nodes without touching the control plane, and the failure of a worker Node does not lose the decisions already recorded.
By default, your applications do not run on the control plane. A taint (a mark placed on the Node) keeps ordinary Pods away from it to reserve its resources: the Scheduler places no ordinary Pod on that Node. System Pods managed by a DaemonSet (kube-proxy, kindnet) are the exception: they carry a toleration that allows them on every Node, control plane included. It is a protection, not a ban: on a cluster that has a single Node, you remove it so that applications have a machine to run on.
This protection only applies to the Scheduler, and the control plane components do not go through it. The kubelet of the control plane starts them itself, from files placed on the Node. They are called static Pods: no Scheduler chooses a Node for them, so they have no Scheduled event.
On kind, the four control plane components are Pods in the kube-system namespace, alongside CoreDNS (the cluster DNS) and kindnet (kind's network plugin). The lesson The control plane lists them. The Node name is appended to the name of each Pod (kube-apiserver-demo-control-plane), but people simply say kube-apiserver or kube-scheduler, and that is the name you will read in the official documentation.
Who does what in the cluster?
Each component has a single function, and these seven names come back throughout the Kubernetes documentation. The first four form the control plane, the next three run on every Node. The detail of each is in the lessons The control plane and Worker Nodes.
| Component | Where it runs | Its function |
|---|---|---|
kube-apiserver | control plane | receives every request, checks it and records it |
etcd | control plane | stores the cluster state |
kube-scheduler | control plane | chooses the Node for each new Pod |
kube-controller-manager | control plane | compares the desired state to the actual state and corrects the gap |
kubelet | every Node | starts the containers of the Pods assigned to its Node |
| runtime (containerd) | every Node | actually creates the containers |
kube-proxy | every Node | programs the network so that Services answer |
One point often surprises people: the Scheduler decides where, but it launches nothing. It writes a Node name into the Pod, and the kubelet of that Node starts the container.
On a cloud cluster, an optional fifth component joins the control plane, the cloud-controller-manager, which creates the provider's resources (load balancers, routes). Kubernetes also delegates Pod networking, storage and HTTP entry to extension components, detailed in CNI, CSI and CRI: a Kubernetes object without its implementer does nothing, for example an Ingress without an Ingress Controller.
Where does the cluster state live?
The cluster state lives in etcd, a key-value database: the list of Pods, Deployments, Services, Secrets, everything kubectl get can display. When you write replicas: 3, this desired state is recorded in etcd, and the cluster then works to make it true.
There is a single rule to remember: only the API Server reads and writes etcd, all the other components go through it (the reasons are in The control plane). Losing etcd without a backup amounts to losing the cluster, which is covered by backing up etcd.
Components do not send each other orders directly. Each one watches the API Server (it performs a watch: it receives a notification on every change) and reacts to what concerns it. The Scheduler does not wake up because it was given an order, but because a Pod without a Node has just appeared.
What is the path of a Pod, from kubectl to the container?
Here is the complete journey, on the demo cluster. You will create a Deployment with three replicas, then name the component that acts at each step. A replica is an identical copy of the Pod.
kubectl create deployment web \ --image=nginx:1.30@sha256:9bf97bd7714f5e24c1ccd545ecb9eb5435cb6d109c97cebb15e7e455e0239edb \ --replicas=3kubectl wait --for=condition=Available deployment/web --timeout=120sdeployment.apps/web createddeployment.apps/web condition metThe first line confirms that the API Server accepted and recorded the Deployment. The second appears when the three Pods are running. The next diagram shows what happened in between.
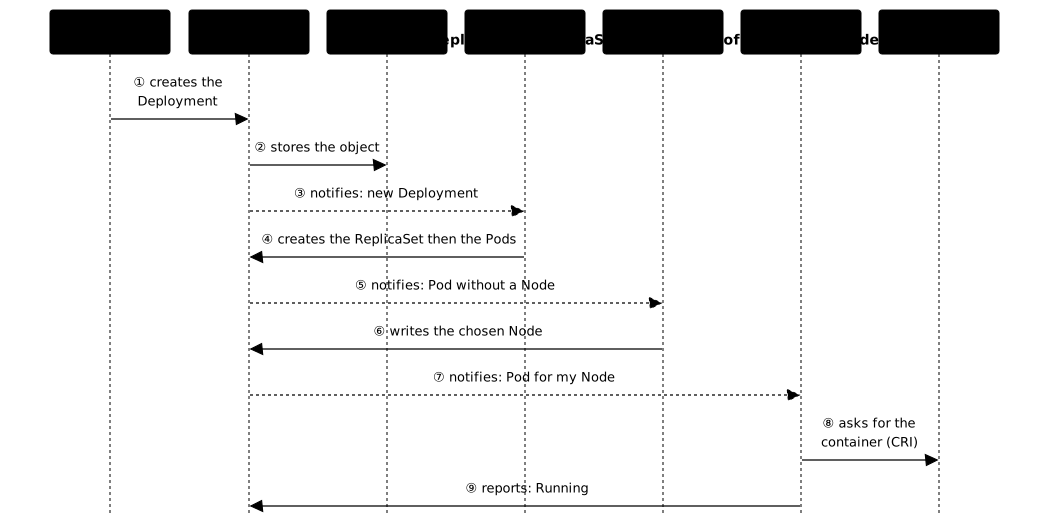
Read the diagram from top to bottom: every arrow goes through the API Server, and it is the only one that talks to etcd. The dotted arrows are notifications, the ones that wake a component up. The steps, in order:
-
kubectl sends the request. It addresses it over HTTPS to the API Server, which checks who you are, whether you are allowed to, and whether the manifest is valid, then records it in etcd. At this point nothing is running yet: the desired state exists, the containers do not.
-
The controllers create the missing objects. The Deployment controller creates a ReplicaSet (the object that maintains the number of replicas), and the ReplicaSet controller creates three Pods. These Pods do not have a Node yet.
-
The Scheduler chooses a Node for each Pod. It discards the Nodes that do not fit, ranks the others, and writes the result into the Pod's
nodeNamefield. -
The kubelet of the chosen Node starts the container. It sees a Pod assigned to it, asks the runtime (containerd) to download the image and create the container, then reports the
Runningstate to the API Server.
Now check this result. The NODE column says which Node received each Pod, and IP the address the cluster gave it.
kubectl get pods -o wideNAME READY STATUS RESTARTS AGE IP NODE NOMINATED NODE READINESS GATESweb-6d8c9555f7-5bfjp 1/1 Running 0 16s 10.244.1.2 demo-worker3 <none> <none>web-6d8c9555f7-cm8pj 1/1 Running 0 16s 10.244.3.2 demo-worker2 <none> <none>web-6d8c9555f7-lz2gr 1/1 Running 0 16s 10.244.2.2 demo-worker <none> <none>The Scheduler spread the three Pods across three different Nodes, and each one has its own IP. Pod names are generated and change on every run: in the commands that follow, <web-pod-name> stands for one of the names in the NAME column, which you copy.
Each decision leaves an event on the Pod, along with the component that made it. These events are kept for only one hour by default: read them soon after creation. The sed command keeps only the end of the describe output, starting at the Events: line. Here are the events of the Pod web-6d8c9555f7-5bfjp:
kubectl describe pod <web-pod-name> | sed -n '/^Events:/,$p'Events: Type Reason Age From Message ---- ------ ---- ---- ------- Normal Scheduled 16s default-scheduler Successfully assigned default/web-6d8c9555f7-5bfjp to demo-worker3 Normal Pulling 15s kubelet spec.containers{nginx}: Pulling image "nginx:1.30@sha256:9bf97bd7714f5e24c1ccd545ecb9eb5435cb6d109c97cebb15e7e455e0239edb" Normal Pulled 1s kubelet spec.containers{nginx}: Successfully pulled image "nginx:1.30@sha256:9bf97bd7714f5e24c1ccd545ecb9eb5435cb6d109c97cebb15e7e455e0239edb" in 14.508s (14.508s including waiting). Image size: 63638242 bytes. Normal Created 1s kubelet spec.containers{nginx}: Container created Normal Started 1s kubelet spec.containers{nginx}: Container startedLook at the From column. The Scheduled event comes from default-scheduler, which chose demo-worker3. The next four come from kubelet, the one on demo-worker3, which downloads the image, then creates and starts the container. The Pulled message gives the image size (63638242 bytes) and the download time, 14.5 seconds here because this Node did not have it yet.
The two earlier steps, the creation of the ReplicaSet and then of the Pods, can be read on the ReplicaSet. Its name is computed from the Pod template: with the same pinned image, you should get the same web-6d8c9555f7. If yours differs, use the name that kubectl get rs shows.
kubectl describe rs web-6d8c9555f7Name: web-6d8c9555f7[...]Controlled By: Deployment/webReplicas: 3 current / 3 desiredPods Status: 3 Running / 0 Waiting / 0 Succeeded / 0 Failed[...]Events: Type Reason Age From Message ---- ------ ---- ---- ------- Normal SuccessfulCreate 16s replicaset-controller Created pod: web-6d8c9555f7-5bfjp Normal SuccessfulCreate 16s replicaset-controller Created pod: web-6d8c9555f7-lz2gr Normal SuccessfulCreate 16s replicaset-controller Created pod: web-6d8c9555f7-cm8pjThe line Controlled By: Deployment/web says that the ReplicaSet belongs to the Deployment: it is the Deployment controller that created it. The three SuccessfulCreate events, emitted by replicaset-controller, are the creation of the three Pods. These two controllers run inside the kube-controller-manager.
Why is a deleted Pod recreated?
A deleted Pod is recreated because you did not ask for three Pods, you declared that you want three. This declaration is the desired state. A controller constantly compares this state to the actual state, and as soon as it sees a gap, it acts to remove it. This is reconciliation, and it explains Kubernetes self-healing.
| Desired state | Actual state | Gap | Controller action |
|---|---|---|---|
| 3 replicas | 3 Pods | none | nothing to do |
| 3 replicas | 2 Pods | one missing | create 1 Pod |
| 3 replicas | 4 Pods | one too many | delete 1 Pod |
Cause the gap yourself. Delete one of the Pods, then read the latest events of the cluster:
kubectl delete pod <web-pod-name>kubectl get events --sort-by=.lastTimestamp | tailpod "web-6d8c9555f7-5bfjp" deleted from default namespace[...]7s Normal Scheduled pod/web-6d8c9555f7-76k8w Successfully assigned default/web-6d8c9555f7-76k8w to demo-worker37s Normal SuccessfulCreate replicaset/web-6d8c9555f7 Created pod: web-6d8c9555f7-76k8w6s Normal Pulled pod/web-6d8c9555f7-76k8w Container image "nginx:1.30@sha256:9bf97bd7714f5e24c1ccd545ecb9eb5435cb6d109c97cebb15e7e455e0239edb" already present on machine and can be accessed by the pod6s Normal Killing pod/web-6d8c9555f7-5bfjp Stopping container nginx5s Normal Started pod/web-6d8c9555f7-76k8w Container started5s Normal Created pod/web-6d8c9555f7-76k8w Container createdRead these events to find out who did what. SuccessfulCreate comes from the ReplicaSet web-6d8c9555f7: it saw two Pods instead of three and created one, web-6d8c9555f7-76k8w. The deleted Pod did not come back, it is a brand new Pod with a different name. It then follows the same path as the others: Scheduled (a new decision by the Scheduler, here again on demo-worker3), then Created and Started by the kubelet. On this Node the image was already present, hence the message already present on machine instead of a download. Killing is the kubelet stopping the container of the deleted Pod. The detail of the loop (observe, compare, act) is in the lesson The control plane.
How do Pods reach each other?
Kubernetes imposes three rules on the cluster network, whatever plugin implements them. The first: every Pod gets its own IP address, you saw it in the IP column. The second: any Pod can reach any other Pod directly, without address translation (NAT), even on another Node: the receiving Pod sees the real address of the sender. The third: a Service gives a stable address in front of a group of Pods, because Pods change address when they are recreated.
Check the second rule. Launch a temporary Pod and request the welcome page of one of the web Pods by its IP. <pod-IP> stands for one of the addresses in the IP column of kubectl get pods -o wide, which you copy:
kubectl run test --rm -it --restart=Never \ --image=busybox:1.37@sha256:a7dbc319b1438115a207e11930dc4bb3e643dcb3ec0bdd694bb36cd8fad289ec \ -- wget -qO- http://<pod-IP><!DOCTYPE html><html><head><title>Welcome to nginx!</title>[...]pod "test" deleted from default namespaceThe nginx page is displayed, without writing any rule: the test Pod reached a Pod of the cluster by its IP address, whichever Node hosts it. The last line confirms the deletion of the test Pod, thanks to --rm. An address that matches no Pod does not answer: wget eventually prints wget: can't connect to remote host (…): Connection timed out.
On kind, the plugin that makes this possible is called kindnet, installed with the cluster: a network plugin of this kind is called a CNI (Container Network Interface). On a cluster you install yourself, you have to choose one, and without it the Nodes stay NotReady. The choice is covered in Pod networking.
The address of a Pod changes every time it is recreated, which is why you do not use it to reach an application. A Service provides a fixed address and name, and kube-proxy, present on every Node, programs the rules that send traffic to the ready Pods. Pods therefore talk to each other without kube-proxy; Services, on the other hand, need it.
Put it into practice
The guided lab has you retrace this journey on your cluster: you create a Deployment, then you read in the events each step of the path and the component that acts at each one (From column). The goal is to learn to read events to find out who did what, with your own Pod names. The lab creates the Deployment suivi in the namespace suivre-un-pod, and you write your findings in ~/suivre-un-pod/etapes.txt, in key: value format. The validation compares what you record with what the cluster says.
Key takeaways
- A cluster combines a control plane that decides and Nodes that execute, and your applications run on the Nodes.
kube-apiserveris the single entry point, and the only component that reads and writes etcd.etcdkeeps the cluster state, including the desired state you declare.- Components do not call each other: each one watches the API Server and reacts to the changes that concern it.
- The path of a Pod:
kubectl, API Server, etcd, controllers, Scheduler, kubelet, containerd. - The Scheduler places a Pod without launching it, the kubelet of the chosen Node starts it.
- A deleted Pod is recreated by the ReplicaSet, because a controller keeps bringing the actual state back toward the desired state.
- Every Pod has its IP and all Pods reach each other without address translation; a Service provides the stable address.
Knowledge check
The questions are about the split of roles: who decides, who executes, and which component acts at each step of the path of a Pod.
Knowledge check
Check what you have learned with this interactive quiz
How it works
- The timer starts when you click Start
- Multiple choice, true/false and short answer questions
- You can move between questions
- Detailed results are shown at the end
Starts the quiz and the timer
Review
(0/0)Score by domain
A domain groups several guides and gets several questions, so its score is more reliable than a per-topic score, which often rests on a single question.
Summary
Strengths
No topic passed at 80% on at least two questions yet.
Weak areas
No topic below the pass mark.
Recommended next
Hints before you try again?
Continue the course: Kubernetes control plane: API Server, etcd, Scheduler
A new full quiz with random questions
Work again only on the questions you missed
FAQ: frequently asked questions about Kubernetes architecture
These questions come up often when you discover the inner workings of a Kubernetes cluster: control plane components, the role of etcd and the kubelet, self-healing and the number of nodes.
- API Server: the single entry point of the cluster.
- etcd: the database that stores the whole state.
- Scheduler: decides which node each Pod is placed on.
- Controller Manager: watches the cluster and corrects gaps.
kubectl get pods, the answer goes through the API Server, which often serves lists from its cache, but the source of truth remains etcd. This is why regularly backing up etcd is critical: losing etcd means losing the cluster.kubectl command, every internal component (Scheduler, kubelet, controllers) communicates through it. It authenticates, validates and applies requests, then reads or writes the state in etcd. It is the only component that talks directly to etcd: everything else goes through the API Server.