Every kubectl command reads a file, the kubeconfig, to know which cluster to talk to, under which identity and in which namespace (the space that groups the cluster's resources). A context is the entry in that file that gathers these three pieces of information under a single name. When you created your first cluster, you let kind add the kind-monapp context and activate it without asking you anything. This lesson teaches you to read that file, to switch context and default namespace, and to protect a file that holds the keys to the cluster. An optional section at the end of the lesson shows how to add an access you were given without overwriting yours. Build this reflex before your first deployment: know where a command is going to run before you run it.
What you will learn
- Read the kubeconfig and say which cluster
kubectlis going to talk to - Switch context, permanently or for a single command
- Change the default namespace of a context
- Protect your kubeconfigs:
600permissions, never in Git - Optional: create, rename and delete a context
- Optional: add a kubeconfig you were given without overwriting yours, after reading it
Prerequisites
You need the kind cluster monapp created in the previous lesson, running, and the kubectl tool installed. Only the optional section on the received kubeconfig creates a second single-node cluster, recette, then deletes it: then plan for a little under 1 GB of memory on top of what monapp uses. The notion of namespace comes from the key concepts: reread it if the word means nothing to you. Every command on this page was run with kubectl 1.37 on kind clusters. The only excerpt that was not run is the exec block in the optional section on the received kubeconfig, an example of what a cloud provider produces.
What is the kubeconfig file?
The kubeconfig is a YAML file, by default ~/.kube/config, that kubectl reads on every command. You rarely write it by hand, because tools fill it in. kind added your cluster to it when it created it. A cloud CLI (aws eks update-kubeconfig, gcloud container clusters get-credentials) does the same for a managed cluster (hosted by a cloud provider), and a platform team often hands you a ready-made file. The KUBECONFIG environment variable points to another file, or to several, instead of ~/.kube/config.
The kubectl config view command displays this file while masking the secrets:
kubectl config viewapiVersion: v1clusters:- cluster: certificate-authority-data: DATA+OMITTED server: https://127.0.0.1:34201 name: kind-monappcontexts:- context: cluster: kind-monapp user: kind-monapp name: kind-monappcurrent-context: kind-monappkind: Configusers:- name: kind-monapp user: client-certificate-data: DATA+OMITTED client-key-data: DATA+OMITTEDThe DATA+OMITTED markers replace the certificate and the private key that authenticate you. kubectl config view hides them by default, and only the --raw option shows them in clear text. Keep this reflex when you share an output with a colleague: without --raw, you disclose no secret.
The four parts of the file
A kubeconfig contains three lists and one pointer. clusters says where to connect, users says who you are, contexts pairs a cluster with a user, and current-context designates the pairing used by default. With a single kind cluster, each list holds only one entry. Every access you add lengthens the three lists.
| Part | What it contains | In the example |
|---|---|---|
clusters | the API address (server) and the certificate that authenticates it | https://127.0.0.1:34201 |
users | your identity: client certificate, token, or a command that obtains one | kind-monapp |
contexts | a name that pairs a cluster, a user and, optionally, a namespace | kind-monapp |
current-context | the context used when you specify nothing | kind-monapp |
In a context, the namespace field is optional. When it is absent, as here, kubectl works in the default namespace. The term AUTHINFO that you will meet in some outputs simply means the user.
How does kubectl choose the cluster?
kubectl starts from the current context, then applies the options you pass it. When you type kubectl get pods, it reads current-context, finds the cluster, the user and the namespace of that context, connects to the cluster address with the user's credentials, then queries the namespace. Two options override these values for a single command, without changing anything in the file: --context changes the context, -n changes the namespace.
In the diagram, follow the solid arrows from the command to the three pieces of information it needs. The dotted arrows show where the two options come in: they go in front of the file, which does not change.
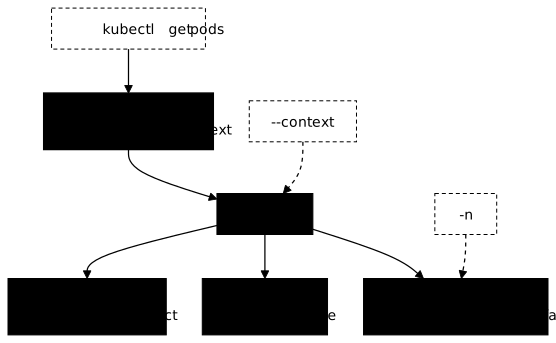
The next two commands show it. The first follows the file, the second changes namespace for itself only.
# Context and namespace from the filekubectl get pods
# Same context, another namespace, for this command onlykubectl get pods -n kube-system
Read and change the active context
Two commands tell you where you are, and you can switch context in two ways. get-contexts and current-context only read the kubeconfig. use-context rewrites the file, whereas the --context option applies only to the current command.
List the contexts and see the active one
kubectl config get-contexts lists the known contexts. The asterisk in the CURRENT column marks the active context, the one your commands run against.
kubectl config get-contextsCURRENT NAME CLUSTER AUTHINFO NAMESPACE* kind-monapp kind-monapp kind-monappThe NAMESPACE column is empty: this context therefore works in default. To get only the name of the active context, for example before a risky command, use kubectl config current-context:
kubectl config current-contextkind-monappSwitch context
kubectl config use-context changes the active context by rewriting current-context in the file. The change is therefore permanent and shared: every terminal that reads the same kubeconfig switches at the same time, including the one you forgot in another tab.
kubectl config use-context kind-monappSwitched to context "kind-monapp".This behavior surprises you as soon as you work on several clusters in several terminals. Tools such as kubectx and kubens (in French) speed up the switch, and Kubie (in French) isolates one context per terminal. They will be useful the day you manage several clusters, but they are superfluous as long as you only have your kind cluster.
Target another context for a single command
The --context option runs a command against another context without touching the active context. It is the safest form for a one-off command, and the only one to use in a script, which must never depend on the state left by the last use-context.
kubectl --context=kind-monapp get nodesA mistyped context name is refused, with a message that changes depending on the form you use. The two outputs below are those of kubectl 1.37 for a nonexistent context xxx.
Error in configuration: context was not found for specified context: xxxerror: no context exists with the name: "xxx"Change the default namespace
kubectl config set-context --current --namespace=<name> sets the namespace your commands work in when you omit -n. Only the active context is modified: the cluster and the user do not change. It is useful when you spend an hour in the same namespace, because you no longer have to repeat -n and you no longer risk forgetting it even once.
kubectl config set-context --current --namespace=kube-systemContext "kind-monapp" modified.Check the active namespace with a query limited to the current context (--minify). The final echo adds the line break that this output lacks.
kubectl config view --minify -o jsonpath='{..namespace}'; echokube-systemA plain kubectl get pods now lists the system Pods of the cluster, those in kube-system, without -n. The trap lies elsewhere: kubectl does not check that the namespace exists. A typo is accepted without complaint, and the next command answers as if the namespace were simply empty:
kubectl config set-context --current --namespace=kube-sytemkubectl get podsContext "kind-monapp" modified.No resources found in kube-sytem namespace.When a resource seems to have vanished, first look at the NAMESPACE column of kubectl config get-contexts. Then go back to the default namespace, the one the lessons of the module expect:
kubectl config set-context --current --namespace=defaultProtect your kubeconfigs
A kubeconfig holds what it takes to act on the cluster with your rights: protect it like an SSH key. The one kind wrote is the best example. kubectl auth whoami shows the identity it carries:
kubectl auth whoamiATTRIBUTE VALUEUsername kubernetes-adminGroups [kubeadm:cluster-admins system:authenticated]The kubeadm:cluster-admins group grants all rights on the cluster. On a learning cluster, this has no consequence. On a shared cluster, the same file copied to the wrong place gives these rights to anyone who reads it. Hence three rules that are not up for discussion:
600permissions on every kubeconfig (chmod 600 ~/.kube/config), so that only you can read it;- never in Git, nor in a ticket, nor in a chat: a certificate or a token is enough to connect;
- no kubeconfig lying around in
~/Downloads: store it in~/.kube/configs/as soon as you receive it.
ls -l ~/.kube/config must show -rw-------: read and write for you, nothing for the others. If you need to show your configuration, kubectl config view without --raw is enough, since it already masks the secrets.
Avoid targeting the wrong cluster
The costliest mistake with contexts is a correct command run against the wrong cluster. With a single kind cluster, the mistake is impossible, since there is only one target. It happens the day a staging cluster and a production cluster coexist and you stop looking. Three reflexes prevent it, and you pick them up now, when they cost nothing.
Before any command that deletes or modifies, run kubectl config current-context. In a script, always pass --context and -n explicitly, rather than relying on the state of the file. Finally, many shells can display the context in the prompt (the kubernetes module of Starship, the kube-ps1 plugin): seeing the cluster name permanently makes the mistake much harder to make.
Optional deep dive: create contexts and add a received access
This section is not needed for the rest of the module. You already have the basic gestures: list the contexts, see the active one, switch it and set the default namespace. What follows is for the day you receive the access to a second cluster, which does not usually happen in your first days. You can jump straight to troubleshooting and come back when you need it.
Here you learn to create, rename and delete a context, then to add a received kubeconfig without overwriting yours. The recipe creates a second kind cluster, recette, and deletes it at the end: you return to the starting state of the lesson.
Create, rename and delete a context
A context is just a name placed on a cluster and user pair already present in the file. Creating one creates neither a cluster nor an account: it is a shortcut. kubectl config set-context creates the context if it does not exist and modifies it if it does. Here, a context systeme targets the same kind cluster, directly in the kube-system namespace:
kubectl config set-context systeme \ --cluster=kind-monapp \ --user=kind-monapp \ --namespace=kube-systemkubectl config get-contextsContext "systeme" created.CURRENT NAME CLUSTER AUTHINFO NAMESPACE* kind-monapp kind-monapp kind-monapp default systeme kind-monapp kind-monapp kube-systemThe active context has not changed: the asterisk stays on kind-monapp, whose NAMESPACE column shows default since you set it in the section on the default namespace.
To rename a context, for example an unreadable cloud name, use kubectl config rename-context <old> <new>: only the name changes, the cluster and the user stay the same. To delete the systeme context:
kubectl config delete-context systemeDeleting a context only deletes the shortcut. The cluster and the user it pointed to remain in the file, with their credentials. When an access is no longer used at all, also remove these two entries with kubectl config delete-cluster <name> and kubectl config delete-user <name>, after checking their names with kubectl config get-clusters and kubectl config get-users.
Add a received kubeconfig without overwriting yours
A received kubeconfig is read, then merged with yours: it never replaces ~/.kube/config. Copying the received file over yours makes you lose access to your existing clusters, including your kind cluster. Using it without having read it amounts to running an unknown script, for the reason shown by the exec block further down.
Read the file before using it
Point KUBECONFIG at the received file for the duration of one command to display it without changing anything on your side. An assignment placed in front of kubectl applies only to that command, and your configuration stays intact.
In practice, a received access is a file that the platform team drops in ~/Downloads. To play out the recipe without a cloud cluster, a second kind cluster, named recette, plays that role: the --kubeconfig option makes it write its access into the file you give, instead of ~/.kube/config, which stays untouched.
Two clusters then run at the same time. If the creation hangs or fails, check your machine's inotify limits, described in the Troubleshooting section of the lesson on the first cluster.
mkdir -p ~/Downloadskind create cluster --name recette \ --image kindest/node:v1.37.0@sha256:a1ed56cfb0e7b93589bdf97c8cd566405a265939e3620fc4f5de89adff580ae5 \ --kubeconfig ~/Downloads/kubeconfig-recette.yamlCreating cluster "recette" ... ✓ Ensuring node image (kindest/node:v1.37.0) ✓ Preparing nodes ✓ Writing configuration ✓ Starting control-plane ✓ Installing CNI ✓ Installing StorageClassSet kubectl context to "kind-recette"You can now use your cluster with:
kubectl cluster-info --context kind-recette --kubeconfig /home/ansible/Downloads/kubeconfig-recette.yamlYour ~/.kube/config has not moved: kubectl config get-contexts still lists only kind-monapp in it. The received file, for its part, contains the kind-recette context. The path on the last line of the previous output depends on your account: on your machine, it starts with your home directory. Now display the received file, without changing anything on your side:
KUBECONFIG=~/Downloads/kubeconfig-recette.yaml kubectl config viewapiVersion: v1clusters:- cluster: certificate-authority-data: DATA+OMITTED server: https://127.0.0.1:38925 name: kind-recettecontexts:- context: cluster: kind-recette user: kind-recette name: kind-recettecurrent-context: kind-recettekind: Configusers:- name: kind-recette user: client-certificate-data: DATA+OMITTED client-key-data: DATA+OMITTEDPort 38925 is picked at random: yours will be different. Three points can be checked in the output. The server address must match the cluster you were told about: a file that points elsewhere would send your commands, and your credentials, to an unknown server. The context name tells you what to rename. The users section tells you how you will be authenticated: by a certificate, by a token or by an exec block.
An exec block is a command that kubectl runs on your machine, with your rights, to obtain a token. It is the normal mechanism for SSO accesses (the company's single sign-on): the platform team asks you to install an authentication plugin, and the file calls it. The recipe's file contains none, since a kind cluster authenticates by certificate. So here is, as an example, the form an access through the oidc-login plugin takes at a cloud provider. This excerpt was not run: there is no SSO server to answer it.
users:- name: recette-sso user: exec: apiVersion: client.authentication.k8s.io/v1 command: kubectl args: - oidc-login - get-token - --oidc-issuer-url=https://sso.acme-industrie.fr - --oidc-client-id=kubernetesThis command does not run when you read the file, but at the first command that contacts the cluster. According to the kubectl documentation, kubectl config view displays the block without running it, whereas a command that contacts the cluster, such as kubectl get pods, runs it. An exec block whose command is not the one your team told you about, an sh -c for example, is reason enough not to use the file and to raise it with its sender.
Merge cleanly
The KUBECONFIG variable accepts several files separated by :, and kubectl then reads them as a single one. The --flatten option of kubectl config view writes the result of that reading into a self-contained file, certificates included. The recipe below relies on these two mechanisms and keeps a backup of your original file. On Windows, the separator is ; instead of :.
-
Store the file and restrict its permissions
Terminal window mkdir -p ~/.kube/configsmv ~/Downloads/kubeconfig-recette.yaml ~/.kube/configs/recette.yamlchmod 600 ~/.kube/configs/recette.yaml -
Check the contexts it brings
Terminal window KUBECONFIG=~/.kube/configs/recette.yaml kubectl config get-contextsOutput CURRENT NAME CLUSTER AUTHINFO NAMESPACE* kind-recette kind-recette kind-recette -
Merge, with a backup
Terminal window export KUBECONFIG=~/.kube/config:~/.kube/configs/recette.yamlkubectl config view --flatten > ~/.kube/config.mergedcp ~/.kube/config ~/.kube/config.backupmv ~/.kube/config.merged ~/.kube/configchmod 600 ~/.kube/configunset KUBECONFIGThe final
unset KUBECONFIGmatters: an exported variable stays active in this terminal, and all your commands would keep reading two files instead of yours. -
Check the result and rename the context
Terminal window kubectl config get-contextskubectl config rename-context kind-recette recettekubectl config get-contextsOutput CURRENT NAME CLUSTER AUTHINFO NAMESPACE* kind-monapp kind-monapp kind-monapp defaultkind-recette kind-recette kind-recetteContext "kind-recette" renamed to "recette".CURRENT NAME CLUSTER AUTHINFO NAMESPACE* kind-monapp kind-monapp kind-monapp defaultrecette kind-recette kind-recetteThe
NAMESPACEcolumn ofkind-monappshowsdefaultbecause you set it earlier withset-context --current --namespace=default. The one forrecettestays empty, andkubectlalso works indefaultthere. Therecettecontext still designates thekind-recettecluster and user: only its name has changed. The active context remainskind-monapp, because--flattenkeeps thecurrent-contextof the first file in the list. -
Test the access without changing the active context
Terminal window kubectl --context=recette cluster-infokubectl --context=recette auth can-i get pods -AOutput Kubernetes control plane is running at https://127.0.0.1:38925CoreDNS is running at https://127.0.0.1:38925/api/v1/namespaces/kube-system/services/kube-dns:dns/proxyTo further debug and diagnose cluster problems, use 'kubectl cluster-info dump'.yesThe first command displays the API address, the second answers
yesornodepending on the permissions you were granted. Here, the kind access is administrator, hence theyes. -
Really switch to
recette, then go back tomonappuse-contextchanges the active context, andkubectl config current-contexttells you where you are at any time. The secondget nodesmust show themonappnode, proof that you are back on your original cluster.Terminal window kubectl config use-context recettekubectl wait --for=condition=Ready nodes --all --timeout=120skubectl get nodeskubectl config use-context kind-monappkubectl get nodesOutput Switched to context "recette".node/recette-control-plane condition metNAME STATUS ROLES AGE VERSIONrecette-control-plane Ready control-plane 23s v1.37.0Switched to context "kind-monapp".NAME STATUS ROLES AGE VERSIONmonapp-control-plane Ready control-plane 2m32s v1.37.0The
kubectl waitcommand waits for the node to beReady, 120 seconds at most (--timeout=120s): a freshly created cluster reportsNotReadyduring its first seconds, and akubectl get nodesrun too early would show it that way.
The active context stayed kind-monapp during the whole merge: nothing switches until you run use-context. The kind-recette context now bears the name recette. With a managed cluster, the gain is clearer: a name like gke_<project>_<region>_<cluster> gets renamed to recette, which reads at a glance in get-contexts as in a shell prompt.
Once the recipe is done, delete the recette cluster to free the memory. kind delete cluster removes the cluster and the kind-recette user from your kubeconfig, but not the renamed context, which it no longer recognizes under that name. Remove it yourself, then check:
kind delete cluster --name recettekubectl config delete-context recettekubectl config get-contextsDeleting cluster "recette" ...Deleted nodes: ["recette-control-plane"]deleted context recette from /home/ansible/.kube/configCURRENT NAME CLUSTER AUTHINFO NAMESPACE* kind-monapp kind-monapp kind-monapp defaultThe path on the deleted context line is that of your home directory. What remains is to erase the received kubeconfig, stored in ~/.kube/configs/: it no longer leads anywhere. The rm -f command also deletes ~/Downloads/kubeconfig-recette.yaml if you had not moved that file, and says nothing when it is already absent.
rm -f ~/.kube/configs/recette.yaml ~/Downloads/kubeconfig-recette.yamlThe ~/.kube/config.backup backup contains only your access to monapp, already present in ~/.kube/config. You can keep it or delete it with rm ~/.kube/config.backup. As long as it exists, treat it like the original file: it carries the same 600 permissions and the same sensitive content. You are back to the starting state of the lesson: a single cluster, monapp, and its kind-monapp context active.
Troubleshooting
Most context errors are recognized by their exact message. The table below uses the real outputs of kubectl 1.37: the left column is what you will see on screen.
| Message or symptom | Likely cause | What to do |
|---|---|---|
error: no context exists with the name: "xxx" | context name mistyped in use-context | kubectl config get-contexts, then copy the exact name |
Error in configuration: context was not found for specified context: xxx | name mistyped in --context | same check |
The connection to the server localhost:8080 was refused | kubectl found no kubeconfig: KUBECONFIG points to a missing file, or ~/.kube/config is missing | echo $KUBECONFIG, then check that the file exists |
The connection to the server 127.0.0.1:34201 was refused | the kind cluster is stopped | docker start on its containers, as in the previous lesson |
No resources found in kube-sytem namespace. | default namespace mistyped, accepted without a check | kubectl config set-context --current --namespace=<exact name> |
recette is still listed in get-contexts after kind delete cluster --name recette | the context had been renamed, and kind delete cluster no longer recognizes it under that name | kubectl config delete-context recette |
| contexts missing after a merge | wrong path in KUBECONFIG at the time of --flatten | restore ~/.kube/config.backup, redo the recipe |
Put it into practice
The guided lab practices the basic gesture of the lesson. Your kubeconfig already holds two contexts: kind-boutique, which is active, and recette. You switch to recette, give it kube-system as its default namespace, then create a ConfigMap without naming any context or namespace. Finally, the setup left your kubeconfig readable by every account on the machine: you make it readable by you alone, as the section on protecting kubeconfigs explains. The validation checks the active context, the default namespace, that the ConfigMap lands in the right place, in kube-system of the staging cluster only, and the kubeconfig permissions. Merging kubeconfigs, described in the optional section, is not asked of you.
Key takeaways
- The kubeconfig (
~/.kube/configby default) tellskubectlwhich cluster to talk to, under which identity and in which namespace. - A context pairs a cluster, a user and an optional namespace;
current-contextdesignates the one used by default. use-contextmodifies the file and affects all your terminals;--contextapplies to a single command, and it is the form for scripts.set-context --current --namespace=changes the default namespace without checking that it exists: a typo looks like an empty namespace.- A kubeconfig is protected like a key:
600permissions, never in Git, andconfig viewwithout--rawto show it. - Optional: a received kubeconfig is read before use (server address, context name, and above all the
execblock, which runs a command on your machine). - Optional: you merge, you do not overwrite, with
KUBECONFIG=file1:file2,kubectl config view --flatten, a backup, thenunset KUBECONFIG.
Knowledge check
Six questions about what makes you act in the wrong place: the context that switches for all your terminals, the mistyped namespace that raises no error, and the received kubeconfig you use before reading it.
Knowledge check
Check what you have learned with this interactive quiz
How it works
- The timer starts when you click Start
- Multiple choice, true/false and short answer questions
- You can move between questions
- Detailed results are shown at the end
Starts the quiz and the timer
Review
(0/0)Score by domain
A domain groups several guides and gets several questions, so its score is more reliable than a per-topic score, which often rests on a single question.
Summary
Strengths
No topic passed at 80% on at least two questions yet.
Weak areas
No topic below the pass mark.
Recommended next
Hints before you try again?
Continue the course: Deploy your first application on Kubernetes
A new full quiz with random questions
Work again only on the questions you missed