Kubernetes does not schedule Pods "at random". You can control precisely where your workloads run, thanks to several complementary mechanisms. This guide presents the modern scheduling tools: from the simple nodeSelector up to topologySpreadConstraints for high availability.
The lesson is long because it brings together the seven placement mechanisms that a single exam task often mixes. Read it according to your need. To send a Pod to a node, sections 1 to 3 then 6 are enough. To spread or group Pods relative to each other, read sections 4 and 5. To troubleshoot a Pending Pod, go to sections 8 and 9. Section 7 combines these mechanisms in complete cases.
What you will learn
- Target specific nodes with
nodeSelectorandnodeAffinity - Manage relations between Pods with
podAffinity/podAntiAffinity - Spread replicas cleanly with
topologySpreadConstraints - Protect and reserve nodes with
taints/tolerations - Know what
nodeNamebypasses, and why to avoid it - Debug Pods stuck in
Pending
Prerequisites
You know what a Pod is and what a Deployment is, you read a YAML manifest, and you set labels with kubectl label. The demonstrations on this page assume a multi-node kind cluster, like the one in First cluster with kind: one control plane and three workers, labeled by zone. On a single-node cluster, the scheduler has no choice to make and most examples show nothing.
Overview of the mechanisms
Kubernetes offers seven placement mechanisms, and the confusion comes from the fact that they do not answer the same question. Some say where to put a Pod, others define who is allowed in on a node, others still organize the spreading of a group of replicas. The "Acts on" column is the best landmark: a mechanism that acts on the node does not combine the same way as a mechanism that acts on Pods relative to each other.
| Mechanism | Goal | Acts on |
|---|---|---|
nodeName | Force a specific node (bypass the scheduler) | Node |
nodeSelector | Filter by labels (simple) | Node |
nodeAffinity | Filter by labels (advanced, preference/constraint) | Node |
podAffinity | Bring related Pods together | Pods |
podAntiAffinity | Keep Pods apart | Pods |
topologySpreadConstraints | Spread replicas across domains | Topology |
taints / tolerations | Protect/reserve nodes | Node |
Four families stand out, and naming them avoids a lot of confusion. nodeSelector and nodeAffinity are used to target nodes. taints and tolerations are used to protect or reserve nodes, which is the opposite operation. podAffinity and podAntiAffinity manage the relations between Pods, without saying anything about nodes. And topologySpreadConstraints spreads a group of replicas across domains. Section 8 comes back to this choice, once the mechanisms have been detailed.
Standard Kubernetes labels
Kubernetes defines standard labels for topology. Prefer them to custom labels when they exist:
| Label | Description |
|---|---|
kubernetes.io/hostname | Node name |
topology.kubernetes.io/zone | Availability zone |
topology.kubernetes.io/region | Region |
node.kubernetes.io/instance-type | Instance type (cloud) |
# Show the labels of a nodekubectl get nodes --show-labels1. nodeName: bypassing the scheduler
The nodeName field binds a Pod to a node, without going through the scheduler. It is the only mechanism on this page that does not state a constraint to satisfy, but a fixed assignment: the kubelet of the named node takes the Pod in charge.
The scheduler is bypassed, but the kubelet still checks that the Pod can run on its node: if resources are missing, the Pod fails with OutOfcpu or OutOfmemory; if the nodeSelector or the affinity do not match the labels of the node, it is refused; a NoExecute taint without a toleration rejects it too. Only the NoSchedule and PreferNoSchedule taints are ignored, since only the scheduler reads them.
The kubernetes.io documentation ("Assigning Pods to Nodes", nodeName section) says that nodeName takes precedence over nodeSelector and affinity. That is true for placement: no computation chooses the node. The refusal comes afterwards, at admission by the kubelet, and it only covers the nodeSelector and the required affinity (requiredDuringSchedulingIgnoredDuringExecution), never the preferences.
apiVersion: v1kind: Podmetadata: name: pod-on-specific-nodespec: containers: - name: my-container image: my-image:1.0.0 nodeName: my-node-1Proof that the taint is ignored
The claim "a NoSchedule taint is ignored" can be checked in one manipulation. A node is protected by a NoSchedule taint, and a Pod without any toleration is addressed to it with nodeName:
kubectl taint nodes worker-3 reserve=yes:NoSchedulekubectl run direct --image=nginx:1.31.3-alpine3.24@sha256:4a73073bd557c65b759505da037898b61f1be6cbcc3c2c3aeac22d2a470c1752 \ --overrides='{"spec":{"nodeName":"worker-3"}}'direct 1/1 Running worker-3The Pod runs, on a node that would have refused any other Pod. The same Pod aiming at this node with a nodeSelector stays in Pending. It is the clearest demonstration of what nodeName bypasses: the filter of the scheduler, not the check of the kubelet.
A non-existent node: the Pod does not stay Pending, it disappears
This is the most puzzling behavior of this field, and the only one that leaves the reader with nothing to diagnose. A misspelled nodeName does produce a Pending Pod, but not for long:
| Moment | What kubectl get pods shows |
|---|---|
| Creation | Pending, with spec.nodeName already filled in |
| About 1 minute later | the Pod no longer exists |
The garbage collector of kube-controller-manager forcibly deletes the Pods bound to a node that is absent from the cluster. The deletion writes no event on the object: kubectl describe pod answers NotFound, and the usual diagnostic method, reading the events, returns nothing at all.
In a Deployment, the consequence is worse: the controller recreates a Pod, the garbage collector deletes it a minute later, and the cycle never stops. A Pod age that never exceeds one minute is the signature of this defect.
nodeName is for troubleshooting and tests on a specific node, or in very specific situations where you know exactly where to place the Pod. Avoid it in production: prefer nodeSelector or nodeAffinity for dynamic rules.
2. nodeSelector: the simple filter
nodeSelector is the simplest method to constrain a Pod to nodes that have a specific label. The scheduler keeps only the nodes carrying all the requested labels, with a strict equality. The setup takes two steps: put the label on the relevant nodes, then request it in the Pod.
Put a label on a node
A label is a free key/value pair stored on the Node object. It persists across restarts, but disappears if the node is removed then registered again in the cluster.
kubectl label nodes node-gpu accelerator=nvidia-gpuUse nodeSelector
The field sits directly under spec, at the same level as containers, without going through the affinity block.
apiVersion: v1kind: Podmetadata: name: pod-gpuspec: containers: - name: my-container image: my-image:1.0.0 nodeSelector: accelerator: nvidia-gpu- Only nodes with
accelerator=nvidia-gpucan host this Pod - If no node matches, the Pod stays in
Pending - This mechanism only accepts strict equalities (
key=value)
3. nodeAffinity: preferences and constraints
nodeAffinity offers more flexibility than nodeSelector: it accepts operators (membership in a list, existence of a key, numeric comparison) and distinguishes a blocking constraint from a mere preference. Their names are long, but they read in two halves: DuringScheduling says when the rule applies, IgnoredDuringExecution says that it is no longer looked at once the Pod is running.
| Mode | Behavior |
|---|---|
requiredDuringSchedulingIgnoredDuringExecution | Mandatory, the Pod will not be scheduled if no node matches |
preferredDuringSchedulingIgnoredDuringExecution | Preference, Kubernetes tries to respect the rule, but may bypass it |
The IgnoredDuringExecution suffix is the most informative part of these long names: the rule is evaluated only once, at placement time. If the node later loses the label that made it eligible, the Pod stays where it is. A single mechanism on this page escapes this logic: the NoExecute taint effect, which evicts Pods already in place.
Required affinity
The In operator accepts several values, which nodeSelector cannot do. If no node matches, the Pod stays in Pending as long as no node fits, and the only clue is the FailedScheduling event.
apiVersion: v1kind: Podmetadata: name: pod-gpu-requiredspec: containers: - name: my-container image: my-image:1.0.0 affinity: nodeAffinity: requiredDuringSchedulingIgnoredDuringExecution: nodeSelectorTerms: - matchExpressions: - key: accelerator operator: In values: - nvidia-gpu - amd-gpuThe Pod will only be scheduled on a node with accelerator=nvidia-gpu or accelerator=amd-gpu.
Preferred affinity
The preferred mode takes a weighted list: the weight field, from 1 to 100, ranks candidate nodes when several rules apply. The Pod is always scheduled, even if no preference is satisfied.
apiVersion: v1kind: Podmetadata: name: pod-gpu-preferredspec: containers: - name: my-container image: my-image:1.0.0 affinity: nodeAffinity: preferredDuringSchedulingIgnoredDuringExecution: - weight: 100 preference: matchExpressions: - key: accelerator operator: In values: - nvidia-gpuKubernetes will prefer a GPU node, but will schedule the Pod elsewhere if none is available.
Available operators
These six operators are used in matchExpressions, in required mode as well as in preferred mode. The last two, Gt and Lt, compare the label value as an integer, and that is where a diagnostic trap hides.
A node whose label is cores=four is simply ruled out, as if it did not carry the label at all. No message says that the value was not a number: the event stays the generic node(s) didn't match Pod's node affinity/selector. It is better to know it, because nothing in the output will put you on the trail.
The value written in the rule is not validated either. A values: ["many"] behind a Gt is accepted by the API, the Pod is created, and it stays in Pending with the same generic message. Check the value yourself, the API will not do it for you.
| Operator | Description |
|---|---|
In | The value is in the list |
NotIn | The value is not in the list |
Exists | The key exists (whatever the value) |
DoesNotExist | The key does not exist |
Gt | Value greater than (numeric) |
Lt | Value less than (numeric) |
4. podAffinity and podAntiAffinity: relations between Pods
These mechanisms influence the placement of Pods relative to each other, not relative to nodes. The rule therefore cites no node name: it describes the Pods to look for through a labelSelector, then says with topologyKey at what scale to apply the grouping or the separation. The scheduler evaluates this rule at every placement, which has a cost the end of the section talks about.
podAffinity: bring Pods together
Grouping is useful when two components exchange a lot and network latency matters, typically an application and its Redis cache. Placing them on the same node removes one network hop, at the price of a loss of resilience if that node goes down.
apiVersion: v1kind: Podmetadata: name: web-app labels: app: webspec: containers: - name: web-container image: my-web-image:1.0.0 affinity: podAffinity: requiredDuringSchedulingIgnoredDuringExecution: - labelSelector: matchExpressions: - key: app operator: In values: - redis topologyKey: kubernetes.io/hostnameThis Pod will be scheduled on the same node as a Pod that has app=redis.
podAntiAffinity: keep Pods apart
Anti-affinity avoids the SPOF (Single Point Of Failure): without it, nothing prevents the scheduler from putting the three replicas of a service on the same node, and the failure of that node takes down the whole service. Note that the rule targets the label of the Deployment itself, app=web, so a Pod pushes away its own siblings.
apiVersion: apps/v1kind: Deploymentmetadata: name: web-appspec: replicas: 3 selector: matchLabels: app: web template: metadata: labels: app: web spec: affinity: podAntiAffinity: requiredDuringSchedulingIgnoredDuringExecution: - labelSelector: matchExpressions: - key: app operator: In values: - web topologyKey: kubernetes.io/hostname containers: - name: web-container image: my-web-image:1.0.0Kubernetes will prevent several app=web Pods from running on the same node.
topologyKey: the level of the constraint
The topologyKey is the node label that defines the scope of the rule. Two nodes carrying the same value for this label belong to the same domain, and the constraint applies inside that domain. Choosing zone rather than hostname changes the result completely, in a different direction depending on the rule.
For podAntiAffinity, the rule becomes stricter: a single Pod per zone, since a Pod then excludes its whole zone at once. For podAffinity, it becomes looser: the Pod only has to be in the same zone as its target, not on the same node.
| topologyKey | Effect |
|---|---|
kubernetes.io/hostname | Spreading by node |
topology.kubernetes.io/zone | Spreading by zone |
topology.kubernetes.io/region | Spreading by region |
5. topologySpreadConstraints: spread replicas properly
topologySpreadConstraints is the modern mechanism to control how Pods are spread across topology domains (nodes, zones, regions). It is often better suited than podAntiAffinity for high availability.
Why use topologySpreadConstraints?
The comparison below covers four real needs. The difference comes from the type of rule: podAntiAffinity expresses a binary prohibition, whereas topologySpreadConstraints expresses a tolerated gap between domains, which allows a controlled imbalance instead of blocking placement.
| Need | podAntiAffinity | topologySpreadConstraints |
|---|---|---|
| Never 2 Pods on the same node | Strict, this is its use | Possible, but not its use |
| Spread evenly across zones | Complex to express | Designed for it |
| Tolerate a slight imbalance | Impossible | maxSkew |
| Spread across zones AND nodes | Complex to express | Several stacked constraints |
Basic example
This Deployment spreads its 6 replicas across nodes with a maximum skew of 1. The labelSelector must designate the Pods of the Deployment itself, otherwise the constraint counts the wrong Pods and the skew computation no longer makes sense.
apiVersion: apps/v1kind: Deploymentmetadata: name: web-appspec: replicas: 6 selector: matchLabels: app: web template: metadata: labels: app: web spec: topologySpreadConstraints: - maxSkew: 1 topologyKey: kubernetes.io/hostname whenUnsatisfiable: DoNotSchedule labelSelector: matchLabels: app: web containers: - name: web-container image: my-web-image:1.0.0Why a maxSkew of 1 sometimes refuses a Pod you thought was placeable
Here is a surprising measurement, made on a cluster of 4 nodes, a tainted control plane and 3 workers. A Deployment of 4 replicas with maxSkew: 1 on kubernetes.io/hostname and DoNotSchedule:
worker-1 Runningworker-2 Runningworker-3 Running Pending0/4 nodes are available: 1 node(s) had untolerated taint(s),3 node(s) didn't match pod topology spread constraints.Three workers, four replicas, a 2/1/1 spread: the skew is 1, the constraint should pass. It does not, and the reason is an implicit setting. The nodeTaintsPolicy field defaults to Ignore: the control plane node, although unreachable for this Pod, still counts as a domain. The real spread is therefore 2/1/1/0, and the skew is 2.
Two ways to unblock it, measured on the same cluster:
| Field added to the constraint | Result |
|---|---|
nodeTaintsPolicy: Honor | 4 replicas placed, tainted domains are excluded from the computation |
whenUnsatisfiable: ScheduleAnyway | 4 replicas placed, the constraint becomes a preference |
Above all, remember the principle: an empty domain counts in the skew computation. It is true of the control plane as of any zone where no Pod can go, and it is a possible cause of a spread that refuses for no apparent reason.
Key parameters
Four fields are enough to write a spread constraint: maxSkew, topologyKey, whenUnsatisfiable and labelSelector. The last two rows of the table adjust how domains are counted. The one that decides in case of a deadlock is whenUnsatisfiable: with DoNotSchedule, a Pod that would unbalance too much stays in Pending; with ScheduleAnyway, it is placed anyway, on the least loaded node.
| Parameter | Description |
|---|---|
maxSkew | Maximum tolerated gap between domains (1 = balanced) |
topologyKey | Label defining the domains (kubernetes.io/hostname, topology.kubernetes.io/zone) |
whenUnsatisfiable | DoNotSchedule (strict) or ScheduleAnyway (best-effort) |
labelSelector | Selects the Pods concerned by the spread |
nodeTaintsPolicy | Ignore by default: tainted nodes count as domains |
nodeAffinityPolicy | Honor by default: nodes excluded by affinity do not count |
Multi-level spreading (zones + nodes)
You can stack several constraints, which are then all evaluated for each placement. The recommended dosage is the one below: strict on zones, where an imbalance costs high availability, and loose on nodes, where demanding it as well would often make placement impossible.
spec: topologySpreadConstraints: # First spread across zones - maxSkew: 1 topologyKey: topology.kubernetes.io/zone whenUnsatisfiable: DoNotSchedule labelSelector: matchLabels: app: web # Then spread across nodes within each zone - maxSkew: 1 topologyKey: kubernetes.io/hostname whenUnsatisfiable: ScheduleAnyway labelSelector: matchLabels: app: webFor the specific case of replica spreading, topologySpreadConstraints is generally the best-suited tool: it expresses a tolerated imbalance with maxSkew, where a strict anti-affinity only knows pure prohibition, and it combines over several topology levels, zone then node.
6. Taints and tolerations: protect and reserve nodes
Taints and tolerations work the opposite way from affinity:
- A taint on a node repels Pods by default
- A toleration on a Pod lets it ignore that taint
Add a taint to a node
The key and the value are free, the effect must be exactly one of the three values listed right after.
kubectl taint nodes <node-name> <key>=<value>:<effect>Available effects
The effect determines when the taint acts. The first two only concern future placement, the third also applies to Pods already running and causes their eviction, which makes it the only one of the three able to interrupt a service in production.
| Effect | Behavior |
|---|---|
NoSchedule | Blocks new Pods without a toleration |
PreferNoSchedule | Avoids new Pods without a toleration (best-effort) |
NoExecute | Blocks + evicts existing Pods without a toleration |
Example: reserve GPU nodes
A GPU node costs noticeably more than a standard node, and nothing prevents by default an arbitrary Pod from occupying it. The taint reverses this situation: the node becomes inaccessible to anything that does not explicitly tolerate it.
# Taint the GPU nodekubectl taint nodes node-gpu accelerator=nvidia-gpu:NoScheduleAll standard Pods will be blocked on this node.
Add a toleration to a Pod
The toleration is declared under spec.tolerations and must match the taint set on the node field by field, effect included. The example below shows the complete combination, with the nodeSelector that actually steers the Pod to the GPU node.
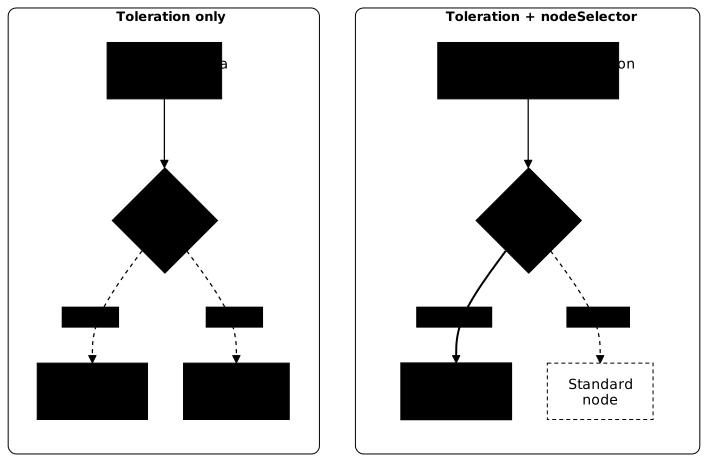
apiVersion: v1kind: Podmetadata: name: pod-gpuspec: containers: - name: my-container image: my-image:1.0.0 tolerations: - key: "accelerator" operator: "Equal" value: "nvidia-gpu" effect: "NoSchedule" # To TARGET the node, also add a selector nodeSelector: accelerator: nvidia-gpuThe two fields share the work: the toleration opens the door, the nodeSelector shows the way. Remove the selector and the Pod stays allowed on the reserved node, but nothing sends it there: it goes wherever the scheduler finds room.
The diagram puts both cases side by side. On the left, with the toleration alone, the scheduler can pick the GPU node, but a standard node remains just as possible. On the right, the toleration and the nodeSelector together: the standard node is ruled out and the GPU node becomes the only choice.
Toleration operators
There are only two operators, and Equal is the one applied by default if you omit the field. Use Exists with care. With a key filled in and an effect left empty, the toleration covers all effects of that key, and only that key. With neither key nor effect, it tolerates all the taints of the node, including those Kubernetes sets in case of failure.
| Operator | Description |
|---|---|
Equal | The key and the value must match |
Exists | The key must exist (value ignored) |
tolerationSeconds: temporarily tolerating NoExecute
With NoExecute, you can let a Pod stay for a while on a node that has become tainted:
tolerations:- key: "node.kubernetes.io/not-ready" operator: "Exists" effect: "NoExecute" tolerationSeconds: 300The Pod will stay 5 minutes on a node that has become not-ready before being evicted. Useful to tolerate temporary network disturbances.
How long a NoExecute eviction really takes
Three Pods placed on the same node, with three different tolerations, then a NoExecute taint applied at time zero:
| Toleration of the Pod | Evicted at |
|---|---|
| None | t + 1 s |
tolerationSeconds: 20 on this taint | t + 21 s |
operator: Exists with no key or effect | never, still in place after 46 s |
Eviction without a toleration is therefore immediate, not deferred: do not count on any grace period to react. And the last row confirms the warning of the operators section: a toleration reduced to operator: Exists swallows all taints, including those Kubernetes sets when a node goes down. A Pod written this way will stay on a failed node.
Common system taints
Kubernetes itself sets taints on nodes in trouble, without you doing anything. Knowing how to recognize them changes the diagnosis: a Pod that refuses to start on an apparently healthy node is often blocked by one of these automatic taints, visible with kubectl describe node.
| Taint | Description |
|---|---|
node.kubernetes.io/not-ready | Node not ready |
node.kubernetes.io/unreachable | Node unreachable |
node.kubernetes.io/disk-pressure | Disk pressure |
node.kubernetes.io/memory-pressure | Memory pressure |
node.kubernetes.io/unschedulable | Node cordoned |
The control plane taint, and its exact name
In most clusters installed by kubeadm, the control plane nodes carry a taint that keeps ordinary workloads away. It is a common practice, not a universal rule, and its name is found like this:
kubectl get node <control-plane> -o jsonpath='{.spec.taints[*].key}{":"}{.spec.taints[*].effect}'node-role.kubernetes.io/control-plane:NoScheduleIts value is empty: a toleration written with operator: Equal and value: "" works, but operator: Exists on the key alone is the usual form and the most readable.
Remove a taint
The trailing dash is what tells removal from addition, and it goes after the effect. Since a node can carry several taints, check the result with kubectl describe node rather than assuming placement is unblocked.
kubectl taint nodes <node-name> <key>:<effect>-# Example:kubectl taint nodes node-gpu accelerator:NoSchedule-7. Combined strategies: practical examples
In production, a single mechanism is rarely enough. The three scenarios below show common combinations, and above all why they combine: a taint protects the node but attracts nobody to it, so it must be paired with an affinity or a selector for the Pod to actually go there.
Example 1: Dedicated GPU nodes
The goal is to reserve GPU nodes for ML/AI workloads.
-
Label and taint the GPU nodes
Terminal window kubectl label nodes node-gpu-1 node-gpu-2 accelerator=nvidia-gpukubectl taint nodes node-gpu-1 node-gpu-2 accelerator=nvidia-gpu:NoSchedule -
Create the ML Pod with toleration + nodeAffinity
apiVersion: v1kind: Podmetadata:name: ml-trainingspec:containers:- name: trainingimage: tensorflow/tensorflow:2.21.0-gpu@sha256:61fe1ce25bd26b0a38e310463a5588d4067d2d01b6bdb058a3ca4f5cf2e18f15tolerations:- key: "accelerator"operator: "Equal"value: "nvidia-gpu"effect: "NoSchedule"affinity:nodeAffinity:requiredDuringSchedulingIgnoredDuringExecution:nodeSelectorTerms:- matchExpressions:- key: acceleratoroperator: Invalues:- nvidia-gpu
Example 2: Multi-zone high availability
The goal is to spread 6 replicas evenly across 3 zones.
apiVersion: apps/v1kind: Deploymentmetadata: name: web-haspec: replicas: 6 selector: matchLabels: app: web-ha template: metadata: labels: app: web-ha spec: topologySpreadConstraints: - maxSkew: 1 topologyKey: topology.kubernetes.io/zone whenUnsatisfiable: DoNotSchedule labelSelector: matchLabels: app: web-ha - maxSkew: 1 topologyKey: kubernetes.io/hostname whenUnsatisfiable: ScheduleAnyway labelSelector: matchLabels: app: web-ha containers: - name: web image: nginx:1.31.3-alpine3.24@sha256:4a73073bd557c65b759505da037898b61f1be6cbcc3c2c3aeac22d2a470c1752The 6 replicas spread as 2 per zone, on different nodes within each zone.
Example 3: Reserved infrastructure nodes
The goal is to reserve nodes for DaemonSets and infrastructure components.
# Taint the infra nodeskubectl taint nodes infra-1 infra-2 dedicated=infrastructure:NoSchedulekubectl label nodes infra-1 infra-2 node-role=infrastructure# Monitoring DaemonSet with a tolerationapiVersion: apps/v1kind: DaemonSetmetadata: name: prometheus-node-exporterspec: selector: matchLabels: app: node-exporter template: metadata: labels: app: node-exporter spec: tolerations: - key: "dedicated" operator: "Equal" value: "infrastructure" effect: "NoSchedule" # This DaemonSet also runs on the infra nodes; without a toleration for the # control plane taint, it does not run on the control plane containers: - name: exporter image: prom/node-exporter:v1.12.1@sha256:1b4e4438faca4dd7e001dd445d161a4a2091b0fededa84093b3a8dfeae1f1be08. How do you choose the right mechanism?
Start from the goal, never from the mechanism. The table below translates six common needs into mechanisms. Only one row combines two mechanisms, the one for reserved nodes: the taint locks access, the affinity steers the Pod, and forgetting the second is a mistake to avoid.
| Goal | Recommended solution |
|---|---|
| Target a type of node (GPU, SSD) | nodeSelector or nodeAffinity |
| Reserve a node for certain workloads | taints + tolerations (+ affinity to target) |
| Bring related Pods together | podAffinity |
| Keep a few sensitive Pods apart | podAntiAffinity |
| Spread replicas across nodes/zones | topologySpreadConstraints |
| Temporarily tolerate an unstable node | tolerationSeconds |
To target a node, nodeSelector is enough as long as an equality will do, and nodeAffinity takes over as soon as an operator or a preference is needed. To protect or reserve a node, taints and tolerations, adding something to steer the Pod. To spread replicas, topologySpreadConstraints. To express a relation between Pods, podAffinity or podAntiAffinity. These needs often combine, and that is the subject of the previous section.
9. Debugging Pods stuck in Pending
A Pod stays Pending when the scheduler finds no node satisfying all the constraints. The useful information is not in the Pod status but in its events, where the scheduler writes the number of nodes ruled out and the reason for each exclusion. That is always the first place to look, even before rereading the manifest.
Diagnostic commands
These four commands are run in this order: first the reason given by the scheduler, then the real state of the nodes to check it against.
# See why a Pod is Pendingkubectl describe pod <pod-name>
# See recent events (very useful)kubectl get events --sort-by=.lastTimestamp
# See the labels of all nodeskubectl get nodes --show-labels
# See the taints of a nodekubectl describe node <node-name> | grep -A5 Taints
Common causes
The first column reproduces the messages as Kubernetes 1.37 writes them: look for yours rather than reasoning by deduction. The wording has changed over the versions, and a search on an old label returns nothing.
| Message in the events | Probable cause | Solution |
|---|---|---|
0/4 nodes are available: | Header, always followed by the detail per cause | Read the rest of the line |
node(s) didn't match Pod's node affinity/selector | Label missing on the nodes | kubectl label nodes |
node(s) had untolerated taint(s) | Missing toleration | Add the toleration to the Pod |
node(s) didn't match pod anti-affinity rules | More replicas than free domains | Reduce replicas or add nodes |
node(s) didn't match pod topology spread constraints | Skew exceeded, often because of an empty domain | nodeTaintsPolicy: Honor, or ScheduleAnyway |
Insufficient cpu, Insufficient memory | Insufficient resources | Adjust the requests or add nodes |
The full message has a second part, after preemption:, which says whether evicting a lower-priority Pod would have helped. It is read in the lesson Priority and preemption, which details its three forms.
Full diagnostic example
Here is the complete sequence on a real case, from the error message to checking the taints node by node. The final loop is the one people forget: kubectl describe node is not used on a single node when you are looking for why none fits.
# 1. Identify the problemkubectl describe pod my-pending-pod | grep -A10 Events
# 2. Check the available nodeskubectl get nodes -o wide
# 3. Check the labelskubectl get nodes --show-labels | grep -E "accelerator|zone"
# 4. Check the taintsfor node in $(kubectl get nodes -o name); do  echo "=== $node ==="  kubectl describe $node | grep -A3 Taintsdone
Put it into practice
Placement rules can only be checked by looking at where the Pods actually landed. These two labs have you set a required node affinity then a weighted preference, reserve a worker with a taint and make it reachable only to the Pod that carries the expected toleration. Validation reads the labels of the nodes and the actual node of each Pod, never the YAML you wrote.
Key takeaways
| Mechanism | Role | Side |
|---|---|---|
nodeSelector | Simple filter by label | Pod → Node |
nodeAffinity | Advanced filter (preference/constraint) | Pod → Node |
podAffinity | Brings Pods together | Pod → Pod |
podAntiAffinity | Keeps Pods apart | Pod → Pod |
topologySpreadConstraints | Spreads replicas | Pod → Topology |
taints | Repels unauthorized Pods | Node |
tolerations | Allows a Pod on a tainted node | Pod |
Seven points sum up the page:
topologySpreadConstraintsis the modern mechanism for spreading, do not forget it- A toleration does not attract a Pod, it only allows it
- To target a tainted node: toleration +
nodeSelector/nodeAffinity - Inter-pod affinity can slow down scheduling in large clusters
- Use the standard labels (
kubernetes.io/hostname,topology.kubernetes.io/zone) - An empty domain counts in the
maxSkewcomputation, control plane included - A wrong
nodeNamedoes not leave aPendingPod: the Pod is deleted after a minute
Knowledge check
Seven questions on what sets the seven placement mechanisms apart, and above all on the only one that can evict a Pod already running.
Knowledge check
Check what you have learned with this interactive quiz
How it works
- The timer starts when you click Start
- Multiple choice, true/false and short answer questions
- You can move between questions
- Detailed results are shown at the end
Starts the quiz and the timer
Review
(0/0)Score by domain
A domain groups several guides and gets several questions, so its score is more reliable than a per-topic score, which often rests on a single question.
Summary
Strengths
No topic passed at 80% on at least two questions yet.
Weak areas
No topic below the pass mark.
Recommended next
Hints before you try again?
Continue the course: Priority and preemption: PriorityClass and Pending Pods
A new full quiz with random questions
Work again only on the questions you missed