When a cluster is full, an important Pod can stay waiting while secondary Pods occupy the room. A PriorityClass gives each Pod a rank, and preemption lets the scheduler stop a lower-ranked Pod to place a higher-ranked one. This lesson has you create classes, trigger a preemption on Kubernetes 1.37, stop a Pod from preempting with preemptionPolicy: Never, then read the FailedScheduling message of a Pod that does not get placed.
What you will learn
- Create a PriorityClass and assign it to a Pod with
priorityClassName - Read the priority actually retained in the Pod specification
- Predict which Pods preemption evicts, then check it in the events
- Stop a Pod from preempting with
preemptionPolicy: Never - Read a
FailedSchedulingmessage, including itspreemptionpart - Follow a diagnostic routine for a Pod that stays
Pending
Prerequisites
You know what requests and limits are: the scheduler uses them to know whether a node still has room. You have seen placement by labels, taints and spreading in the lesson Affinities, taints and tolerations; this lesson does not go back over it. A kind cluster on Kubernetes 1.37 with several workers is enough.
The outputs in this lesson were captured on a 2 vCPU VM, with a kind cluster named demo-m89-multi: one control plane and two workers. The reference cluster of the course has three workers (its configuration is given in First cluster with kind). With three workers, adapt three things: the number of replicas of remplissage (two per worker, so 6), the name of the nominated node you will read in your outputs, and the count in the FailedScheduling message (0/4 nodes instead of 0/3, with three Insufficient cpu). The section "Prepare the saturated cluster" explains how to compute the requests for your machine.
How do you give a priority to a Pod?
A PriorityClass associates a name with an integer, the value: the higher it is, the more the Pods of that class go ahead of the others in the scheduler queue. The Pod references the class by name with priorityClassName. A PriorityClass belongs to no namespace: it is a cluster object, created only by an administrator.
Create a PriorityClass
The file below creates three classes. The class basse (French for "low") is for work that can be delayed, haute ("high") for the critical service, and haute-sans-preemption ("high without preemption") for the exercise in the last part of the lesson. The field globalDefault: false means the class does not apply to Pods that declare none. With true, every Pod without a class would receive this priority: reserve this setting for a single class, and only if you have decided it.
apiVersion: scheduling.k8s.io/v1kind: PriorityClassmetadata: name: bassevalue: 1000globalDefault: falsedescription: "Work that can be deferred"---apiVersion: scheduling.k8s.io/v1kind: PriorityClassmetadata: name: hautevalue: 100000globalDefault: falsedescription: "Critical service, can preempt"---apiVersion: scheduling.k8s.io/v1kind: PriorityClassmetadata: name: haute-sans-preemptionvalue: 100000preemptionPolicy: NeverglobalDefault: falsedescription: "Goes ahead in the queue, preempts nobody"After kubectl apply -f priorityclasses.yaml, list the classes with kubectl get priorityclass.
NAME VALUE GLOBAL-DEFAULT AGE PREEMPTIONPOLICYbasse 1000 false 0s PreemptLowerPriorityhaute 100000 false 0s PreemptLowerPriorityhaute-sans-preemption 100000 false 0s Neversystem-cluster-critical 2000000000 false 76s PreemptLowerPrioritysystem-node-critical 2000001000 false 76s PreemptLowerPriorityLook at the PREEMPTIONPOLICY column: PreemptLowerPriority is the default value, Never is the one of haute-sans-preemption. Two classes you did not create exist from the start: system-cluster-critical and system-node-critical, reserved for the essential components of the cluster. Their values, close to two billion, exceed anything you will set on your applications, which protects those components from your own classes.
Assign a class to a Pod
The Pod declares priorityClassName: basse under spec. At creation, Kubernetes copies the value of the class into the Pod, in spec.priority, and the policy into spec.preemptionPolicy. To check it, display these fields for the Pods of the remplissage ("filling") Deployment, which the next section creates: come back to this command once those Pods are running.
kubectl get pods -n prio -o custom-columns=NOM:.metadata.name,CLASSE:.spec.priorityClassName,PRIORITE:.spec.priority,POLITIQUE:.spec.preemptionPolicyNOM CLASSE PRIORITE POLITIQUEremplissage-cfc876476-266zg basse 1000 PreemptLowerPriorityremplissage-cfc876476-7xw7r basse 1000 PreemptLowerPriorityremplissage-cfc876476-vgt8h basse 1000 PreemptLowerPriorityremplissage-cfc876476-x49qs basse 1000 PreemptLowerPriorityThe scheduler reads spec.priority, not the name of the class: this copy is what matters from here on.
What does preemption do when the cluster is full?
Preemption stops Pods of lower priority to free room for a higher-priority Pod that finds no node. To see it, you need a cluster saturated by requests, not by a real load: a Pod that only runs sleep still reserves its resources.
Prepare the saturated cluster
To see a preemption, the urgent Pod must fit on no worker. The scheduler compares the request of the Pod with what is left of allocatable on each node, that is, the capacity the node offers to Pods. So start by reading it.
kubectl get nodes -o custom-columns=NOM:.metadata.name,CPU:.status.allocatable.cpu,MEMOIRE:.status.allocatable.memory,PODS:.status.allocatable.pods,TAINTS:.spec.taints[*].keyNOM CPU MEMOIRE PODS TAINTSdemo-m89-multi-control-plane 2 4009784Ki 110 node-role.kubernetes.io/control-planedemo-m89-multi-worker 2 4009784Ki 110 <none>demo-m89-multi-worker2 2 4009784Ki 110 <none>Each node offers 2 CPUs, and only the control plane carries a taint: the Pods of the exercise will therefore land on the two workers. Next, look at what system Pods already reserve on a worker, with kubectl describe node demo-m89-multi-worker, under Allocated resources. On this cluster, kindnet (the networking component of kind) reserves 100m and kube-proxy nothing, so 100m is taken and 1900m is free.
The computation goes as follows. Call L the free CPU of a worker before the exercise (here 1900m) and R the request of each Pod. You want two Pods to fit on a worker, but not three: 2 x R must be lower than or equal to L, and 3 x R greater than L. Once two Pods are placed, less than R remains, and urgent, which also asks for R, no longer fits. With L = 1900m, any R between 634m and 950m works, and 800m is one of them. The number of replicas of remplissage is then 2 times the number of workers: 4 on two workers, 6 on three.
Beware of kind: a kind node advertises all the CPUs of the host, not 2. On an 8-core laptop, allocatable is 8 CPUs, and four 800m Pods saturate nothing. Redo the computation with your own L, aiming at a request of about 40% of L: with 8 CPUs, that gives about 3,200m per Pod. Keep the same values for remplissage and urgent, otherwise the saturation disappears.
Create the working namespace. The three PriorityClasses of priorityclasses.yaml, above, must already be applied: they belong to no namespace.
kubectl create namespace prionamespace/prio createdThe remplissage Deployment carries the class basse and reserves 800m per Pod. The field terminationGracePeriodSeconds: 30 sets to 30 seconds the delay a Pod is given to stop cleanly: it explains the wait you will measure below.
apiVersion: apps/v1kind: Deploymentmetadata: name: remplissage namespace: priospec: replicas: 4 selector: matchLabels: app: remplissage template: metadata: labels: app: remplissage spec: priorityClassName: basse terminationGracePeriodSeconds: 30 containers: - name: attente image: busybox:1.38.0@sha256:a46257e06c82ad85242d0d38077d0a52d9896389ca60a1a59d3463db586e5fa4 command: ["sleep", "36000"] resources: requests: cpu: 800m memory: 16Mi limits: memory: 32MiThe urgent Pod has the class haute and asks for the same request as the remplissage Pods. The patient Pod, used further down, is identical, with the class haute-sans-preemption. Write both files now.
apiVersion: v1kind: Podmetadata: name: urgent namespace: priospec: priorityClassName: haute containers: - name: web image: nginx:1.30.5@sha256:9bf97bd7714f5e24c1ccd545ecb9eb5435cb6d109c97cebb15e7e455e0239edb resources: requests: cpu: 800m memory: 32Mi limits: memory: 64MiapiVersion: v1kind: Podmetadata: name: patient namespace: priospec: priorityClassName: haute-sans-preemption containers: - name: web image: nginx:1.30.5@sha256:9bf97bd7714f5e24c1ccd545ecb9eb5435cb6d109c97cebb15e7e455e0239edb resources: requests: cpu: 800m memory: 32Mi limits: memory: 64MiApply remplissage.yaml and wait for the Pods to be ready: kubectl apply -f remplissage.yaml && kubectl rollout status deployment/remplissage -n prio --timeout=180s. On the VM used for the captures, the four Pods start in 4 seconds.
Preemption in action
Once remplissage is applied, its 4 Pods each ask for cpu: 800m. Two Pods fit on each worker: 100m + 2 x 800m = 1700m out of 2000m. That leaves 300m per worker.
kubectl describe node demo-m89-multi-worker | grep -A3 'Resource *Requests' | grep -E 'Resource|cpu' Resource Requests Limits cpu 1700m (85%) 0 (0%)The second worker shows the same line: 1700m reserved out of 2000m. A Pod that asks for 800m therefore finds no room on any worker. The control plane carries a taint and receives nothing.
Now create the urgent Pod, of class haute, with requests.cpu: 800m, then read its state two seconds later.
kubectl apply -f urgent.yaml; sleep 2; kubectl get pod urgent -n prio -o jsonpath='phase={.status.phase} nominatedNodeName={.status.nominatedNodeName} nodeName={.spec.nodeName}{"\n"}'pod/urgent createdphase=Pending nominatedNodeName=demo-m89-multi-worker nodeName=The Pod is still Pending and has no nodeName, but nominatedNodeName is filled in: the scheduler has picked a node and is preparing room on it. The next diagram shows the order of the exchanges. Look at who acts first (the scheduler, not the Deployment), and at what becomes of the victim: its Deployment replaces it at once, and that replacement finds no room.
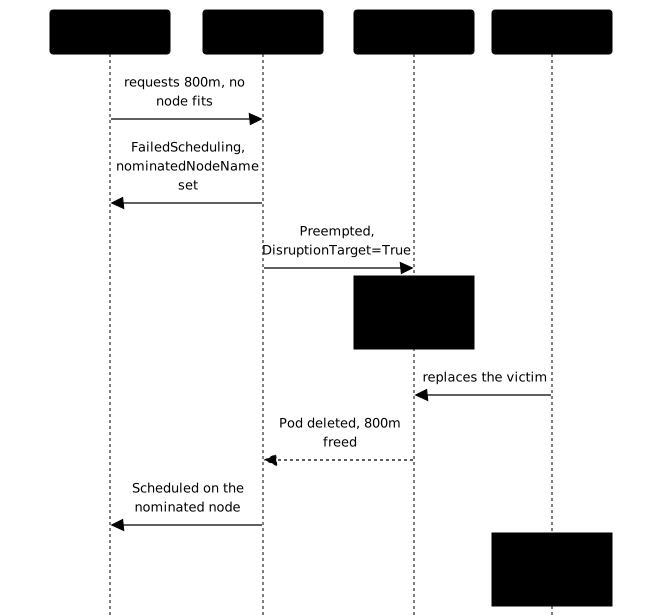
List the Pods a moment later.
kubectl get pods -n prio -o wideNAME READY STATUS RESTARTS AGE IP NODE NOMINATED NODE READINESS GATESremplissage-cfc876476-266zg 1/1 Terminating 0 6s 10.244.1.3 demo-m89-multi-worker <none> <none>remplissage-cfc876476-7xw7r 1/1 Running 0 6s 10.244.3.2 demo-m89-multi-worker2 <none> <none>remplissage-cfc876476-vgt8h 1/1 Running 0 6s 10.244.3.3 demo-m89-multi-worker2 <none> <none>remplissage-cfc876476-vx2nn 0/1 Pending 0 2s <none> <none> <none> <none>remplissage-cfc876476-x49qs 1/1 Running 0 6s 10.244.1.2 demo-m89-multi-worker <none> <none>urgent 0/1 Pending 0 2s <none> <none> demo-m89-multi-worker <none>A single victim, …-266zg, goes to Terminating, on the nominated node. The scheduler tries to stop as few Pods as possible. The NOMINATED NODE column of urgent shows the reserved worker, and the replacement …-vx2nn created by the Deployment is Pending.
Two written traces say why the victim stops. The first is the Preempted event.
kubectl get events -n prio --field-selector reason=PreemptedLAST SEEN TYPE REASON OBJECT MESSAGE3s Normal Preempted pod/remplissage-cfc876476-266zg Preempted by pod f901dbd1-fc7b-4f8b-aa2b-92521b630ff5 on node demo-m89-multi-workerThe event is attached to the victim and names the preemptor by its uid, not by its name. The second trace is a condition set on the victim itself.
kubectl get pod remplissage-cfc876476-266zg -n prio -o jsonpath='{range .status.conditions[?(@.type=="DisruptionTarget")]}{.type}={.status} reason={.reason} message={.message}{"\n"}{end}'DisruptionTarget=True reason=PreemptionByScheduler message=default-scheduler: preempting to accommodate a higher priority podThe condition DisruptionTarget=True, with reason PreemptionByScheduler, tells an eviction by preemption apart from an ordinary stop. It is the place to look when a Pod disappears without you having asked for it.
Two behaviors to know
The first: the room is not free right away. The urgent Pod became Ready about 40 seconds after its creation, because it waited for the victim's graceful shutdown to end: 30 seconds of terminationGracePeriodSeconds, since sleep does not stop on SIGTERM. A critical service is therefore not placed instantly, and the victim's shutdown follows its own delay.
kubectl wait --for=condition=Ready pod/urgent -n prio --timeout=120spod/urgent condition metThe second: the priority value is a copy. You saw it above, spec.priority is copied into each Pod at admission, and the scheduler uses that copy. The value of a PriorityClass cannot be modified anyway: the API refuses the change. To change a priority, create a new class, have your Pods reference it, then recreate them: Pods already created keep their copy.
One last effect of preemption shows in the replacement that stayed Pending: the remplissage Deployment lost a replica, and that replica can no longer be placed. A high priority therefore has a real cost for the other workloads, which is why high classes are not handed out widely in a shared cluster.
How do you stop a Pod from preempting?
With preemptionPolicy: Never, a Pod keeps its priority in the queue, but the scheduler does not let it evict anyone. The patient Pod uses the class haute-sans-preemption (value 100000) and also asks for 800m.
kubectl apply -f patient.yaml; sleep 15; kubectl get pod patient -n prio -o wide; kubectl get pod patient -n prio -o jsonpath='priority={.spec.priority} preemptionPolicy={.spec.preemptionPolicy} nominatedNodeName={.status.nominatedNodeName}{"\n"}'pod/patient createdNAME READY STATUS RESTARTS AGE IP NODE NOMINATED NODE READINESS GATESpatient 0/1 Pending 0 15s <none> <none> <none> <none>priority=100000 preemptionPolicy=Never nominatedNodeName=After fifteen seconds, patient is still Pending, its priority is indeed 100000, and nominatedNodeName is empty: no node was reserved. Check that nobody was evicted: kubectl get events -n prio --field-selector reason=Preempted still shows only the event caused by urgent. This setting suits important but patient workloads, which must move to the head of the queue without interrupting a running service.
How do you read a Pod that stays Pending?
A Pending Pod is not always a resource problem: an untolerated taint, a missing label or an anti-affinity blocks it too, even if the cluster has room. The scheduler writes the reason in a FailedScheduling event, which kubectl describe pod displays at the bottom.
kubectl describe pod patient -n prio | sed -n '/^Events:/,$p'Events: Type Reason Age From Message ---- ------ ---- ---- ------- Warning FailedScheduling 15s default-scheduler 0/3 nodes are available: 1 node(s) had untolerated taint(s), 2 Insufficient cpu. preemption: not eligible due to preemptionPolicy=Never.The same text is found in the Pod condition: kubectl get pod patient -n prio -o jsonpath='{.status.conditions[?(@.type=="PodScheduled")].message}', with PodScheduled=False and the reason Unschedulable.
Read the FailedScheduling message piece by piece
The message splits into two parts, separated by preemption:. The first says why each node was ruled out, the second says whether preemption could help.
| Piece | What it says | Where to look |
|---|---|---|
0/3 nodes are available | the scheduler examined 3 nodes, none fits | kubectl get nodes |
1 node(s) had untolerated taint(s) | one node (here the control plane) carries a taint the Pod does not tolerate | kubectl get nodes -o custom-columns=NAME:.metadata.name,TAINTS:.spec.taints |
2 Insufficient cpu | two nodes no longer have enough unreserved CPU | kubectl describe nodes, under Allocated resources |
preemption: ... | what preemption concluded | the rest of the message, see the next table |
The numbers in the first part add up to the number of nodes: here 1 + 2 = 3.
The preemption part takes three forms in the captures of this lesson.
Message after preemption: | Meaning |
|---|---|
found a potential placement for pod on node demo-m89-multi-worker, preempting 1 victims | preemption will help: a node is chosen, one victim will be evicted (the case of urgent) |
0/3 nodes are available: 1 Preemption is not helpful for scheduling, 2 No preemption victims found for incoming pod. | evicting Pods would change nothing on the node with the taint, and no Pod of lower priority can be evicted on the other two (the case of the low-priority replacement) |
not eligible due to preemptionPolicy=Never | the Pod is not allowed to preempt (the case of patient) |
Seeing preemption in an event therefore does not mean that your Pod has priority: the scheduler considers preemption for every waiting Pod, and writes why it helps or not. Preemption is not helpful generally describes a node ruled out for a cause that eviction does not fix, such as a taint.
Debugging checklist
These four checks go from the announced cause to its confirmation. Start with the events, which name the cause, then confirm with the real state of the nodes. If the event mentions Insufficient cpu or Insufficient memory, the problem is a lack of unreserved resources: lower the requests of the Pod, free some room or add a node.
-
Read the Pod events.
Terminal window kubectl describe pod <nom> | sed -n '/^Events:/,$p' -
Check the requested and free resources.
Terminal window kubectl describe nodes | grep -A5 "Allocated resources" -
Check the taints of the nodes.
Terminal window kubectl get nodes -o custom-columns=NAME:.metadata.name,TAINTS:.spec.taints -
Check the labels of the nodes and the priority of the Pod.
Terminal window kubectl get nodes --show-labelskubectl get pod <nom> -o jsonpath='{.spec.priority}{"\n"}'
To fix a faulty placement (missing label, toleration, anti-affinity that is too strict), apply what you learned in the lesson Affinities, taints and tolerations.
How do you clean up after the lesson?
The Pods and the prio namespace disappear together, but a PriorityClass belongs to no namespace: it stays in the cluster after the lesson, and a Pod from another lesson could reference it by mistake. Delete them explicitly.
kubectl delete namespace priokubectl delete priorityclass basse haute haute-sans-preemptionThe first command deletes the remplissage, urgent and patient Pods. The second removes the three classes you created; system-cluster-critical and system-node-critical stay, they are the ones from Kubernetes. Check with kubectl get priorityclass: only those two system classes remain.
Put it into practice
The lab replays the lesson on a kind cluster with two workers. One worker is already filled with remplissage Pods, whose requests are computed on its real allocatable. You create two classes, basse (1000) and haute (100000), both without globalDefault. You put remplissage under basse, then you run the urgent Pod under haute on that full worker. Validation reads the state of the cluster: both classes exist, remplissage runs under basse, urgent runs on the filled worker with the class haute, and a remplissage Pod carries the Preempted event. Making room by hand or placing urgent on the other worker does not pass.
Key takeaways
- A PriorityClass is a cluster object: its
valueranks Pods, andglobalDefault: falsekeeps it from applying to Pods without a class. - Kubernetes copies the value into
spec.priorityat admission; the scheduler reads that copy. - When no node fits, preemption picks a node and stops as few lower-priority Pods as possible on it; that node becomes the
nominatedNodeNameof the high-priority Pod. - The victim receives the condition
DisruptionTargetwith reasonPreemptionBySchedulerand thePreemptedevent; the high-priority Pod waits for the end of its graceful shutdown. - The victim's Deployment replaces it, and that replacement stays
Pending: a high priority has a cost for the other workloads. preemptionPolicy: Neverkeeps the priority in the queue but forbids evicting: the Pod staysPendingwith nonominatedNodeName.- A
FailedSchedulingmessage reads in two parts: the rejection reasons of each node, then the verdict of preemption afterpreemption:.
Knowledge check
Six questions cover the three skills of the lesson: predicting what preemption does, stopping a Pod from preempting with preemptionPolicy: Never, and reading a FailedScheduling error message piece by piece. If an answer surprises you, go back to the matching section.
Knowledge check
Check what you have learned with this interactive quiz
How it works
- The timer starts when you click Start
- Multiple choice, true/false and short answer questions
- You can move between questions
- Detailed results are shown at the end
Starts the quiz and the timer
Review
(0/0)Score by domain
A domain groups several guides and gets several questions, so its score is more reliable than a per-topic score, which often rests on a single question.
Summary
Strengths
No topic passed at 80% on at least two questions yet.
Weak areas
No topic below the pass mark.
Recommended next
Hints before you try again?
Continue the course: ResourceQuota and LimitRange: control resources per namespace
A new full quiz with random questions
Work again only on the questions you missed