kubeadm is the official tool to bootstrap a Kubernetes cluster that follows the upstream standards. This guide walks you through installing a cluster on KVM virtual machines, from preparing the VMs to a working control plane. You will learn to configure containerd, initialize the control plane and maintain your cluster. Adding a worker has its own lesson, Join a worker to a kubeadm cluster.
Let's clear up a possible misunderstanding right away. This guide builds a cluster that is robust enough for a lab, for technical validation and for CKA preparation, not a strict production cluster. What is missing, in no particular order, is a private registry mirror with its image policy, an automated, externalized and encrypted etcd backup (you learn the gesture here, not its automation), monitoring, centralized log management, and hardening aligned with a benchmark. Each of these points is the subject of a lesson elsewhere in this course: what you build here is their foundation, not their end point.
Three references complement this guide. The official kubeadm documentation details all the options, and the official production best practices tell you what to add to go from a lab to production. To understand each component by hand, Kubernetes the Hard Way redoes the installation without kubeadm, and the issues and discussions of the kubeadm project help when a behavior surprises you.
kubeadm vs other solutions
The table below places kubeadm among the tools that build clusters. Read it with one idea in mind: kubeadm does not compete with the distributions, it is what several of them are built on. Choosing it directly means accepting to assemble yourself what they ship pre-assembled, in exchange for a Kubernetes strictly conformant with upstream and an understanding of every piece.
| Criterion | kubeadm | k0s | k3s | Kubespray | RKE2 |
|---|---|---|---|---|---|
| Type | Bootstrap tool | Distribution | Distribution | Ansible playbooks | Distribution |
| Focus | Upstream standard | Edge, prod, CI | Edge, IoT, dev | Prod, multi-cloud | Enterprise, security |
| Installation | Commands | k0sctl (YAML) | Single script | Ansible | Script |
| Default CNI | None | kube-router | Flannel | Configurable | Canal |
| Native HA | Manual | Yes, multi-controller | Yes, multi-server | Yes, via Ansible | Yes, built in |
| CIS profile | Manual | Manual | Manual | Depends on config | Yes, built in |
| Use case | Bare metal, training | Edge, CI/CD, prod | Edge, IoT, dev | Automated prod | Compliance, prod |
What you will learn
This guide teaches you to install and maintain a Kubernetes cluster with kubeadm. By the end, you will be able to:
- Provision KVM VMs to host the cluster, understanding why each setting is needed
- Install containerd and the Kubernetes components, setting the cgroup driver correctly to avoid stability problems
- Initialize a cluster with kubeadm, understanding the role of each option and component
- Configure high availability with several control planes and a load balancer
- Upgrade the cluster to a new version while respecting the version skew rules
- Back up etcd, the critical database of the cluster, and know where to find the restore procedure
- Renew the certificates of the control plane before they expire, then restart its static Pods without losing control of the cluster
- Troubleshoot common problems with a structured method
Prerequisites
Why these hardware resources?
Before you create your VMs, understand why Kubernetes imposes strict minimums. The control plane hosts the API server, etcd, the scheduler and the controller-manager: these components use memory even at rest. With less than 2 GB of RAM, etcd will refuse to start or will crash under load. The workers run your application containers: 2 vCPUs let you run several Pods without excessive contention.
| Role | CPU | RAM | Disk | Quantity | Why these specs |
|---|---|---|---|---|---|
| Control plane | 2 vCPU | 2 GB | 20 GB | 1 (or 3 for HA) | etcd + API server + scheduler + controller-manager |
| Worker | 2 vCPU | 2 GB | 20 GB | 2+ | kubelet + application Pods |
For a production environment, at least double these values. For a test environment or CKA preparation, these minimums are enough.
Software required on the hypervisor
You need a Linux hypervisor with KVM to create the virtual machines. If you do not have a dedicated server, your workstation will do, as long as it has enough memory: 16 GB to run three VMs at the same time.
- KVM/QEMU and libvirt installed (the core of the virtualization)
- virt-manager or virsh to manage the VMs (graphical interface or CLI)
- An Ubuntu 24.04 or Rocky Linux 9 cloud image (preconfigured for cloud-init)
Network ports to open
Kubernetes components talk to each other through well-defined ports. With a firewall between the VMs, such as iptables, firewalld or a network appliance, you must open them explicitly. On a local network without a firewall, this step is pointless.
| Port | Component | Who connects | Why |
|---|---|---|---|
| 6443 | kube-apiserver | kubectl, kubelet, other control planes | Entry point for all communication with the cluster |
| 2379-2380 | etcd | API server, other etcd members (HA) | Cluster database, HA replication |
| 10250 | kubelet | API server, metrics-server | Pod management, retrieval of logs and metrics |
| 10257 | kube-controller-manager | Prometheus (optional) | Controller metrics |
| 10259 | kube-scheduler | Prometheus (optional) | Scheduler metrics |
| 179 (TCP) | Calico BGP | Other Calico nodes | Route exchange between nodes |
| 4789 (UDP) | Calico VXLAN | Other Calico nodes | Pod traffic encapsulated in VXLAN, the mode chosen by the Calico configuration of this guide |
| 5473 (TCP) | Calico Typha | Calico agents on the nodes | Relay between the API server and the Calico agents (Typha, deployed by the operator) |
The three Calico lines come from its network requirements for v3.32 and concern only Calico. With Flannel, open instead UDP port 8472 of its default VXLAN mode.
Creating the virtual machines with KVM
kubeadm does not provision machines: you have to build them before using it.
This section sets up three VMs under KVM, a choice that is not mandatory,
since any hypervisor or physical server would do. What matters is the
result: three systems that can reach each other, with a user that has
sudo and a stable address. If you already have machines, skip directly to the
next section.
Lab architecture
The diagram below shows the target architecture. One control plane node, cp1, hosts the management components, and two workers, worker1 and worker2, run your applications. All of them sit on the default libvirt virtual network, virbr0, in 192.168.122.0/24.

This architecture is enough to learn Kubernetes and prepare for the CKA. In production, you add two more control planes for high availability, covered in a dedicated section.
Downloading and preparing the cloud images
Cloud images are system disks preconfigured to initialize themselves through cloud-init. They configure themselves at first boot. Here we use the QCOW2 backing file: the base image stays untouched and each VM stores only its differences, which saves disk space and speeds up creation.
Ubuntu 24.04 LTS is recommended for its stability and its support until 2029. Its cloud image already ships cloud-init and the required kernel modules.
# Download the Ubuntu cloud image (about 700 MB)wget https://cloud-images.ubuntu.com/noble/current/noble-server-cloudimg-amd64.img \  -O /var/lib/libvirt/images/ubuntu-24.04-cloud.img
# Create a snapshot for each VM (20 GB max, but it starts small)# The backing file (-b) lets all the VMs share the base imageqemu-img create -f qcow2 -b /var/lib/libvirt/images/ubuntu-24.04-cloud.img \  -F qcow2 /var/lib/libvirt/images/cp1.qcow2 20Gqemu-img create -f qcow2 -b /var/lib/libvirt/images/ubuntu-24.04-cloud.img \  -F qcow2 /var/lib/libvirt/images/worker1.qcow2 20Gqemu-img create -f qcow2 -b /var/lib/libvirt/images/ubuntu-24.04-cloud.img \  -F qcow2 /var/lib/libvirt/images/worker2.qcow2 20G
Rocky Linux 9 is the RHEL-compatible alternative, free and maintained by the community. It is the natural choice if your company's fleet already runs RHEL.
# Download the Rocky Linux cloud image (about 1 GB)wget https://download.rockylinux.org/pub/rocky/9/images/x86_64/Rocky-9-GenericCloud.latest.x86_64.qcow2 \  -O /var/lib/libvirt/images/rocky-9-cloud.qcow2
# Create a snapshot for each VMqemu-img create -f qcow2 -b /var/lib/libvirt/images/rocky-9-cloud.qcow2 \  -F qcow2 /var/lib/libvirt/images/cp1.qcow2 20Gqemu-img create -f qcow2 -b /var/lib/libvirt/images/rocky-9-cloud.qcow2 \  -F qcow2 /var/lib/libvirt/images/worker1.qcow2 20Gqemu-img create -f qcow2 -b /var/lib/libvirt/images/rocky-9-cloud.qcow2 \  -F qcow2 /var/lib/libvirt/images/worker2.qcow2 20G
Configuring cloud-init
Cloud-init is the standard initialization tool for cloud instances. It sets the hostname, creates users, injects SSH keys and runs commands at first boot. Write two files per VM, one for the configuration and the other for the network, adapting the IP address and the hostname.
The first file below configures the control plane (cp1). The important points:
kubeuser: a dedicated account with passwordless sudo to simplify operations- SSH key: replace it with your public key to connect without a password
- Static IP, set by a second file,
network-config: it guarantees that the nodes keep the same IP after a reboot - Swap disabled: the kubelet refuses to start if swap is active
#cloud-confighostname: cp1fqdn: cp1.kube.localmanage_etc_hosts: true
users:  - name: kube    sudo: ALL=(ALL) NOPASSWD:ALL    groups: sudo    shell: /bin/bash    ssh_authorized_keys:      - ssh-ed25519 AAAA... your-public-key
# Commands run at first bootruncmd:  - swapoff -a  - sed -i '/swap/d' /etc/fstab
The static IP address does not go in this file: cloud-init reads the network configuration from a separate file, called network-config (here network-config-cp1.yaml), which cloud-localds puts on the same disk. A network: block left in the user-data would be ignored, and the VM would get an address over DHCP.
# Static network - adapt to your libvirt networkversion: 2ethernets: enp1s0: dhcp4: false addresses: - 192.168.122.10/24 routes: - to: default via: 192.168.122.1 nameservers: addresses: - 192.168.122.1Create the same pair of files for worker1 (IP .20) and worker2 (IP .21).
Creating the VMs with virt-install
With the images and the configuration ready, all that remains is to create the virtual machines. The cloud-localds command builds an ISO disk carrying the cloud-init configuration, which the VM reads at its first boot.
# Generate the cloud-init ISO for the control planecloud-localds --network-config=network-config-cp1.yaml \  /var/lib/libvirt/images/cp1-cidata.iso cloud-init-cp1.yaml
# Create the control plane VM# --import: use an existing disk instead of starting an installation# --noautoconsole: do not attach a console (the VM starts in the background)virt-install \  --name cp1 \  --ram 2048 \  --vcpus 2 \  --disk path=/var/lib/libvirt/images/cp1.qcow2,format=qcow2 \  --disk path=/var/lib/libvirt/images/cp1-cidata.iso,device=cdrom \  --os-variant ubuntu24.04 \  --network network=default \  --graphics none \  --console pty,target_type=serial \  --import \  --noautoconsole
Repeat the operation for worker1 and worker2, adapting the names, the cloud-init file and the network-config file.
Once the VMs have started, test the SSH connection. If it fails, check that your public key is correct in the cloud-init file.
ssh kube@192.168.122.10# Must connect without asking for a passwordInstalling the prerequisites on all nodes
This section prepares the system to run Kubernetes. Each step has a precise reason, and skipping a step causes problems that are hard to diagnose. Run these commands on all nodes (control plane and workers).
-
Configure the kernel modules for container networking
Kubernetes connects containers through virtual network bridges. The
overlaymodule allows layered storage of images, andbr_netfiltermakes the bridge traffic go through iptables. Without the second module, the Service rules do not apply.Terminal window # Load the modules at bootcat <<EOF | sudo tee /etc/modules-load.d/k8s.confoverlaybr_netfilterEOF# Load the modules immediately (without a reboot)sudo modprobe overlaysudo modprobe br_netfilterBoth modules must appear in the list of loaded modules.
Terminal window lsmod | grep -E 'overlay|br_netfilter'# br_netfilter 32768 0# overlay 151552 0 -
Configure sysctl for network forwarding
These kernel parameters let traffic cross the virtual interfaces. Without them, Pods can talk neither to each other nor to the outside world. The
ip_forwardparameter enables IP routing, which is essential since each node behaves as a router for its Pods.Terminal window cat <<EOF | sudo tee /etc/sysctl.d/k8s.confnet.bridge.bridge-nf-call-iptables = 1net.bridge.bridge-nf-call-ip6tables = 1net.ipv4.ip_forward = 1EOF# Apply without a rebootsudo sysctl --systemThe values must be 1.
Terminal window sysctl net.ipv4.ip_forward# net.ipv4.ip_forward = 1 -
Disable swap (mandatory)
The kubelet refuses to start as long as swap is active, and the reason is worth knowing: the scheduler decides placement from the memory that is actually available. A system that swaps makes these calculations wrong. If cloud-init has already disabled swap, the command has no effect.
Terminal window # Disable immediatelysudo swapoff -a# Remove the swap entry from fstab so that it persists across rebootssudo sed -i '/swap/d' /etc/fstabThe
freecommand must show no swap.Terminal window free -h | grep Swap# Swap: 0B 0B 0B -
Install containerd as the container runtime
Kubernetes needs a container runtime that conforms to the CRI (Container Runtime Interface). Since Kubernetes 1.24, the kubelet no longer talks directly to Docker Engine: it is dockershim that was removed, and Docker Engine remains usable through the cri-dockerd adapter. containerd has become the de facto standard: lightweight, stable, and a CNCF graduated project. We install it from the Docker repository because it provides up-to-date binaries.
Terminal window # Install the dependencies to add HTTPS repossudo apt-get updatesudo apt-get install -y ca-certificates curl gnupg# Add the GPG key of the Docker reposudo install -m 0755 -d /etc/apt/keyringscurl -fsSL https://download.docker.com/linux/ubuntu/gpg | \sudo gpg --dearmor -o /etc/apt/keyrings/docker.gpg# Add the Docker repoecho "deb [arch=$(dpkg --print-architecture) signed-by=/etc/apt/keyrings/docker.gpg] \https://download.docker.com/linux/ubuntu $(lsb_release -cs) stable" | \sudo tee /etc/apt/sources.list.d/docker.list# Install containerdsudo apt-get updatesudo apt-get install -y containerd.ioTerminal window # Add the Docker reposudo dnf config-manager --add-repo \https://download.docker.com/linux/centos/docker-ce.repo# Install containerdsudo dnf install -y containerd.io -
Configure containerd with the systemd cgroup driver
This is a critical step, and a classic omission. Kubernetes and containerd must use the same cgroup driver. On modern distributions with systemd, this driver must be
systemd(notcgroupfs). If you forget this configuration, the node becomes unstable or the kubelet fails with cryptic errors, depending on the containerd version: the lesson Join a worker to a kubeadm cluster details both cases.Terminal window # Generate the default configurationsudo mkdir -p /etc/containerdcontainerd config default | sudo tee /etc/containerd/config.toml# CRITICAL: enable the systemd cgroup driversudo sed -i 's/SystemdCgroup = false/SystemdCgroup = true/' /etc/containerd/config.toml# Restart to applysudo systemctl restart containerdsudo systemctl enable containerdCheck that containerd is active and that the configuration is in place.
Terminal window sudo systemctl status containerd# ● containerd.service - containerd container runtime# Active: active (running)grep SystemdCgroup /etc/containerd/config.toml# SystemdCgroup = true -
Install kubeadm, kubelet and kubectl
These three binaries form the core of the installation:
- kubeadm: the bootstrap tool that initializes the cluster and generates the certificates
- kubelet: the agent that runs on every node and manages the containers
- kubectl: the CLI to interact with the Kubernetes API
Terminal window # Add the GPG key of the Kubernetes reposudo mkdir -p /etc/apt/keyringscurl -fsSL https://pkgs.k8s.io/core:/stable:/v1.37/deb/Release.key | \sudo gpg --dearmor -o /etc/apt/keyrings/kubernetes-apt-keyring.gpg# Add the Kubernetes repoecho 'deb [signed-by=/etc/apt/keyrings/kubernetes-apt-keyring.gpg] \https://pkgs.k8s.io/core:/stable:/v1.37/deb/ /' | \sudo tee /etc/apt/sources.list.d/kubernetes.list# Install the componentssudo apt-get updatesudo apt-get install -y kubelet kubeadm kubectl# Block automatic updates (important for controlled upgrades)sudo apt-mark hold kubelet kubeadm kubectlThe
apt-mark holdcommand pins the three packages at their current version. This is the procedure of the official documentation, and it has a consequence that you will meet again at upgrade time:apt-get install -y kubeadm=<version>refuses to change a held package until it has been released withapt-mark unhold.Terminal window # Add the Kubernetes repocat <<EOF | sudo tee /etc/yum.repos.d/kubernetes.repo[kubernetes]name=Kubernetesbaseurl=https://pkgs.k8s.io/core:/stable:/v1.37/rpm/enabled=1gpgcheck=1gpgkey=https://pkgs.k8s.io/core:/stable:/v1.37/rpm/repodata/repomd.xml.keyexclude=kubelet kubeadm kubectl cri-tools kubernetes-cniEOF# Install the componentssudo dnf install -y kubelet kubeadm kubectl --disableexcludes=kubernetessudo systemctl enable kubeletCheck that the binaries are installed at the right version.
Terminal window kubeadm version# kubeadm version: &version.Info{Major:"1", Minor:"37", EmulationMajor:"",# EmulationMinor:"", MinCompatibilityMajor:"", MinCompatibilityMinor:"",# GitVersion:"v1.37.2", GitCommit:"c50e5395f1ae2d4a2c05f28fdcc38c0916cc1a32",# GitTreeState:"clean", BuildDate:"2026-10-27T12:04:00Z", GoVersion:"go1.26.10",# Compiler:"gc", Platform:"linux/amd64"}kubectl version --client# Client Version: v1.37.2# Kustomize Version: v5.8.1Two fields of this output are puzzling the first time. Since 1.36, the version structure carries
EmulationMajor/EmulationMinorandMinCompatibilityMajor/MinCompatibilityMinor, tied to the compatibility version. They are empty on a standard binary, and that is normal: they serve a kube-apiserver that must emulate the behavior of an earlier version during a rolling upgrade.
Initializing the cluster
Initializing the cluster is the moment when kubeadm generates all the control plane components: TLS certificates, configuration files, and static Pods. This step runs only on the first control plane node.
Understanding the kubeadm init options
Before running the command, understand each option so that you can adapt it to your environment:
| Option | Meaning | Why it matters |
|---|---|---|
--pod-network-cidr | Address range for the Pods | The CNI (Flannel, Calico) will use this CIDR. 10.244.0.0/16 is the Flannel default |
--apiserver-advertise-address | IP the API server listens on | The workers and kubectl will use this IP |
--control-plane-endpoint | Stable endpoint for the control plane | Essential for HA: lets you add other control planes later |
Recommended method: a YAML configuration file
Rather than long CLI options, use a kubeadm configuration file. It is reproducible, versionable and compatible with IaC (Ansible, Terraform).
Create a kubeadm-config.yaml file:
apiVersion: kubeadm.k8s.io/v1beta4kind: ClusterConfigurationkubernetesVersion: v1.37.2clusterName: cataloguecontrolPlaneEndpoint: "192.168.122.10:6443"networking: podSubnet: 10.244.0.0/16 serviceSubnet: 10.96.0.0/12---apiVersion: kubelet.config.k8s.io/v1beta1kind: KubeletConfigurationcgroupDriver: systemdThe clusterName field gives the cluster its name, kubernetes if you do not set it. The controlPlaneEndpoint field carries the address and port through which the other machines will reach the API server: replace 192.168.122.10 with the address of the node you are initializing. Read it on the node with hostname -I or ip -4 addr show. Then initialize with:
sudo kubeadm init --config kubeadm-config.yamlThe configuration file remains preferable to the command line, for four
reasons. It is versionable in Git, so it can be reviewed and compared from one
version to the next. It can be generated from Ansible or Terraform the day the
installation is industrialized. It gathers all the options in one
place, where a long command becomes unreadable. And it rules nothing out:
switching to high availability is done by adding --upload-certs to the
command, not to the file.
Initializing with the command line (alternative)
If you prefer not to create a YAML file for a quick lab, you can use the CLI options. On the cp1 node only, run the initialization:
sudo kubeadm init \ --pod-network-cidr=10.244.0.0/16 \ --apiserver-advertise-address=192.168.122.10 \ --control-plane-endpoint=192.168.122.10:6443A tip that costs nothing now and saves you from rebuilding the cluster
later: set --control-plane-endpoint even if high availability is not on the
agenda. This field fixes the address that all the clients will use, and it is what lets you add control planes
without recreating the cluster. If you have no load balancer, put the address of the
first control plane; what matters is that the field exists from the start.
Expected output (the tokens will be different):
Your Kubernetes control-plane has initialized successfully!
To start using your cluster, you need to run the following as a regular user:
  mkdir -p $HOME/.kube  sudo cp -i /etc/kubernetes/admin.conf $HOME/.kube/config  sudo chown $(id -u):$(id -g) $HOME/.kube/config
...
Then you can join any number of worker nodes by running the following on each as root:
kubeadm join 192.168.122.10:6443 --token abcdef.0123456789abcdef \    --discovery-token-ca-cert-hash sha256:...
Copy and save the kubeadm join command that is displayed: you will need it to join the workers, and its token expires after 24 hours. The lesson Join a worker to a kubeadm cluster explains how to regenerate it.
Configuring kubectl for the current user
kubectl needs a kubeconfig to know where to reach the API server and how to authenticate to it. The admin.conf file produced by kubeadm carries an administrator client certificate. We copy it into the home directory so that kubectl finds it without any option.
# Create the kubectl configuration directorymkdir -p $HOME/.kube
# Copy the admin configuration filesudo cp -i /etc/kubernetes/admin.conf $HOME/.kube/config
# Give ownership to the current usersudo chown $(id -u):$(id -g) $HOME/.kube/config
Test that kubectl can now contact the API server.
kubectl get nodesHere is the output captured on the course's lab cluster, right after kubeadm init. The control plane is named k8s-cp.lab there: on your machine, you will see the name of your own node.
NAME STATUS ROLES AGE VERSIONk8s-cp.lab NotReady control-plane 9s v1.37.2The NotReady status is normal at this stage: the CNI (Container Network Interface) is not installed yet. Without a CNI, Pods cannot get IP addresses and the node cannot be considered ready. The kubelet says so itself: the node's Ready condition carries this message.
container runtime network not ready: NetworkReady=false reason:NetworkPluginNotReady message:Network plugin returns error: cni plugin not initializedThe two coredns Pods are Pending too: as long as the node is not ready, they do not start. They will start once the CNI is in place.
If you initialized the cluster with a file, you can also check that kubeadm took it into account. kubeadm keeps the configuration it was given in the kubeadm-config ConfigMap of the kube-system namespace.
kubectl -n kube-system get configmap kubeadm-config -o yamlLook in the output for the clusterName and podSubnet fields: they must reuse the values of your file, here catalogue and 10.244.0.0/16.
Installing the CNI network plugin
The CNI (Container Network Interface) provides the network to the Pods. Without it, the Pods stay in Pending and the node in NotReady.
Choose your CNI according to your use case:
| CNI | Recommended use | NetworkPolicies | Complexity | When to use it |
|---|---|---|---|---|
| Flannel | Lab, demo, learning | No | Low | You are a beginner or do not need NetworkPolicies |
| Calico | Classic production | Yes | Medium | You need network isolation between namespaces |
| Cilium | Advanced production, observability | Yes, with eBPF | Higher | You want advanced network observability |
Flannel is the simplest CNI to set up, which makes it the right choice for learning and for the CKA. It does not enforce NetworkPolicies, a limit that has no consequence on a lab but is a deal breaker in production.
# Install Flannel, pinned versionkubectl apply -f https://github.com/flannel-io/flannel/releases/download/v0.28.10/kube-flannel.ymlCalico supports NetworkPolicies and offers more control over the network. It is recommended for serious self-managed clusters and for production. The sequence below matches Calico v3.32.2 on Kubernetes 1.37.2: it is the version whose image quay.io/calico/node:v3.32.2 runs on the lab cluster of this course.
Calico is installed through an operator, that is, a program that runs in the cluster and that deploys and maintains software according to the resources you declare. Since Calico 3.31, installation takes two manifests. The first, operator-crds.yaml, declares the resource types (the CRDs) that the operator will serve, including Installation and APIServer. The second, tigera-operator.yaml, now installs only the operator and its permissions. Without the first one, waiting for the CRDs fails with NotFound.
# 1. Declare the CRDs of the Tigera operator (Installation, APIServer, Calico resources)kubectl create -f https://raw.githubusercontent.com/projectcalico/calico/v3.32.2/manifests/operator-crds.yaml
# 2. Install the Tigera operatorkubectl create -f https://raw.githubusercontent.com/projectcalico/calico/v3.32.2/manifests/tigera-operator.yaml
# Check that the CRDs are registered before applying the Installationkubectl wait --for=condition=Established crd/installations.operator.tigera.io --timeout=60skubectl wait --for=condition=Established crd/apiservers.operator.tigera.io --timeout=60s
# Deploy Calico with the CIDR consistent with the one of kubeadm init (podSubnet)cat <<EOF | kubectl apply -f -apiVersion: operator.tigera.io/v1kind: Installationmetadata: name: defaultspec: calicoNetwork: ipPools: - blockSize: 26 cidr: 10.244.0.0/16 encapsulation: VXLANCrossSubnet natOutgoing: Enabled nodeSelector: all()---apiVersion: operator.tigera.io/v1kind: APIServermetadata: name: defaultspec: {}EOFThe two kubectl wait --for=condition=Established commands act as a check:
they confirm that the CRDs are registered before you declare the
Installation. If you forgot operator-crds.yaml, they say so at once,
without waiting for their 60 seconds:
Error from server (NotFound): customresourcedefinitions.apiextensions.k8s.io "installations.operator.tigera.io" not foundThis NotFound, exit code 1, points to the missing first manifest, not to an
operator failure.
The operator then deploys Calico by itself, in one to two minutes on the lab cluster (48 to 108 seconds depending on the rebuild). To know when it has finished, read the tigerastatus resources, the state that the operator publishes for each component: all of them must reach Available. All of Calico runs in the calico-system namespace, its API server included.
# List the components the operator has createdkubectl get tigerastatusRun this command again until it lists the four components: apiserver, calico, ippools and tiers. Then start the wait, which returns once all of them are Available:
kubectl wait --for=condition=Available tigerastatus --all --timeout=300skubectl get pods -n calico-systemHere are both outputs on the course's lab cluster, captured at the second the last tigerastatus reaches Available. At this stage, the worker is not joined yet: you see a single calico-node and a single csi-node-driver, those of the control plane. The two calico-apiserver Pods are the Calico API server, in two replicas.
$ kubectl get tigerastatusNAME        AVAILABLE   PROGRESSING   DEGRADED   SINCE   MESSAGEapiserver   True        False         False      10s     All objects availablecalico      True        False         False      0s      All objects availableippools     True        False         False      31s     All objects availabletiers       True        False         False      5s      All objects available
$ kubectl get pods -n calico-systemNAME                                      READY   STATUS    RESTARTS   AGEcalico-apiserver-7995fd6855-p74b7         1/1     Running   0          39scalico-apiserver-7995fd6855-sj7kn         1/1     Running   0          39scalico-kube-controllers-b6c5887f9-76qx4   1/1     Running   0          38scalico-node-rn7x6                         1/1     Running   0          37scalico-typha-6f9b894597-gdp66             1/1     Running   0          39scsi-node-driver-k5mmm                     2/2     Running   0          38s
The tigerastatus resources exist only once the operator is at work. Run within a second of the Installation, kubectl wait finds nothing yet and stops at once with exit code 1, without waiting for its timeout:
error: no matching resources foundThis is not a failure, but running it again needs one precaution. kubectl wait --all only waits for the resources that exist when it starts: a tigerastatus created afterwards escapes it, and the command can return before Calico is ready. So wait until kubectl get tigerastatus lists the four components, then run kubectl wait. On the lab cluster, the four are created in the same second.
The Flannel command creates a dedicated namespace, a DaemonSet, ConfigMaps and the required RBAC; with Calico, the Pods live in the calico-system namespace, and the tigerastatus resources tell you when the operator has finished.
The node must become Ready and the Pods of the chosen CNI must be running. With Calico, run kubectl get pods -n calico-system instead of the Flannel command below.
# The node must now be Readykubectl get nodes# Captured on the lab cluster (node k8s-cp.lab), after Calico# NAME         STATUS   ROLES           AGE   VERSION# k8s-cp.lab   Ready    control-plane   88s   v1.37.2
# With Flannel, one kube-flannel-ds-<suffix> Pod per node must be Running, READY 1/1kubectl get pods -n kube-flannel
# Also check the system Podskubectl get pods -n kube-system# All the Pods must be Running or Completed
The control plane is now ready. To add a worker to it, follow the lesson Join a worker to a kubeadm cluster: it prepares the worker,
produces the kubeadm join command with kubeadm token create --print-join-command, checks that the node is Ready and explains why a
join fails.
High availability configuration
In production, a single control plane is a single point of failure. If it goes down, the API server becomes unreachable and the cluster can no longer be driven. The workers keep running the existing Pods, but no deployment, scaling or change succeeds anymore.
High availability answers this risk with three control planes and a load balancer in front of them. Losing one node leaves the other two to serve.
Why three, and not two? etcd records a write only if a majority of its members, the quorum, that is, more than half of them, has accepted it. With three members, the quorum is two: the cluster survives the loss of one node. With two members, the quorum is still two: losing a single node blocks etcd, so two control planes protect against nothing. A fourth member does not help any more, because the quorum then rises to three.
The table below gives these figures, from the etcd FAQ. An even number of members tolerates no more failures than the odd number just below it, so you choose an odd number, three or five. The lesson High availability of the control plane details what really happens when a member goes down.
| etcd members | Quorum | Failures tolerated |
|---|---|---|
| 2 | 2 | 0 |
| 3 | 2 | 1 |
| 4 | 3 | 1 |
| 5 | 3 | 2 |
Choosing your etcd topology
Kubernetes HA supports two etcd architectures. Understand the differences before choosing:
| Architecture | Description | Advantages | Drawbacks | When to use it |
|---|---|---|---|---|
| Stacked etcd | etcd on the same nodes as the control plane | Fewer VMs, simpler | Control plane/etcd coupling, risk of resource contention | Lab, CKA, small clusters |
| External etcd | Dedicated etcd cluster (3 separate VMs) | Resource isolation, independent scaling | More VMs, certificate complexity | Critical production, large clusters |
This guide uses stacked etcd (the default topology of kubeadm).
Watch out: the load balancer as a SPOF
The load balancer itself (HAProxy) can become a single point of failure. In strict production:
- Use 2 HAProxy instances with Keepalived for a floating VIP
- Or a cloud load balancer (AWS ELB, GCP LB) that is natively HA
HA architecture
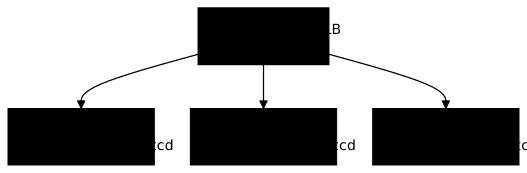
The diagram below shows a common HA architecture. HAProxy spreads the traffic across the API servers, each control plane hosts its own etcd, which is called the stacked topology, and the workers know only the load balancer.
Installing HAProxy on a dedicated VM
HAProxy balances API server port 6443 at the TCP level. Dedicate a VM to it, or reuse an existing load balancer. In this guide, the HAProxy VM has the address 192.168.122.5: it is the stable address that the control planes and the workers will use to reach the API. Create it like cp1, with its two cloud-init files, as well as cp2 (192.168.122.11) and cp3 (192.168.122.12). The TCP health check automatically removes from service a control plane that no longer answers.
sudo apt-get install -y haproxyConfigure HAProxy to spread the traffic across the three control planes. The tcp mode is mandatory: the API server speaks TLS, and the load balancer must absolutely not terminate the encrypted connection.
global    daemon    maxconn 256
defaults    mode tcp    timeout connect 5000ms    timeout client 50000ms    timeout server 50000ms
frontend kubernetes-frontend    bind *:6443    default_backend kubernetes-backend
backend kubernetes-backend    balance roundrobin    option tcp-check    server cp1 192.168.122.10:6443 check    server cp2 192.168.122.11:6443 check    server cp3 192.168.122.12:6443 check
Restart HAProxy and check that it listens on port 6443:
sudo systemctl restart haproxysudo systemctl enable haproxy
# Check that HAProxy is listeningss -tlnp | grep 6443# LISTEN  0  128  *:6443  *:*  users:(("haproxy",...))
Initializing the first HA control plane
HA initialization differs by the --upload-certs option, which encrypts the cluster certificates and stores them in a Secret. The next control planes fetch them at join time, with no manual copy. So that 192.168.122.5 serves as the endpoint from the start, this command replaces the kubeadm init of the previous section: run it on a fresh cp1, or after a kubeadm reset -f.
sudo kubeadm init \ --pod-network-cidr=10.244.0.0/16 \ --control-plane-endpoint="192.168.122.5:6443" \ --upload-certsTwo options deserve an explanation:
--control-plane-endpointpoints to HAProxy (not to cp1)--upload-certsgenerates a decryption key valid for 2 hours
The output displays two kubeadm join commands:
- One for the workers (without
--control-plane) - One for the control planes (with
--control-plane --certificate-key)
Joining the other control planes
On cp2 and cp3, run the special command for control planes:
sudo kubeadm join 192.168.122.5:6443 \ --token abcdef.0123456789abcdef \ --discovery-token-ca-cert-hash sha256:... \ --control-plane \ --certificate-key ...The three control planes must appear with the control-plane role.
kubectl get nodes# NAME STATUS ROLES AGE VERSION# cp1 Ready control-plane 10m v1.36.0# cp2 Ready control-plane 5m v1.36.0# cp3 Ready control-plane 3m v1.36.0This output of the HA cluster was captured with 1.36.0 and was not replayed on 1.37.2. The shape and the control-plane role of the three nodes are what you will get; only the VERSION column changes.
Upgrading the cluster
Upgrading a cluster is a skill expected at the CKA. Kubernetes publishes three minor versions per year, and the exercise is to follow this pace without any service interruption.
Version skew rules
Kubernetes imposes strict compatibility rules between versions. The version skew defines the version gap allowed between components:
| Component | Skew allowed relative to kube-apiserver |
|---|---|
| kubelet | up to -3 minor versions, never newer than the API (e.g. API 1.37 → kubelet 1.34 OK) |
| kubectl | ±1 minor version |
| kube-controller-manager, kube-scheduler | Same version or -1 |
In practice, upgrade the control plane before the workers, and do not skip a minor version.
Two rules govern the order of operations, and breaking them blocks the
upgrade rather than breaking the cluster. The first forbids
skipping a minor version: from 1.35, you go through 1.36 before
reaching 1.37. The second sets the order within a single step:
kubeadm first, then kubeadm upgrade apply, and only afterwards
kubelet and kubectl.
Upgrading the control plane
Upgrading the control plane takes several steps. This procedure minimizes the downtime of the API server.
The outputs of this section come from a two-node lab cluster, k8s-cp.lab (control plane) and k8s-w1.lab (worker), built on 1.36 and then moved to 1.37.2 on 2026-11-12. The kubeadm, kubelet and kubectl packages are held there by apt-mark hold, as in the installation procedure of this guide. This precaution has a direct consequence: apt-get install -y kubeadm=1.37.2-1.1 on a held package fails with E: Held packages were changed and -y was used without --allow-change-held-packages. (exit code 100). Each installation below is therefore wrapped between apt-mark unhold before and apt-mark hold after.
Four checks before you launch anything, none of which is optional. Back up etcd (see Backing up etcd), it is the only way back if the operation goes wrong. Read the release notes of the target, looking for behavior changes. Check the skew, no minor version jump is allowed. And if your nodes sit behind a mirror, prepare the images in advance (see step 3 below).
-
Check the available versions
First of all, look at which versions the repository actually offers. This lets you plan the upgrade and check that the target version exists.
Terminal window # List the 1.37 versions of kubeadmapt-cache madison kubeadm | grep 1.37Output kubeadm | 1.37.2-1.1 | https://pkgs.k8s.io/core:/stable:/v1.37/deb Packageskubeadm | 1.37.1-1.1 | https://pkgs.k8s.io/core:/stable:/v1.37/deb Packageskubeadm | 1.37.0-1.1 | https://pkgs.k8s.io/core:/stable:/v1.37/deb PackagesThe first line is the most recent: we aim for
1.37.2-1.1.The
pkgs.k8s.iorepository is versioned by minor version, which is surprising the first time. To see the1.37.xpackages, you must first declare thev1.37repository:/etc/apt/sources.list.d/kubernetes.listmust point tohttps://pkgs.k8s.io/core:/stable:/v1.37/deb/. Without this step,apt-cache madisonwill list only the current minor version, and you will wrongly conclude that the target version does not exist. -
Upgrade kubeadm first
kubeadm itself must be at the target version before it can apply it. So we lift the package hold, upgrade, then hold again so that a system update does not carry it away.
Terminal window # Refresh the package cachesudo apt-get update# Unhold, install the new version, hold againsudo apt-mark unhold kubeadm && \sudo apt-get install -y kubeadm=1.37.2-1.1 && \sudo apt-mark hold kubeadm# Check the installed versionkubeadm version -o short# v1.37.2 -
Check the upgrade plan
This command displays exactly what will be upgraded, checks the prerequisites and flags the obstacles. Read its output in full before going further.
Terminal window sudo kubeadm upgrade planOutput (excerpt) [upgrade/versions] Cluster version: 1.36.6[upgrade/versions] kubeadm version: v1.37.2[upgrade/versions] Target version: v1.37.2[upgrade/versions] Latest version in the v1.36 series: v1.36.6Components that must be upgraded manually after you have upgraded the control plane with 'kubeadm upgrade apply':COMPONENT NODE CURRENT TARGETkubelet k8s-cp.lab v1.36.4 v1.37.2kubelet k8s-w1.lab v1.36.4 v1.37.2Upgrade to the latest stable version:COMPONENT NODE CURRENT TARGETkube-apiserver k8s-cp.lab v1.36.6 v1.37.2kube-controller-manager k8s-cp.lab v1.36.6 v1.37.2kube-scheduler k8s-cp.lab v1.36.6 v1.37.2kube-proxy 1.36.6 v1.37.2CoreDNS v1.14.2 v1.14.6etcd k8s-cp.lab 3.6.8-0 3.7.0-0You can now apply the upgrade by executing the following command:kubeadm upgrade apply v1.37.2Look first at
Cluster versionandTarget version: they say where you start from and where you are going. The two tables then list what changes. Here, the control plane is on 1.36.6 and the kubelets on v1.36.4, which is normal: the kubelets are upgraded after the control plane, and by hand, hence the first table. Finally, note the bundled version jumps: CoreDNS v1.14.2 → v1.14.6 and etcd 3.6.8-0 → 3.7.0-0. For the full list of the images packaged with 1.37:Terminal window kubeadm config images list --kubernetes-version v1.37.2Output registry.k8s.io/kube-apiserver:v1.37.2registry.k8s.io/kube-controller-manager:v1.37.2registry.k8s.io/kube-scheduler:v1.37.2registry.k8s.io/kube-proxy:v1.37.2registry.k8s.io/coredns/coredns:v1.14.6registry.k8s.io/pause:3.10.2registry.k8s.io/etcd:3.7.0-0This list is only correct if the command is run by the kubeadm of the target version. With kubeadm 1.36.4 still installed, the same command announces
coredns v1.14.2andetcd 3.6.8-0, the images of 1.36: one more reason to upgrade kubeadm before anything else.If your nodes cannot reach
registry.k8s.iodirectly, do not discover the problem in the middle of the upgrade: fetch the images in advance on each node withkubeadm config images pull --kubernetes-version v1.37.2. On a cluster isolated behind a mirror, this step makes the difference between an upgrade that runs in one go and an outage that drags on. -
Apply the upgrade
This command upgrades the control plane components: it downloads the images, rewrites the static Pod manifests and restarts the components one by one. The application Pods keep running. On a single control plane, the API is cut while etcd and then kube-apiserver restart, an interruption of the same order as the one measured when renewing the certificates. Avoid any deployment during this time.
Terminal window sudo kubeadm upgrade apply v1.37.2 --yesWithout
--yes, kubeadm stops at the question[upgrade] Are you sure you want to proceed? [y/N]:and waits for ay. On the lab cluster, the operation took about 2 min 40 s.Output (excerpt) [upgrade/staticpods] Preparing for "etcd" upgrade[upgrade/staticpods] Waiting for the kubelet to restart the component[apiclient] Found 1 Pods for label selector component=etcd[upgrade/staticpods] Component "etcd" upgraded successfully![upgrade/staticpods] Preparing for "kube-apiserver" upgrade[upgrade/staticpods] Component "kube-apiserver" upgraded successfully!... (same for kube-controller-manager and kube-scheduler)[upgrade/control-plane] The control plane instance for this node was successfully upgraded![upgrade/kubelet-config] The kubelet configuration for this node was successfully upgraded![addons] Applied essential addon: CoreDNS[addons] Applied essential addon: kube-proxy[upgrade] SUCCESS! A control plane node of your cluster was upgraded to "v1.37.2".What counts in this output is the last line,
SUCCESS!. An error line may appear while etcd restarts, for exampleUnexpected error when reading response body ... net/http: request canceled (Client.Timeout ...). It is harmless: on the lab cluster,Component "etcd" upgraded successfully!is displayed right after and the upgrade ends normally.What
kubeadm upgrade applydoes is worth knowing, because it tells you where to look if the operation goes wrong. For each static Pod of the control plane,kube-apiserver,kube-controller-manager,kube-schedulerandetcd, kubeadm proceeds in three steps: it backs up the old manifest in/etc/kubernetes/tmp/kubeadm-backup-manifests-<timestamp>/, writes the new one in/etc/kubernetes/manifests/, then waits for the kubelet to restart the Pod. This backup directory is your safety net in case of a rollback. -
Upgrade kubelet and kubectl
kubelet and kubectl must be upgraded separately. The kubelet manages the Pods on this node, so a restart is required. As for kubeadm, we unhold the packages, install, then hold again.
Terminal window # Unhold, install the new versions, hold againsudo apt-mark unhold kubelet kubectl && \sudo apt-get install -y kubelet=1.37.2-1.1 kubectl=1.37.2-1.1 && \sudo apt-mark hold kubelet kubectl# Reload the systemd configuration and restart kubeletsudo systemctl daemon-reloadsudo systemctl restart kubeletThe control plane node must show the new version.
Terminal window kubectl get nodesOutput NAME STATUS ROLES AGE VERSIONk8s-cp.lab Ready control-plane 3m29s v1.37.2k8s-w1.lab Ready <none> 3m17s v1.36.4The control plane shows
v1.37.2, the worker stays onv1.36.4: the worker is what remains to be upgraded. -
Check the add-ons after the upgrade
After the upgrade, check that the critical components still work:
Terminal window # Check CoreDNSkubectl get pods -n kube-system -l k8s-app=kube-dns# All must be Running# Check kube-proxykubectl get pods -n kube-system -l k8s-app=kube-proxy# DaemonSet, one Pod per node# Check the CNI (Flannel or Calico)kubectl get pods -n kube-flannel # or -n calico-system# All must be Running# Check that there are no errors in the eventskubectl get events -A --field-selector type=Warning --sort-by='.lastTimestamp' | head -10
Upgrading the workers
Workers are upgraded one by one, so that the applications keep being served. This section assumes a worker that has already joined, as in the lesson Join a worker to a kubeadm cluster. The drain, upgrade, uncordon sequence guarantees that the Pods are moved away before any intervention on the node.
-
Drain the node to evacuate the Pods
The drain cleanly moves the Pods to the other nodes. The DaemonSets stay, since they must run everywhere. Pods carrying an emptyDir volume lose their data, which the
--delete-emptydir-dataoption makes you accept explicitly.Terminal window # From the control planekubectl drain k8s-w1.lab --ignore-daemonsets --delete-emptydir-dataOutput (Calico through the operator) node/k8s-w1.lab cordonedWarning: ignoring DaemonSet-managed Pods: calico-system/calico-node-2v6pv, calico-system/csi-node-driver-ncsj9, kube-system/kube-proxy-2b5xrevicting pod kube-system/coredns-559f6c778d-dm898evicting pod kube-system/coredns-559f6c778d-4h8nbpod/coredns-559f6c778d-dm898 evictedpod/coredns-559f6c778d-4h8nb evictednode/k8s-w1.lab drainedThe node is first cordoned (no new Pod is placed on it any more), then its Pods are evicted one by one, except those of a DaemonSet. Check that the node does carry
SchedulingDisabled:Terminal window kubectl get nodesOutput NAME STATUS ROLES AGE VERSIONk8s-cp.lab Ready control-plane 3m31s v1.37.2k8s-w1.lab Ready,SchedulingDisabled <none> 3m19s v1.36.4 -
Upgrade kubeadm and kubelet on the worker
These commands run on the worker, not on the control plane.
kubeadm upgrade nodeupgrades the local kubelet configuration, not the control plane. As on the control plane, each installation is wrapped betweenapt-mark unholdandapt-mark hold, otherwiseapt-get install -yrefuses to touch the held packages.Terminal window # On the worker (SSH to k8s-w1.lab)# Add the v1.37 repository (same as on the control plane)curl -fsSL https://pkgs.k8s.io/core:/stable:/v1.37/deb/Release.key \| sudo gpg --dearmor -o /etc/apt/keyrings/kubernetes-1.37-keyring.gpgecho "deb [signed-by=/etc/apt/keyrings/kubernetes-1.37-keyring.gpg] \https://pkgs.k8s.io/core:/stable:/v1.37/deb/ /" \| sudo tee /etc/apt/sources.list.d/kubernetes-1.37.listsudo apt-get update# 1. kubeadm firstsudo apt-mark unhold kubeadm && \sudo apt-get install -y kubeadm=1.37.2-1.1 && \sudo apt-mark hold kubeadm# 2. Upgrade the local kubelet configurationsudo kubeadm upgrade node# 3. Then kubelet, and its restartsudo apt-mark unhold kubelet && \sudo apt-get install -y kubelet=1.37.2-1.1 && \sudo apt-mark hold kubeletsudo systemctl daemon-reloadsudo systemctl restart kubeletThe
kubeadm upgrade nodecommand must end with these lines:Output (excerpt of kubeadm upgrade node) [upgrade/preflight] Skipping prepull. Not a control plane node.[upgrade/control-plane] Skipping phase. Not a control plane node.[upgrade/kubeconfig] Skipping phase. Not a control plane node.[upgrade] Backing up kubelet config file to /etc/kubernetes/tmp/kubeadm-kubelet-config-2026-11-12-21-00-07/config.yaml[kubelet-start] Writing kubelet configuration to file "/var/lib/kubelet/config.yaml"[upgrade/kubelet-config] The kubelet configuration for this node was successfully upgraded![upgrade/addon] Skipping the addon/coredns phase. Not a control plane node.[upgrade/addon] Skipping the addon/kube-proxy phase. Not a control plane node.The
Skippinglines are normal: a worker hosts neither a control plane nor an add-on to upgrade, only the kubelet configuration changes. -
Put the node back in service
Once the upgrade is done, allow scheduling on this node again. The pending Pods will automatically be scheduled onto it.
Terminal window # From the control planekubectl uncordon k8s-w1.lab# node/k8s-w1.lab uncordoned# Check that the node is Ready and at the new versionkubectl get nodes -o wideOutput NAME STATUS ROLES AGE VERSION INTERNAL-IP EXTERNAL-IP OS-IMAGE KERNEL-VERSION CONTAINER-RUNTIMEk8s-cp.lab Ready control-plane 4m8s v1.37.2 10.10.50.11 <none> Ubuntu 24.04.5 LTS 6.8.0-147-generic (amd64) containerd://2.2.1k8s-w1.lab Ready <none> 3m56s v1.37.2 10.10.50.12 <none> Ubuntu 24.04.5 LTS 6.8.0-147-generic (amd64) containerd://2.2.1Both nodes are
Ready, withoutSchedulingDisabled, and show the samev1.37.2version: the upgrade is complete.
Repeat this procedure for each worker, one at a time. In production, wait for the Pods to be stable on a node before moving on to the next one.
Backing up and restoring etcd
etcd is the database of the Kubernetes cluster. It holds everything: Deployments, Services, Secrets, ConfigMaps, Pod state, and so on. If etcd is corrupted or lost without a backup, the cluster is unrecoverable. Regular backup of etcd is therefore critical in production.
Understanding where etcd data is stored
etcd runs as a static Pod on each control plane. Its data lives in /var/lib/etcd/, its certificates in /etc/kubernetes/pki/etcd/. Any interaction with it requires three of them:
| Certificate | Path | Role |
|---|---|---|
| CA | /etc/kubernetes/pki/etcd/ca.crt | etcd certificate authority |
| Client certificate | /etc/kubernetes/pki/etcd/healthcheck-client.crt | Client authentication |
| Private key | /etc/kubernetes/pki/etcd/healthcheck-client.key | Request signing |
Backing up etcd
The backup creates a snapshot of all the etcd data. This operation is non-blocking and can be run on a production cluster.
Where to find etcdctl, which is not on the node
First surprise: etcdctl is not installed by kubeadm. Checked on a
node of this course, command -v etcdctl returns nothing. You can call the
binary where it already lives, in the etcd container itself, without
installing anything: this is the path followed in this section. To install etcdctl and
etcdutl on the node, from the official archive whose digest you verify,
follow the section
How do you install etcdctl and etcdutl on a node?.
The etcd container answers like this:
kubectl -n kube-system exec etcd-<node-name> -- etcdctl versionetcdctl version: 3.7.0API version: 3.7Call etcdctl directly, without going through sh -c: the etcd image
contains no shell, and any wrapped command fails with
"sh": executable file not found in $PATH.
The snapshot is written to /var/lib/etcd, and not to /tmp. This directory is the data volume of etcd, mounted from the node: the file is therefore immediately readable on the machine. Written to the container's /tmp, it would stay locked inside, and kubectl cp cannot get it out, for lack of tar in the image.
After a restore done as in the lesson Back up and restore Kubernetes, the container's /var/lib/etcd corresponds to /var/lib/etcd-restaure on the node: the file is then read in that directory, and a sudo cp /var/lib/etcd/snapshot.db on the node fails.
# Create an etcd snapshot, from the etcd container, in its data volumekubectl -n kube-system exec etcd-<node-name> -- etcdctl snapshot save /var/lib/etcd/snapshot.db \ --endpoints=https://127.0.0.1:2379 \ --cacert=/etc/kubernetes/pki/etcd/ca.crt \ --cert=/etc/kubernetes/pki/etcd/healthcheck-client.crt \ --key=/etc/kubernetes/pki/etcd/healthcheck-client.keyThe command ends with Snapshot saved at /var/lib/etcd/snapshot.db. The file is first written as snapshot.db.part, then renamed: a leftover .part signals an interrupted backup.
Two clarifications on this command. First, do not add ETCDCTL_API=3:
with etcd 3.7, version 3 is the only API, and the variable triggers
the warning unrecognized environment variable. Second, the client
certificate used here is healthcheck-client, intended for this use;
server.crt works too, but it means diverting a server certificate to a
client role.
Then check that the snapshot is valid and contains data. In etcd 3.7, etcdctl snapshot offers only save; verification belongs to etcdutl, which is also present in the etcd image:
kubectl -n kube-system exec etcd-<node-name> -- \ etcdutl snapshot status /var/lib/etcd/snapshot.db --write-out=table┌──────────┬──────────┬────────────┬────────────┬─────────┐│ HASH │ REVISION │ TOTAL KEYS │ TOTAL SIZE │ VERSION │├──────────┼──────────┼────────────┼────────────┼─────────┤│ 642e758b │ 257204 │ 360 │ 40 MB │ 3.7.0 │└──────────┴──────────┴────────────┴────────────┴─────────┘etcdctl snapshot status is not an alternative, and that is the trap. Calling
etcdctl snapshot status does not fail: the command prints the help of
snapshot and exits with 0. A backup script that checks its snapshot this way
reports a success without having opened the file.
The file is now on the node. Copy it out of /var/lib/etcd, then off the node:
# On the control planesudo install -d -m 0700 /backupssudo cp /var/lib/etcd/snapshot.db /backups/etcd-$(date +%Y%m%d-%H%M%S).dbA snapshot left on the node it backs up is useless the day that node disappears. Four rules separate a backup from the illusion of a backup. Externalize the snapshots to S3, GCS, NFS or any remote storage. Encrypt them: they contain all the Secrets of the cluster, in clear text as long as encryption at rest is not enabled, which makes them the most sensitive object of your infrastructure. Test the restore on a throwaway cluster, every month, otherwise you will not know whether your files are usable. And keep at least seven days of history, because a corruption is not always noticed the same day.
Before an upgrade, and to restore
Before a control plane upgrade, take a snapshot with the commands above,
verify it with etcdutl snapshot status, then copy it off the node. It lets
you restore the pre-upgrade data if the upgrade fails, but only onto an etcd
of the same major and minor version (for example 3.7) as the one that produced
it: going back therefore also means putting back the pre-upgrade manifests.
These manifests do not bring the kubelet back: a kubelet that has already been
upgraded would be newer than the API server, which the Kubernetes version skew
policy does not allow. This rollback therefore applies to a failure that
occurred before the kubelet upgrade.
Restoring a snapshot is a destructive operation, and it has its own lesson:
Back up and restore Kubernetes
gives the reference procedure, with the installation of etcdutl, the options
to pass and the verification of the result.
Renewing certificates
The Kubernetes certificates generated by kubeadm expire after 1 year by default. An expired certificate completely blocks access to the cluster: kubectl no longer works, and the nodes lose contact with the API server. The lesson Kubernetes cluster PKI: authorities and certificates explains what each authority signs and how to read a certificate; this section gives the renewal procedure.
Checking certificate expiry
This command displays the expiry date of each certificate. Plan the renewal before expiry.
sudo kubeadm certs check-expiration[check-expiration] Reading configuration from the "kubeadm-config" ConfigMap in namespace "kube-system"...[check-expiration] Use 'kubeadm init phase upload-config kubeadm --config your-config-file' to re-upload it.
CERTIFICATE EXPIRES RESIDUAL TIME CERTIFICATE AUTHORITY EXTERNALLY MANAGEDadmin.conf Nov 10, 2027 21:44 UTC 364d ca noapiserver Nov 10, 2027 21:44 UTC 364d ca noapiserver-etcd-client Nov 10, 2027 21:44 UTC 364d etcd-ca noapiserver-kubelet-client Nov 10, 2027 21:44 UTC 364d ca no[...]super-admin.conf Nov 10, 2027 21:44 UTC 364d ca no
CERTIFICATE AUTHORITY EXPIRES RESIDUAL TIME EXTERNALLY MANAGEDca Nov 07, 2036 21:44 UTC 9y noetcd-ca Nov 07, 2036 21:44 UTC 9y nofront-proxy-ca Nov 07, 2036 21:44 UTC 9y noWatch the RESIDUAL TIME column of the first table, the authority certificates (second table) being valid for 9 years here. Renew when less than 30 days remain.
One distinction saves you from watching what needs no watching. Kubeadm
configures by default the automatic rotation of the kubelet client
certificates: those renew themselves before expiry, and you have nothing to
do. The ones that need manual intervention are those of the control
plane: API server, etcd, controller-manager, scheduler, and the kubeconfig
files that go with them. This is exactly the list returned by kubeadm certs check-expiration.
Renewing all certificates
The kubeadm certs renew all command regenerates the control plane certificates with a new validity of one year, and also renews the kubeconfig files that kubeadm manages (admin.conf, controller-manager.conf, scheduler.conf and super-admin.conf). It does not touch the certificate authority, valid for 10 years by default.
On a cluster with several control planes, run it on each of them. A control plane upgrade with kubeadm upgrade already renews all these certificates, unless you pass --certificate-renewal=false.
sudo kubeadm certs renew all[renew] Reading configuration from the "kubeadm-config" ConfigMap in namespace "kube-system"...[renew] Use 'kubeadm init phase upload-config kubeadm --config your-config-file' to re-upload it.
certificate embedded in the kubeconfig file for the admin to use and for kubeadm itself renewedcertificate for serving the Kubernetes API renewedcertificate the apiserver uses to access etcd renewedcertificate for the API server to connect to kubelet renewedcertificate embedded in the kubeconfig file for the controller manager to use renewedcertificate for liveness probes to healthcheck etcd renewedcertificate for etcd nodes to communicate with each other renewedcertificate for serving etcd renewedcertificate for the front proxy client renewedcertificate embedded in the kubeconfig file for the scheduler manager to use renewedcertificate embedded in the kubeconfig file for the super-admin renewed
Done renewing certificates. You must restart the kube-apiserver, kube-controller-manager, kube-scheduler and etcd, so that they can use the new certificates.The command renews eleven certificates, and its last line asks you to restart the four components of the control plane. The kubeadm documentation says the same thing ("you should restart the control plane Pods").
A measurement of 13 November 2026 (kubeadm 1.37.2) qualifies this advice for
the serving certificates only. After kubeadm certs renew apiserver and kubeadm certs renew etcd-server, with nothing restarted, the API server (port 6443) and etcd
(port 2379) served the new certificate in less than 25 seconds: their
containers were the same, with the same creation date. But renew all
also renews the client certificates, etcd-peer and the kubeconfig
files. So restart the four static Pods (kube-apiserver,
kube-controller-manager, kube-scheduler and etcd) without counting on a
reload.
The controller-manager and the scheduler, in particular, read the client
certificate of their kubeconfig (/etc/kubernetes/controller-manager.conf and
/etc/kubernetes/scheduler.conf) only at startup: without a restart, they
keep the old certificate and stop working the day it expires.
For etcd-peer, the certificate used for exchanges between etcd members, the serial
number changes and the expiry starts again at one year. Once etcd is restarted,
etcdctl endpoint health answers is healthy. The etcd page details the
renewal of the certificates specific to etcd.
These are static Pods, which the kubelet starts from the manifests in
/etc/kubernetes/manifests/. Deleting their Pod with kubectl is useless,
since the kubelet immediately recreates the mirror Pod from the file. To
restart a component, move its manifest out of the directory, wait for the
kubelet to stop the container, then put the manifest back in place. Do it
one component at a time, in the order etcd, kube-apiserver,
kube-controller-manager, kube-scheduler.
Plan for an API outage. On the measurement of 13 November 2026 (kubeadm
1.37.2, two nodes), kubectl failed for about 41 seconds in total:
stopping etcd took 7 seconds, and stopping kube-apiserver, which shuts down
gracefully, took 31 seconds. Restarting the controller-manager and the
scheduler caused no API outage. During the outage, only crictl,
run on the node, lets you follow the operation.
The kubelet re-reads the directory only at regular intervals (fileCheckFrequency,
20 seconds by default according to the
KubeletConfiguration reference,
read on 13 November 2026). It therefore notices the removal of the manifest at the latest
within that delay. On the measurement cluster, the stop took from 1 to 31 seconds depending on
the component. Rather than waiting blindly, check with crictl that the
container has disappeared before putting the manifest back. Here is the gesture for etcd.
sudo mkdir /etc/kubernetes/manifests-pausesudo mv /etc/kubernetes/manifests/etcd.yaml /etc/kubernetes/manifests-pause/sudo crictl ps --name '^etcd$'CONTAINER IMAGE CREATED STATE NAME ATTEMPT POD ID POD NAMESPACERun crictl ps again until you get only the header line: the list is
then empty, and you can put the manifest back. Then run the same
command again until you see the container return to the Running state.
sudo mv /etc/kubernetes/manifests-pause/etcd.yaml /etc/kubernetes/manifests/sudo crictl ps --name '^etcd$'CONTAINER IMAGE CREATED STATE NAME ATTEMPT POD ID POD NAMESPACE256c694ac3b3b 270fbeb697171 1 second ago Running etcd 1 bbb1722b9a49f etcd-k8s-cp.lab kube-systemIn the measurement, the container came back 2 seconds after the manifest was put back,
and the API was ready 2 seconds later. For kube-apiserver, the container
also came back in 2 seconds, but the API answered only 5 seconds after the
manifest was put back.
Repeat these three gestures for kube-apiserver, kube-controller-manager then
kube-scheduler, changing the file name and the crictl pattern. When
the four containers are back, remove the temporary directory and
check that the API answers.
sudo rmdir /etc/kubernetes/manifests-pausekubectl get --raw /readyzok/readyz answers ok when the API server is ready again. Then check
that both nodes are Ready with kubectl get nodes, then the
new expiry dates with sudo kubeadm certs check-expiration: each line of the
first table must show today's date plus one year.
One trap remains to know about: renew all rewrites /etc/kubernetes/admin.conf,
but not its copy ~/.kube/config. That copy keeps the old client
certificate and keeps working, which hides the problem until the old
expiry date (in the measurement, kubectl --kubeconfig $HOME/.kube/config get nodes
answered normally with the old certificate). So copy admin.conf again to
benefit from the renewal, with the same gestures as at installation:
sudo cp /etc/kubernetes/admin.conf $HOME/.kube/configsudo chown $(id -u):$(id -g) $HOME/.kube/configAutomate the alert, keep control of the operation. A weekly
task that runs kubeadm certs check-expiration and warns beyond
a threshold costs three lines and is genuinely useful. Triggering the
renewal unattended is another matter: the operation
restarts the control plane components, and you do not want it to
happen at three in the morning with nobody there to check the result.
Troubleshooting the cluster
Troubleshooting weighs 30% of the CKA exam, the heaviest domain of the official curriculum. This section gives you a structured method and the essential commands to diagnose problems quickly.
Diagnostic method
Faced with a problem, follow this layered approach:
- Look at the node state with
kubectl get nodes: is itReady? - Look at the system Pods with
kubectl get pods -n kube-system: are the components running? - Read the kubelet journal with
journalctl -u kubelet: does it start? - Read the static Pod logs with
crictl. - Test the network: connectivity between Pods, DNS, Services.
Common problems and solutions
This table covers the most frequent situations. For each symptom, the most probable cause and the direct solution.
| Symptom | Probable cause | How to diagnose | Solution |
|---|---|---|---|
Node NotReady after init | CNI not installed | kubectl describe node → Ready condition: "cni plugin not initialized" | Install Flannel or Calico |
With Calico, kubectl wait ... tigerastatus exits at once with no matching resources found | The operator has not created the tigerastatus resources yet | kubectl get tigerastatus answers No resources found | Wait until the four are listed, then run kubectl wait again |
With Calico, kubectl wait --for=condition=Established crd/... answers NotFound | operator-crds.yaml was not applied | kubectl get crd installations.operator.tigera.io | Apply operator-crds.yaml, then run the wait again |
Node NotReady after reboot | kubelet does not start | journalctl -u kubelet -xe | Check swap, cgroups, containerd |
connection refused :6443 | API server down | crictl ps -a | grep kube-api | Check the manifest /etc/kubernetes/manifests/kube-apiserver.yaml |
| Expired token | Token > 24h | kubeadm token list | kubeadm token create --print-join-command |
| Expired certificate | Certificates > 1 year | kubeadm certs check-expiration | kubeadm certs renew all, then restart the control plane static Pods |
Pods in Pending | No node available or insufficient resources | kubectl describe pod <pod> → Events | Add workers or free up resources |
Pods in CrashLoopBackOff | Application crashing | kubectl logs <pod> --previous | Fix the application |
CoreDNS in CrashLoopBackOff | CNI problem or DNS loop | kubectl logs -n kube-system coredns-xxx | Check the CNI, /etc/resolv.conf |
| Worker does not join | Token, swap, cgroup driver or network | journalctl -u kubelet -xe on the worker | Follow the diagnosis of the lesson Join a worker to a kubeadm cluster |
E: Held packages were changed and -y was used without --allow-change-held-packages. (code 100) | Package held by apt-mark hold | apt-mark showhold lists kubeadm, kubelet, kubectl | sudo apt-mark unhold <package>, install, then sudo apt-mark hold <package> |
Client.Timeout during kubeadm upgrade apply | etcd restart in progress | The line Component "etcd" upgraded successfully! follows | None: transient error, wait for the SUCCESS! line |
kubeadm upgrade apply refuses the version (at least one minor release higher) | kubeadm still installed at the old version | kubeadm version -o short | Install kubeadm at the target version before upgrade apply |
Diagnosing the kubelet
The kubelet is the agent that drives the containers on each node. If it does not run, nothing runs on that node. The commands below are the first reflexes of diagnosis.
# State of the kubelet servicesudo systemctl status kubelet# If inactive or failed, find out why:
# Detailed kubelet logs (the last 100 lines)sudo journalctl -u kubelet -n 100 --no-pager
# Live logs (to see what happens during a test)sudo journalctl -u kubelet -f
# Specific errors (--since to limit)sudo journalctl -u kubelet --since "5 minutes ago" | grep -i error
Frequent errors in the kubelet logs:
| Error message | Cause | Solution |
|---|---|---|
failed to run Kubelet: running with swap on is not supported | Swap active | swapoff -a && sed -i '/swap/d' /etc/fstab |
failed to get cgroup | Wrong cgroup driver | Check SystemdCgroup = true in containerd |
Unable to connect to the server | API server unreachable | Check the network and the certificates |
certificate has expired | Expired certificates | kubeadm certs renew all, then restart the control plane static Pods |
Diagnosing the control plane static Pods
The control plane components (kube-apiserver, etcd, kube-scheduler, kube-controller-manager) are static Pods managed directly by the kubelet. Their manifests are in /etc/kubernetes/manifests/. To see their logs, use crictl (not kubectl, which needs a working API server).
# List all the containers (including stopped ones)sudo crictl ps -a
# API server logssudo crictl logs $(sudo crictl ps -q --name kube-apiserver)
# etcd logssudo crictl logs $(sudo crictl ps -q --name etcd)
# Scheduler logssudo crictl logs $(sudo crictl ps -q --name kube-scheduler)
# Controller-manager logssudo crictl logs $(sudo crictl ps -q --name kube-controller-manager)Checking the state of etcd
etcd is the database of the cluster. If etcd does not work, the API server can neither store nor retrieve data. Since etcdctl is not installed on the node (see the backup section), these commands go through the etcd container with kubectl exec. The healthcheck-client certificate is the one that kubeadm provides for this check, and the etcd Pod sees it at the same path as the node.
# Health of the local etcd memberkubectl -n kube-system exec etcd-<node-name> -- etcdctl \ --endpoints=https://127.0.0.1:2379 \ --cacert=/etc/kubernetes/pki/etcd/ca.crt \ --cert=/etc/kubernetes/pki/etcd/healthcheck-client.crt \ --key=/etc/kubernetes/pki/etcd/healthcheck-client.key \ endpoint healthhttps://127.0.0.1:2379 is healthy: successfully committed proposal: took = 9.992419msThe member list is mostly useful in high availability, where each control plane carries an etcd member. On a cluster with a single control plane, it shows only one:
kubectl -n kube-system exec etcd-<node-name> -- etcdctl \ --endpoints=https://127.0.0.1:2379 \ --cacert=/etc/kubernetes/pki/etcd/ca.crt \ --cert=/etc/kubernetes/pki/etcd/healthcheck-client.crt \ --key=/etc/kubernetes/pki/etcd/healthcheck-client.key \ member list --write-out=table┌──────────────────┬─────────┬────────────┬──────────────────────────┬──────────────────────────┬────────────┐│ ID │ STATUS │ NAME │ PEER ADDRS │ CLIENT ADDRS │ IS LEARNER │├──────────────────┼─────────┼────────────┼──────────────────────────┼──────────────────────────┼────────────┤│ 2e830b06b400c72b │ started │ k8s-cp.lab │ https://10.10.50.11:2380 │ https://10.10.50.11:2379 │ false │└──────────────────┴─────────┴────────────┴──────────────────────────┴──────────────────────────┴────────────┘Diagnosing network and DNS
These commands check that the Pods can communicate and that DNS works, two failures that are easily mistaken for an application problem.
# Check that CoreDNS workskubectl get pods -n kube-system -l k8s-app=kube-dns# The Pods must be Running
# Test DNS resolution from a temporary Podkubectl run dnstest --image=busybox:1.37@sha256:bdf57e528e45e4433820e045b29b4597825a1c9e38353532d90a01445013f82e --rm -it --restart=Never -- nslookup kubernetes.default.svc.cluster.local# Must resolve to the IP of the kubernetes Service (10.96.0.1 by default)
# If DNS fails, check the CoreDNS Servicekubectl get svc -n kube-system kube-dnskubectl get endpointslice -n kube-system -l kubernetes.io/service-name=kube-dns
# Check the CoreDNS logskubectl logs -n kube-system -l k8s-app=kube-dns
Diagnosing Services and endpoints
When a Service does not answer, check the full chain: Service → Endpoints → Pods.
# List the Services with their ClusterIPkubectl get svc -A
# Check that a Service has endpoints (target Pods)kubectl get endpointslice -l kubernetes.io/service-name=<service-name># If ENDPOINTS is empty, the selector matches no Pod
# Test connectivity to a Service from a Podkubectl run curltest --image=curlimages/curl:8.21.0@sha256:7c12af72ceb38b7432ab85e1a265cff6ae58e06f95539d539b654f2cfa64bb13 --rm -it --restart=Never -- \  curl -v http://<service-name>.<namespace>.svc.cluster.local
Viewing recent events
Kubernetes events tell you what happened recently on the cluster: scheduling refused, image not found, probe failing. They are often the shortest path to the cause.
# All the events of the cluster, sorted by datekubectl get events -A --sort-by='.lastTimestamp'
# Events of a specific namespacekubectl get events -n <namespace>
# Events related to a specific objectkubectl describe pod <pod-name>  # Events section at the bottom
# Filter the Warning eventskubectl get events -A --field-selector type=Warning
Fully resetting a node
If a node is too corrupted to be repaired, reset it completely. This procedure erases all the Kubernetes configuration of the node.
# Reset kubeadm (removes certificates and configuration)sudo kubeadm reset -f
# Remove the CNI configurationsudo rm -rf /etc/cni/net.d
# Remove the user kubeconfigsudo rm -rf $HOME/.kube
# Clean the iptables rules created by kube-proxysudo iptables -Fsudo iptables -t nat -Fsudo iptables -t mangle -Fsudo iptables -X
# Optional: clean the containerd imagessudo crictl rmi --all
After the reset, you can rejoin the cluster with kubeadm join, as the lesson Join a worker to a kubeadm cluster describes.
CKA skills covered by this guide
This guide mainly covers the Cluster Architecture, Installation & Configuration domain, which weighs 25% of the CKA. The table below summarizes what you learned and what remains to be mastered in other guides.
What this guide covers (25% of the exam)
This guide is aligned with the Cluster Architecture, Installation & Configuration domain, which weighs 25% of the exam. The table sets each objective of the curriculum next to the section that covers it, which lets you spot what is left to review instead of rereading the whole page. Three points deserve particular attention: the odd number of control planes, which the etcd quorum justifies (see the section on high availability), the difference between stacked etcd and external etcd, and etcd backup, whose restore has its own lesson.
| CKA objective | Guide section | Skill acquired |
|---|---|---|
| Prepare the infrastructure to install a cluster | Creating the VMs, prerequisites | Kernel, containerd, swap configuration |
| Create and manage clusters with kubeadm | Initialization, then the lesson on joining a worker | kubeadm init and CNI here, kubeadm join in the join lesson |
| Manage the cluster lifecycle | Upgrade | kubeadm upgrade, drain/uncordon |
| Implement an HA control plane | HA configuration | HAProxy, stacked etcd, joining control planes |
| Understand the extension interfaces (CNI, CSI, CRI) | containerd installation, CNI | CRI with containerd, CNI with Flannel or Calico |
| Back up and restore etcd | etcd backup, then the restore lesson | etcdctl snapshot save here, etcdutl snapshot restore in the restore lesson |
What this guide does not cover (study elsewhere)
The CKA also assesses skills that are not covered here. See the dedicated guides:
| CKA domain | Weight | What you need to know | Recommended guide |
|---|---|---|---|
| Troubleshooting | 30% | Logs, events, network debugging, kubelet | This guide + intensive practice |
| Services & Networking | 20% | Services, Ingress, NetworkPolicies, Gateway API, CoreDNS | Kubernetes networking guide |
| Workloads & Scheduling | 15% | Deployments, rollouts, ConfigMaps, Secrets, scheduling | Kubernetes workloads guide |
| Storage | 10% | PV, PVC, StorageClass, access modes | Kubernetes storage guide |
Tools to master for the CKA
The CKA expects you to master certain packaging and configuration tools:
| Tool | What you need to know | Covered here? |
|---|---|---|
| kubectl | All the commands, JSON/YAML output, --dry-run | Partially |
| kubeadm | init, join, upgrade, certs, reset | Yes, worker join in its own lesson |
| etcdctl | snapshot save, endpoint health (etcdutl for restore) | Yes |
| Helm | install, upgrade, rollback, values | No, dedicated guide |
| Kustomize | bases, overlays, patches | No, dedicated guide |
| crictl | ps, logs, images | Yes |
Put it into practice
The lab resets the control plane k8s-cp.lab: the node preparation is undone, swap is active and declared in /etc/fstab, and the packages are no longer held. You prepare it, then you initialize it with a configuration file, ~/kubeadm/init.yaml. This file reuses the example of the lesson, with the node address as controlPlaneEndpoint (10.10.50.11 in the lab, which hostname -I confirms) in place of 192.168.122.10. It keeps the cluster name catalogue and the Pod range 10.244.0.0/16 of the example. You then install Calico v3.32.2 through its operator, whose manifests are provided in ~/kubeadm/calico/.
The validation reads the state of the node after your work. The overlay and br_netfilter modules are declared in /etc/modules-load.d, net.ipv4.ip_forward = 1 is active and written in /etc/sysctl.d, and swap is off and removed from /etc/fstab: these three settings must survive a reboot. kubeadm, kubelet and kubectl are held by apt-mark hold. The cluster was initialized with a v1beta4 configuration file: its ClusterConfiguration declares clusterName: catalogue, and the kubeadm-config ConfigMap of the running cluster carries that name, which a command-line kubeadm init does not produce. The user's kubeconfig, copied from admin.conf, reaches the cluster without sudo. Finally Calico runs on the node, which is Ready, and CoreDNS runs.
Key takeaways
This guide taught you to install and maintain a Kubernetes cluster with kubeadm. Here are the essential points to remember:
-
kubeadm is the official bootstrap tool, it generates certificates and manifests and configures the cluster according to the upstream standards
-
containerd must run with
SystemdCgroup = true: without this setting the node becomes unstable, it is a classic mistake, always check this parameter -
The kernel modules
overlayandbr_netfilterare essential for container networking -
Swap must be disabled, the kubelet refuses to start if swap is active
-
The CNI (Flannel, Calico) is installed after
kubeadm init, without it, the nodes stay NotReady. With Calico, install the operator's two manifests, give theInstallationthe samecidraspodSubnet(or--pod-network-cidr), then wait for thetigerastatusresources to beAvailable -
Specify
--control-plane-endpointeven for a single-node cluster, it lets you move to HA without rebuilding. For high availability, plan at least three control planes, and an odd number: the etcd quorum (the majority of the members) then tolerates the loss of one node out of three, two out of five -
Upgrade the control plane before the workers, respect the version skew (no minor version jump), and release the packages held by
apt-mark holdfor the time it takes to install them, otherwiseapt-get install -yrefuses -
Back up etcd regularly, it is the single source of truth of the cluster, no backup = total loss. The snapshot is written to
/var/lib/etcdso that it can be copied off the node, and the restore follows the procedure of the lesson Back up and restore Kubernetes -
Renew the certificates before they expire, they expire after 1 year, then restart the four control plane static Pods, one by one: the API server and etcd reload their serving certificate on their own, with no guarantee for the client certificates, nor for those of the controller-manager and the scheduler. Plan for about 41 seconds of API outage, and copy
admin.confagain into~/.kube/config, whichrenew alldoes not update -
To troubleshoot, always follow the same layered progression: node state, system Pods, kubelet journal,
crictllogs, then network
Knowledge check
Ten questions, drawn at random, on what costs the most in practice and at
the exam: the ports to open, the kernel modules and the cgroup driver of the prerequisites, the
CNI that makes the node Ready (Calico is installed with two manifests), high availability, the lifetime of the join token, the held packages
of an upgrade, and etcd backup, from access to etcdctl
through to the verification of the snapshot with etcdutl.
Knowledge check
Check what you have learned with this interactive quiz
How it works
- The timer starts when you click Start
- Multiple choice, true/false and short answer questions
- You can move between questions
- Detailed results are shown at the end
Starts the quiz and the timer
Review
(0/0)Score by domain
A domain groups several guides and gets several questions, so its score is more reliable than a per-topic score, which often rests on a single question.
Summary
Strengths
No topic passed at 80% on at least two questions yet.
Weak areas
No topic below the pass mark.
Recommended next
Hints before you try again?
Continue the course: Join a worker to a kubeadm cluster
A new full quiz with random questions
Work again only on the questions you missed