ResourceQuota limits the total consumption of a namespace (CPU, memory, number of pods...), whereas LimitRange sets default values and min/max bounds for each container. Together, they prevent a team or an application from monopolizing the resources of the cluster. This guide shows you how to configure them and combine them effectively.
What you will learn
- Understand the difference between ResourceQuota and LimitRange
- Create quotas that cap CPU, memory and Kubernetes objects
- Configure default values with LimitRange
- Combine the two mechanisms for a multi-tenant namespace
- Debug the errors caused by exceeded quotas
To follow this guide, you need to know Kubernetes namespaces and understand requests and limits.
Why limit resources per namespace?
Without a quota, a developer can deploy a pod that declares neither requests nor limits. The scheduler, the component that picks the node of a pod, then places it blindly, since nothing is reserved for it; the container grows until it exhausts the memory of the node, and the kernel triggers an OOM kill (the forced termination of a process for lack of memory) that also hits the neighboring pods, including those of other teams.
A pod that openly asked for 100 GB, on the other hand, would never be placed: it would stay Pending on Insufficient memory, which is much less dangerous. In a multi-tenant cluster (several teams, several projects on the same infrastructure), nothing isolates by default the consumption of one namespace from that of the others.
| Scenario | Without a quota | With a ResourceQuota |
|---|---|---|
A pod without requests or limits | Scheduled blindly, can saturate the node | Rejected if it does not declare a resource that the quota caps, unless a LimitRange fills it in |
| A team creates 500 pods | Cluster saturated | Limited to 50 pods max |
| Mass creation of ConfigMaps | etcd overload | Capped at 100 ConfigMaps |
Quotas are preventive: they block the deployment before the problem occurs.
ResourceQuota: cap the total consumption
A ResourceQuota defines aggregate limits for a whole namespace. It answers a single question: how many resources can this namespace consume in total?
Which quota types are available?
These four categories do not serve the same purpose. Compute quotas protect the nodes from CPU or memory saturation; Object quotas mainly protect etcd, which is the database of the cluster and a sensitive point of contention. A namespace that creates ten thousand ConfigMaps crashes no node, but it can slow down the API server for everyone. The Extended category is the universal safety net: its count/<resource>.<group> syntax even covers the custom resources installed by your operators.
| Category | Example resources | Description |
|---|---|---|
| Compute | requests.cpu, limits.memory | Total CPU and memory |
| Objects | pods, services, configmaps | Number of Kubernetes objects |
| Storage | requests.storage, persistentvolumeclaims | Disk space and PVCs |
| Extended | count/deployments.apps, count/jobs.batch | Any type of resource |
Create your first ResourceQuota
A ResourceQuota is placed on an existing namespace and takes effect immediately, including where pods are already running: those keep running, but every new creation now has to fit under the ceiling. So start with a test namespace. The third step is the most instructive: describe displays the observed consumption next to each ceiling, the only way to check that the quota counts what you thought it counted.
-
Create the quota file
The quota lives in a namespace, which must exist beforehand:
kubectl create namespace team-backend. This quota caps the namespace at 4 CPU and 8 GiB cumulated inrequests, 8 CPU and 16 GiB inlimits, and 30 pods.quota-team-backend.yaml apiVersion: v1kind: ResourceQuotametadata:name: compute-quotanamespace: team-backendspec:hard:requests.cpu: "4"requests.memory: 8Gilimits.cpu: "8"limits.memory: 16Gipods: "30" -
Apply the quota
Terminal window kubectl apply -f quota-team-backend.yaml -
Check the state of the quota
Terminal window kubectl describe resourcequota compute-quota -n team-backendThe expected output is the following:
Name: compute-quotaNamespace: team-backendResource Used Hard-------- ---- ----limits.cpu 0 8limits.memory 0 16Gipods 0 30requests.cpu 0 4requests.memory 0 8Gi
Quota on the number of objects
You can limit the number of any type of Kubernetes object:
apiVersion: v1kind: ResourceQuotametadata: name: object-quota namespace: team-backendspec: hard: configmaps: "30" secrets: "30" services: "10" services.loadbalancers: "2" services.nodeports: "5" persistentvolumeclaims: "10" count/deployments.apps: "20" count/jobs.batch: "50"Quota per priority class
You can split quotas by the PriorityClass of the pods, the priority class that the lesson Priority and preemption has you create:
apiVersion: v1kind: ResourceQuotametadata: name: high-priority-quota namespace: team-backendspec: hard: requests.cpu: "2" requests.memory: 4Gi scopeSelector: matchExpressions: - operator: In scopeName: PriorityClass values: ["high-priority"]This quota only applies to pods with priorityClassName: high-priority.
LimitRange: default values and bounds
A LimitRange defines constraints at the level of each container or pod, taken in isolation. It answers a different question: what are the minimum, maximum and default values for a container?
The problem with Pods without requests/limits
Putting a ResourceQuota on compute resources has a side effect that is often discovered in production: the namespace becomes stricter for all pods, including those that worked perfectly well before. Kubernetes cannot deduct from a quota a pod that does not declare what it consumes, so it refuses to create it. The manifest below has not changed: it is the namespace around it that has become demanding.
The LimitRange solves this problem by defining automatic default values.
Create a LimitRange
The object below mixes two roles that you need to tell apart before reading it. default and defaultRequest are permissive: they complete an incomplete manifest and let the pod through. max and min are blocking: they reject the pod whose values fall outside the bounds. The third step checks this concretely, by creating a pod without a resources section, then reading back what the API server actually stored.
-
Create the LimitRange file
limitrange-team-backend.yaml apiVersion: v1kind: LimitRangemetadata:name: container-limitsnamespace: team-backendspec:limits:- type: Containerdefault:cpu: "500m"memory: "512Mi"defaultRequest:cpu: "100m"memory: "128Mi"max:cpu: "2"memory: "4Gi"min:cpu: "50m"memory: "64Mi" -
Apply the LimitRange
Terminal window kubectl apply -f limitrange-team-backend.yaml -
Test with a pod without limits
pod-sans-limits.yaml apiVersion: v1kind: Podmetadata:name: test-podnamespace: team-backendspec:containers:- name: nginximage: nginx:1.30.5@sha256:9bf97bd7714f5e24c1ccd545ecb9eb5435cb6d109c97cebb15e7e455e0239edb# No resources declaredTerminal window kubectl apply -f pod-sans-limits.yamlkubectl get pod test-pod -n team-backend -o yaml | grep -A 10 resourcesThe output must show the values of the LimitRange, injected automatically into the pod: requests of
100mand128Mi, limits of500mand512Mi.
The four LimitRange fields
The "Applied when" column is the key to reading this table: the first two fields only come into play if the manifest is silent, the last two apply in every case. A classic mistake is to define default without defaultRequest: the default limit is then copied as the request, and you reserve far more resources than planned on every node.
| Field | Description | Applied when |
|---|---|---|
default | Default limits value | If limits is not specified |
defaultRequest | Default requests value | If requests is not specified |
max | Maximum allowed value | Always (rejected if exceeded) |
min | Minimum allowed value | Always (rejected if lower) |
LimitRange for pods
You can also set limits at the level of the whole pod (sum of all the containers):
apiVersion: v1kind: LimitRangemetadata: name: pod-limits namespace: team-backendspec: limits: - type: Pod max: cpu: "4" memory: "8Gi"LimitRange for storage
The LimitRange can also constrain the size of PVCs:
apiVersion: v1kind: LimitRangemetadata: name: storage-limits namespace: team-backendspec: limits: - type: PersistentVolumeClaim max: storage: 50Gi min: storage: 1GiCombine ResourceQuota and LimitRange
In production, use both together, in the following order:
-
Create the namespace with labels
apiVersion: v1kind: Namespacemetadata:name: team-backendlabels:team: backendenvironment: production -
Apply the LimitRange first
The LimitRange guarantees that every pod will have requests/limits, even undeclared ones.
apiVersion: v1kind: LimitRangemetadata:name: container-limitsnamespace: team-backendspec:limits:- type: Containerdefault:cpu: "500m"memory: "512Mi"defaultRequest:cpu: "100m"memory: "128Mi"max:cpu: "2"memory: "4Gi"min:cpu: "50m"memory: "64Mi" -
Apply the ResourceQuota next
The ResourceQuota caps the total consumption of the namespace. It reuses the compute ceilings set above, and adds the object quotas that protect etcd:
apiVersion: v1kind: ResourceQuotametadata:name: compute-quotanamespace: team-backendspec:hard:requests.cpu: "4"requests.memory: 8Gilimits.cpu: "8"limits.memory: 16Gipods: "30"configmaps: "50"secrets: "50"services: "20"persistentvolumeclaims: "20"
Validation flow
When you create a pod, the API server applies the two objects in a precise order: the LimitRange first, which completes then bounds each container, the ResourceQuota next, which checks the total of the namespace. The diagram follows this path. Look at the two places where a pod can be refused, first by a bound of the LimitRange, then by the ceiling of the ResourceQuota: only a pod that clears both checks is created, and each refusal returns an explicit message.
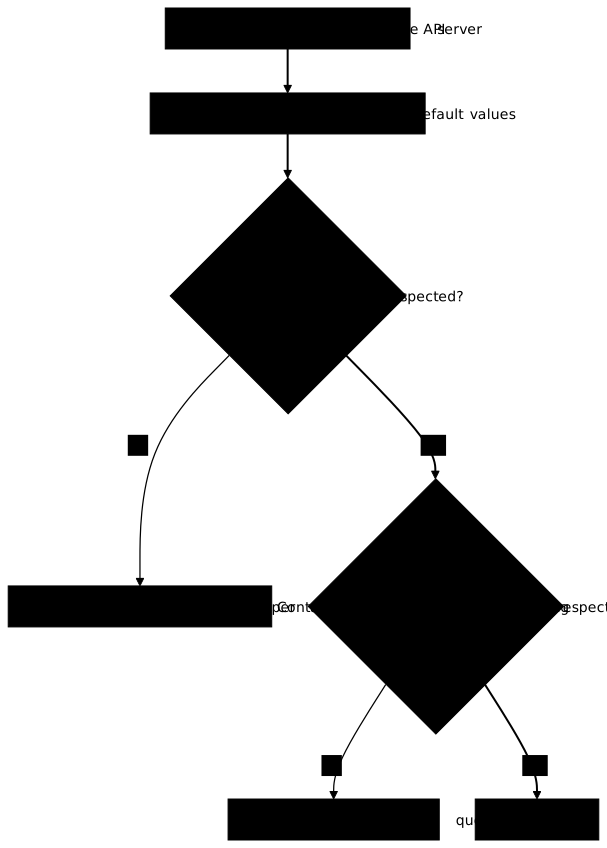
Monitor quota usage
A quota is useless if nobody sees that you are getting close to it. The first alert is usually a refused deployment, which is too late. The two ways of looking below answer different needs: kubectl for a one-off check during an incident, the API for monitoring that warns before the refusal.
With kubectl
get answers "is there a quota here", describe answers "where do we stand". Only the second displays the Used and Hard columns side by side, the information that is really useful day to day: it is by watching Used approach Hard that you anticipate the blocking, instead of discovering it on a deployment refused on a Friday evening.
# List all the quotas of a namespacekubectl get resourcequota -n team-backend
# Details with current usagekubectl describe resourcequota compute-quota -n team-backend
# List the LimitRangeskubectl describe limitrange -n team-backend
With the API or metrics
The status field of a ResourceQuota carries both the ceiling and the consumption, enough to compute an occupancy rate without installing anything. It is the basis of a useful alert: warning before saturation, at 80% for example, leaves time to arbitrate, whereas a deployment refused at 100% lands in the middle of a production release.
The API exposes quota usage:
kubectl get resourcequota compute-quota -n team-backend -o jsonpath='{.status}'For monitoring, kube-state-metrics exposes the metrics:
kube_resourcequota: limits and usagekube_limitrange: configured values
When consumption exceeds the ceiling
The case is surprising at first, and it happens as soon as you tighten a quota on a namespace that is already occupied. Measured on a namespace running 4 Pods, with a quota lowered from 4 to 1:
Resource Used Hard-------- ---- ----pods 4 1requests.cpu 800m 100mUsed greater than Hard is not a display bug. The quota only applies at creation: the Pods already in place keep running, and the counter tells the truth about what the namespace really consumes. It is the typical case where these two columns cross, and it signals that a ceiling was lowered without the load following.
Every new creation, on the other hand, is refused immediately. The message names the quota, then lists, for each exceeded resource, what the Pod asks for (requested), what the namespace already consumes (used) and the ceiling (limited). Here is the message recorded on a quota pods-et-cpu that limits the namespace to 1 Pod and 500m of requests.cpu, while a 200m Pod is already running there. The new Pod asks for 400m:
Error from server (Forbidden): error when creating "pod-deux.yaml": pods "deux" is forbidden: exceeded quota: pods-et-cpu, requested: pods=1,requests.cpu=400m, used: pods=1,requests.cpu=200m, limited: pods=1,requests.cpu=500mLook at the two resources cited: pods (2 Pods for a ceiling of 1) and requests.cpu (600m for a ceiling of 500m) are both exceeded, so both are written. When only the number of Pods is exceeded, the message only cites pods: requested: pods=1, used: pods=1, limited: pods=1. Reading the list is therefore enough to know which resource to fix.
A Pod refused by a quota is never created: it does not exist in the cluster, so kubectl get pods does not show it, not even as Pending. With a Deployment, it is the ReplicaSet that tries to create the Pod and receives the refusal: the message is then read in the events of the ReplicaSet (reason FailedCreate), not in those of a Pod. The page Pending Pods in Kubernetes details this diagnosis.
To get back to a consistent state, you have to delete Pods: no mechanism automatically evicts Pods to fit into a reduced quota.
Troubleshooting
Four messages come up again and again, and they look alike enough that people treat the wrong one. Two come from the ResourceQuota, one from the LimitRange, and the fourth comes from neither: the pod was accepted and it is the scheduler that finds no room. Read the whole message before adjusting anything, because the object to modify is not the same.
The exceeded quota error
This message gives the three numbers of the diagnosis on the same line: requested is what the new Pod asks for, used what the namespace already consumes, limited the ceiling. If the sum of the first two exceeds the third, the Pod is refused.
Error from server (Forbidden): pods "my-pod" is forbidden:exceeded quota: compute-quota, requested: requests.memory=2Gi,used: requests.memory=7Gi, limited: requests.memory=8GiHere, the namespace has already used 7 Gi out of 8 Gi allowed. You have three solutions:
- Reduce the requests of the new pod
- Delete existing pods
- Increase the quota (if justified)
# See the current usagekubectl describe resourcequota -n team-backend
# Identify the biggest consumerskubectl top pods -n team-backend --sort-by=memory
The must specify limits error
Do not confuse this message with the previous one: failed quota signals an incomplete manifest, not a ceiling that has been reached. A completely empty namespace produces the same error. The message lists the missing resources and names the container concerned, which tells you directly what to add.
Error from server (Forbidden): pods "my-pod" is forbidden:failed quota: compute-quota: must specify limits.cpu for: nginx; limits.memory for: nginxThis error appears when a ResourceQuota covers the limits, the pod does not declare them and no default value is injected. A container LimitRange that sets default values solves the problem, and so does a lone max: when default is missing, the API copies max into it. The other solution is to declare the limits in the pod.
The exceeds maximum error
This one comes from the LimitRange, not from the ResourceQuota: it triggers even on an almost empty namespace, because it bounds each container taken in isolation. The phrase per Container in the message is the marker that immediately tells the two mechanisms apart.
Error from server (Forbidden): pods "my-pod" is forbidden:maximum cpu usage per Container is 2, but limit is 4Here, the pod asks for more than the max allowed by the LimitRange: reduce the limits of the container, or adjust the LimitRange.
Pod not scheduled (Pending)
A Pod can pass the quota and still stay Pending, if the cluster does not have the free resources. A quota does not guarantee availability, it only sets a ceiling.
kubectl describe pod my-pod -n team-backend# Look at the Events section for "Insufficient cpu" or "Insufficient memory"Best practices
Setting a quota is easy, setting it at the right value is much harder, and that is where the acceptance of the mechanism by the teams is decided. The three points below deal in turn with the level of the quotas, their consistency with the LimitRange, and their variation by environment.
Sizing quotas
A quota that is too tight turns every deployment into an operations ticket; a quota that is too loose protects nothing. The rule that works: start from the measured consumption, with kubectl top pods over a few days, and not from the figures announced by the team, then add the margin indicated below. Plan to review these values after the first quarter: a quota set once and never reread ends up blocking someone.
| Metric | Recommendation |
|---|---|
requests.cpu | Sum of the requests of all the expected pods |
limits.cpu | Above the requests, by a margin set from the measured peaks |
pods | Realistic maximum number, with a margin for the expected growth |
| Volumes (PVC) | Based on the real storage needs |
Requests/limits consistency
Every container that declares nothing receives the default value of the LimitRange, and the total of these values must not exceed the ceiling of the ResourceQuota. So check that the two stay consistent:
# If LimitRange.default.cpu = 500m and ResourceQuota.limits.cpu = 8# Then max 16 containers with defaults (16 × 500m = 8 CPU)Quotas per environment
The same quota applied everywhere is either too tight in production, or too loose in development. The values below are orders of magnitude for a medium-sized application namespace, to be readjusted to your observed consumption: start from what your namespaces consume today, add a margin, then tighten afterwards.
| Environment | CPU requests quota | Memory quota | Max pods |
|---|---|---|---|
| dev | 2 | 4Gi | 20 |
| staging | 4 | 8Gi | 30 |
| production | 16 | 32Gi | 100 |
Clean up the cluster
All the objects of this lesson live in the team-backend namespace: ResourceQuota, LimitRange and test Pods. Deleting it removes everything in one command, and --ignore-not-found avoids an error if you did not keep it.
kubectl delete namespace team-backend --ignore-not-foundPut it into practice
A namespace without a ceiling or default values lets a team take the whole cluster, and a Pod without requests gets placed blindly. The lab has you set both objects, then proves each one actively: a Pod that asks for 64 CPUs is refused, a Pod that asks for nothing is accepted then completed by the LimitRange. It is this second half that a quota set alone would break.
Key takeaways
- ResourceQuota limits the total consumption of a namespace (CPU, memory, objects)
- LimitRange sets default values and min/max bounds per container
- With a ResourceQuota on compute, pods must declare their requests and limits: a LimitRange provides the default values
- Apply LimitRange before ResourceQuota to avoid pod rejections
- Quotas are preventive: they block before the problem occurs
- Monitor usage with
kubectl describe resourcequota
Test your knowledge
This quiz covers the points where the two objects get confused: which mechanism rejects what, and in which order to apply them. Answer without going back: the questions you miss point to the section to reread.
Knowledge check
Check what you have learned with this interactive quiz
How it works
- The timer starts when you click Start
- Multiple choice, true/false and short answer questions
- You can move between questions
- Detailed results are shown at the end
Starts the quiz and the timer
Review
(0/0)Score by domain
A domain groups several guides and gets several questions, so its score is more reliable than a per-topic score, which often rests on a single question.
Summary
Strengths
No topic passed at 80% on at least two questions yet.
Weak areas
No topic below the pass mark.
Recommended next
Hints before you try again?
Continue the course: Choose your autoscaler: HPA, VPA or Cluster Autoscaler
A new full quiz with random questions
Work again only on the questions you missed