To upgrade a Kubernetes cluster, always follow the same order: control plane
first, workers next, one node at a time. This guide details the upgrade
strategy, the version skew policy that defines the version gaps allowed between
components, and the complete workflow with kubeadm upgrade, from planning to
the post-upgrade checks.
What you will learn
- Understand the version skew policy: which version gaps are allowed
- Follow the correct order for upgrading the components
- Run a complete upgrade with kubeadm: plan, apply, drain, uncordon
- Upgrade the worker nodes one by one without interruption
- Check the cluster after the upgrade and handle failure cases
- Prove the gesture without help with the module challenge: drain a node, put it back in service and upgrade the cluster
Prerequisites
- A working Kubernetes cluster deployed with kubeadm (v1.28+)
kubectlconfigured with cluster-admin rights- Root SSH access (or sudo) to all the nodes of the cluster
- Having followed the guides:
- Check the cluster health (in French)
- Prepare a maintenance (in French)
- Manage the nodes (in French)
- Basic knowledge of kubeadm
Why upgrading is critical
Kubernetes publishes three minor versions a year, roughly one every four months. The project maintains the last three minor versions. Since 1.19, each version receives about one year of fixes, followed by two months of maintenance mode, about fourteen months in all (official patch releases calendar, read on 13 November 2026).
Staying on an obsolete version exposes your cluster to:
- Unpatched vulnerabilities (CVEs)
- Incompatibility with new versions of tools (Helm, Istio, operators)
- Loss of technical support from cloud providers
The right strategy is to upgrade one minor version at a time, for example from 1.35 to 1.36, then from 1.36 to 1.37.
Understanding the version skew policy
The version skew policy defines the version gaps allowed between Kubernetes components. It is the fundamental rule to know before any upgrade.
Main rules
| Component | Gap allowed relative to kube-apiserver |
|---|---|
| kube-apiserver | reference component. In HA, the instances are upgraded one by one. |
| kubelet | never newer, up to three minor versions older |
| kube-proxy | never newer, up to three minor versions older |
| kube-controller-manager / kube-scheduler | never newer, up to one minor version older |
| kubectl | one minor version of gap, newer or older |
Two points of this table explain the upgrade strategy on their own. The first is the asymmetry: a kubelet can lag behind, never run ahead. The second is the size of the window, three versions for the nodes against only one for kubectl. This is what makes the two-phase upgrade possible, and a kubelet lagging behind its API server is a supported situation, not an anomaly to fix within the hour.
In an HA control plane, the kube-apiserver instances must be upgraded
one by one, limiting the version gap between them. The other components must
remain compatible with the oldest and the newest instance during the
transition.
In practice
The version gap tolerance allows you to upgrade the control plane first, then the workers progressively, even on a cluster with many nodes. Always check the official version skew policy for the exact compatibility windows before you start.
Upgrade order with kubeadm
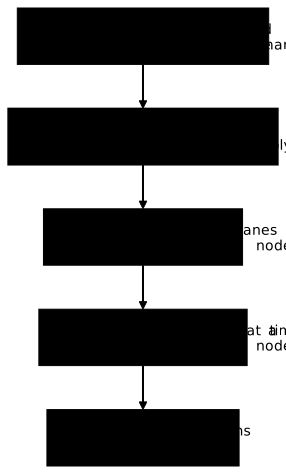
With kubeadm, the upgrade starts with the control plane through
kubeadm upgrade apply, which handles the control plane components
(API server, controller-manager, scheduler) as well as etcd and the addons when
they are managed by kubeadm. If etcd is managed separately, its
compatibility strategy must be checked separately.
Next, the workers are upgraded one by one with kubeadm upgrade node,
followed by the kubelet upgrade.
Finally, upgrade kubectl on your administration workstations.
The diagram sums up this order. Spot the only node where apply is run, the
first control plane: all the other nodes, control planes and workers alike, go
through kubeadm upgrade node.
Before the upgrade: preparation
A completed version upgrade cannot be undone: the only way back is an etcd restore, with the loss of everything that changed since the backup. The three checks below are therefore not formalities, they are the only things you will have left if the operation goes wrong.
Check the cluster state
Make sure the cluster is healthy before you start:
kubectl get nodeskubectl get pods -A | grep -v Running | grep -v CompletedAll nodes must be Ready. No critical pod must be in error.
Back up etcd
An etcd backup is essential before an upgrade. If something goes wrong, it lets you restore the cluster data from before the upgrade, on an etcd of the same major and minor version as the one that produced it.
sudo etcdctl snapshot save /tmp/etcd-backup-pre-upgrade.db \ --endpoints=https://127.0.0.1:2379 \ --cacert=/etc/kubernetes/pki/etcd/ca.crt \ --cert=/etc/kubernetes/pki/etcd/server.crt \ --key=/etc/kubernetes/pki/etcd/server.keyVerify the snapshot with etcdutl and not etcdctl: the latter prints the help
and exits with 0 without checking anything, which gives a backup reputed good
without it ever having been read.
sudo etcdutl snapshot status /tmp/etcd-backup-pre-upgrade.db --write-out=tableThe file contains all the cluster's Secrets: copy it off the node, and do not
leave it in /tmp, which the system may empty on reboot. Also copy the
control plane's /etc/kubernetes/manifests directory: without it, you could not
go back to the manifests from before the upgrade.
These commands assume etcdctl and etcdutl are installed on the node. The
lesson Back up and restore Kubernetes
shows how to install them, then take and verify the snapshot.
Read the release notes
Before each upgrade, read the official Kubernetes release notes. Check:
- The breaking changes and deprecated APIs
- The new features reaching GA (stable)
- The version-specific prerequisites
Read the release notes for the API removals, and not only for the new
features. This is the point that breaks deployments without warning: a manifest
that references a removed API version is rejected after the upgrade, while it
worked the day before. The kubent or kubectl-convert tool lets you spot these
references before switching.
Upgrading the control plane (kubeadm)
The upgrade is done on the first control plane node first, then on any other control plane nodes. The examples upgrade a cluster from 1.36.4 to 1.37.0, the upgrade that the lab at the end of the page plays.
Switch the package repository to the target version
The official pkgs.k8s.io repository publishes one repository per minor
version: a node installed on 1.36 only sees the 1.36.x packages. Without this
switch, apt-get install kubeadm=1.37.0-1.1 simply does not find the requested
version. The Kubernetes documentation requires it before any minor upgrade, and
the step is repeated on every node, workers included.
# The repository still points to the old minor versioncat /etc/apt/sources.list.d/kubernetes.list# Make it point to the target minor versionsudo sed -i 's#/v1.36/#/v1.37/#' /etc/apt/sources.list.d/kubernetes.listThe file must now contain /v1.37/:
deb [signed-by=/etc/apt/keyrings/kubernetes-apt-keyring.gpg] https://pkgs.k8s.io/core:/stable:/v1.37/deb/ /Step 1: upgrade kubeadm
On the control plane node, upgrade the kubeadm package to the target version:
# Ubuntu / Debiansudo apt-mark unhold kubeadmsudo apt-get update && sudo apt-get install -y kubeadm=1.37.0-1.1sudo apt-mark hold kubeadmCheck that the installed version is indeed the target version:
kubeadm versionStep 2: plan the upgrade
This step changes nothing: it queries the cluster and prints the reachable versions and the components that will be touched. It is also the moment when kubeadm reports the incompatibilities it detects, before anything is committed.
sudo kubeadm upgrade planThis command prints:
- The current version of the cluster
- The target version available
- The components that will be upgraded
- Any warnings (deprecated APIs, etc.)
Read the output carefully before going on.
Step 3: apply the upgrade
sudo kubeadm upgrade apply v1.37.0The output first recalls the starting point and the target, then ends, if
everything went well, with the SUCCESS line. Recorded on the lab cluster:
[upgrade/versions] Cluster version: v1.36.4[upgrade/versions] kubeadm version: v1.37.0...[addons] Applied essential addon: CoreDNS[addons] Applied essential addon: kube-proxy
[upgrade] SUCCESS! A control plane node of your cluster was upgraded to "v1.37.0".
kubeadm upgrade apply upgrades the control plane components on the targeted
node, and applies, depending on the cluster configuration, the upgrades of
the components it manages: CoreDNS, kube-proxy and etcd.
Step 4: upgrade kubelet and kubectl
# Drain the nodekubectl drain k8s-cp.lab --ignore-daemonsets
# Upgrade the packagessudo apt-mark unhold kubelet kubectlsudo apt-get update && sudo apt-get install -y kubelet=1.37.0-1.1 kubectl=1.37.0-1.1sudo apt-mark hold kubelet kubectl
# Restart the kubeletsudo systemctl daemon-reloadsudo systemctl restart kubelet
# Put the node back in servicekubectl uncordon k8s-cp.lab
Draining a control plane node depends on your architecture. In many
clusters, no application workload runs there, thanks to the NoSchedule
taint set on these nodes. Elsewhere, treat it like any node hosting Pods.
For the additional control planes of a high-availability cluster, the
procedure is the same except for one detail: you run kubeadm upgrade node,
not kubeadm upgrade apply.
# On the additional CP node, repository already switched to v1.37:sudo apt-mark unhold kubeadmsudo apt-get update && sudo apt-get install -y kubeadm=1.37.0-1.1sudo apt-mark hold kubeadm
sudo kubeadm upgrade node
Then upgrade kubelet/kubectl and restart as for the first node.
The two subcommands do not do the same job and are not used in the same place.
kubeadm upgrade apply is only run once, on the first control plane node: it
is the one that decides the target version and upgrades the control plane
components. kubeadm upgrade node is then run on each of the other nodes,
control planes and workers alike, and merely aligns the local configuration
with the decision already made.
Upgrading the worker nodes
Workers are upgraded one by one to avoid any service interruption. For
each worker, the workflow is identical, and it starts with the same
repository switch to /v1.37/ as on the control plane.
-
Upgrade kubeadm on the worker, repository switched:
Terminal window sudo apt-mark unhold kubeadmsudo apt-get update && sudo apt-get install -y kubeadm=1.37.0-1.1sudo apt-mark hold kubeadm -
Apply the configuration:
Terminal window sudo kubeadm upgrade node -
Drain the worker (from an administration workstation):
Terminal window kubectl drain k8s-w1.lab --ignore-daemonsets --delete-emptydir-data -
Upgrade kubelet and kubectl:
Terminal window sudo apt-mark unhold kubelet kubectlsudo apt-get update && sudo apt-get install -y kubelet=1.37.0-1.1 kubectl=1.37.0-1.1sudo apt-mark hold kubelet kubectlsudo systemctl daemon-reloadsudo systemctl restart kubelet -
Put the worker back in service:
Terminal window kubectl uncordon k8s-w1.lab -
Check before moving on to the next worker:
Terminal window kubectl get nodeskubectl get pods -A -o wide | grep k8s-w1.lab
Post-upgrade checks
After upgrading all the nodes, check the whole cluster:
Node versions
The VERSION column of kubectl get nodes is the kubelet version of each
node. To read only that, ask for it explicitly:
kubectl get nodes -o custom-columns=NOM:.metadata.name,VERSION:.status.nodeInfo.kubeletVersion --no-headersAll nodes must show the target version. Recorded on the lab cluster, before then after the upgrade:
# beforek8s-cp.lab v1.36.4k8s-w1.lab v1.36.4# afterk8s-cp.lab v1.37.0k8s-w1.lab v1.37.0A node left on v1.36.4 almost always has a kubelet that was not replaced or
not restarted: kubeadm upgrade never touches the kubelet package.
System pods
kubectl get pods -n kube-systemAll the control plane pods must be Running.
Control plane health
Check the health of the components through the API server's readyz endpoint:
kubectl get --raw='/readyz?verbose' | grep '\[-\]\|\[\+\]'Quick functional test
Create a test pod to validate that the cluster works:
kubectl run test-upgrade --image=nginx:1.30@sha256:9bf97bd7714f5e24c1ccd545ecb9eb5435cb6d109c97cebb15e7e455e0239edb --restart=Neverkubectl get pod test-upgrade -wWait for the pod to reach Running, then clean up:
kubectl delete pod test-upgradeHandling an upgrade failure
The three situations below are ranked by increasing severity, and the
response is not the same. A failing upgrade apply can be recovered: kubeadm
rolls back, or you rerun the command. A kubelet that does not restart leaves a
node out of service. An etcd restore loses everything that changed since the
backup. Always try in this order.
kubeadm upgrade apply fails
When kubeadm upgrade apply fails along the way, kubeadm first attempts an
automatic rollback. If it could not do so, for example after an abrupt
shutdown of the machine, rerun the same command: it is idempotent, replaying
it brings the real state back toward the state you ask for. The kubeadm
documentation also offers sudo kubeadm upgrade apply --force to get out of a
bad state, without changing the cluster version.
During the upgrade, kubeadm writes two backup folders under
/etc/kubernetes/tmp:
kubeadm-backup-etcd-<date>-<time>contains a copy of the local etcd member's data, to put back in/var/lib/etcd;kubeadm-backup-manifests-<date>-<time>contains the static Pod manifests, to put back in/etc/kubernetes/manifests.
These copies are only useful if the automatic rollback does not work. They stay on the node after the upgrade, and you must delete them by hand (source: Upgrading kubeadm clusters, section "Recovering from a failure state", read on 13 November 2026).
If the problem persists after the rerun, look at the kubelet log and the state of the node's containers:
sudo journalctl -u kubelet -n 50 --no-pagersudo crictl ps -akubelet does not start after the upgrade
If the kubelet does not start on a node after the upgrade:
sudo journalctl -u kubelet -n 50 --no-pagerFrequent causes:
- Version incompatibility: check that the installed versions respect the version skew policy and the upgrade order recommended by kubeadm
- Outdated configuration:
kubeadm upgrade nodewas not run before the kubelet upgrade - Certificates: the certificates have expired (renew with
kubeadm certs renew all, then restart the four control plane static Pods, as described in the section Renewing certificates of the kubeadm guide)
Restore from the etcd backup
As a last resort, if the cluster is in an inconsistent state after a failed
upgrade, restore the etcd backup. The complete procedure, with the order of the
static Pods and the options to pass, is in the section
How do you restore etcd into a new directory?.
It ends with a step not to forget: updating etcd.local.dataDir in the
kubeadm-config ConfigMap, so that the next upgrade does not bring back the old
directory.
The snapshot can only be restored on an etcd of the same major and minor version
as the one that produced it. If the upgrade changed the etcd version, also go
back to the manifests from before the upgrade, otherwise the snapshot no longer
matches the binary that reads it. This return to the manifests does not bring the
kubelet back: if kubelet has already been upgraded, it becomes newer than the
API server, which the Kubernetes version skew policy does not allow. This
rollback therefore holds for a failure that occurred before the kubelet upgrade.
Troubleshooting
These symptoms are met during the operation, when the cluster is in an intermediate state, between two versions. Having read them in advance beats discovering them with a half-upgraded node and a maintenance window that is closing.
| Symptom | Likely cause | Solution |
|---|---|---|
apt-get install kubeadm=1.37.0-1.1 does not find the version | pkgs.k8s.io repository still on the previous minor version | Switch kubernetes.list to /v1.37/, then apt-get update |
| Upgrade stuck for 10+ minutes | Slow image pull or network timeout | Check connectivity and pre-pull the images: kubeadm config images pull |
Node stays NotReady after upgrade | kubelet not restarted or wrong version | systemctl restart kubelet; check kubelet --version |
Pods Pending after drain | Not enough resources on the remaining nodes | Check requests/limits; uncordon first then drain again |
| CoreDNS no longer works | Custom CoreDNS ConfigMap overwritten | Restore the config from the backup; check kubectl -n kube-system get cm coredns |
| API server unreachable after upgrade | Expired certificates or port in use | sudo crictl logs <container-id> of the kube-apiserver container |
Hands-on practice
This lab rebuilds the cluster: its installation brings it back to 1.36.4, otherwise there would be no upgrade to carry out. The upgrade to 1.37.0 is then done in order, the control plane first with its own command, the node afterwards, while an application keeps serving. The tests read the versions on each node and check that none was left drained of its Pods.
Challenge: drain a node, put it back in service and upgrade the cluster
The challenge is the unaided proof of the module "Maintain and update". It is graded on the state of the cluster you leave behind, not on the commands you typed. The kubeadm cluster runs one minor version behind, and an application serves with four replicas that must never fall below two available. You protect this application, you drain a worker then put it back in service, you keep a trace of the operation, you upgrade the whole cluster by one minor version, then you copy into the lab's git repository a change made directly on the cluster. No procedure is given to you.
The validation reads seven states, with no solution or value to copy. It checks the disruption budget, the draining of the worker and its return to service, the trace of the operation in a ConfigMap, the versions announced by the API server and then by each node, and the presence of the four replicas. Finally it compares the value in the cluster with the last commit of the repository. For the return to service, the grader starts an ephemeral Pod that the scheduler must place on the worker.
Passing requires 70 points out of 100, and there is no hint. Two states are blocking and must pass whatever the total: the drained worker, with the application Pods recreated elsewhere, and the whole cluster at 1.37.0, with no unschedulable node and all replicas ready. dsoxlab check lists the states that are not satisfied, without saying how to fix them: the lesson to go back to is the one that teaches that state. The challenge builds on this lesson, on Preparing a cluster maintenance (in French), on Managing nodes (in French) and on Maintenance and changes (in French), which puts the maintenance steps in order. Carrying a change made directly on the cluster back into the Git repository is taught in Modifying a resource in production (in French).
Key takeaways
- Upgrade one minor version at a time: 1.36 → 1.37, never 1.35 → 1.37 directly.
- With
pkgs.k8s.io, switch the repository to the target minor version on each node before installing the packages. - The order is strict: control plane first (kubeadm upgrade apply), workers next (kubeadm upgrade node), one node at a time.
- The version skew policy defines the compatibility windows between components. Check it systematically before an upgrade.
- Back up etcd before each upgrade. It is your safety net.
- Read the release notes to anticipate breaking changes and removed APIs.
kubeadm upgrade applyis idempotent: if kubeadm could not roll back by itself after a failure, rerun the same command.- Check the cluster after each node:
kubectl get nodes, system pods, functional test.
Knowledge check
Seven questions on what cannot be recovered: the exact numbers of the version skew tolerance, the mandatory order that follows from it, and the fact that a finished upgrade cannot be undone.
Knowledge check
Check what you have learned with this interactive quiz
How it works
- The timer starts when you click Start
- Multiple choice, true/false and short answer questions
- You can move between questions
- Detailed results are shown at the end
Starts the quiz and the timer
Review
(0/0)Score by domain
A domain groups several guides and gets several questions, so its score is more reliable than a per-topic score, which often rests on a single question.
Summary
Strengths
No topic passed at 80% on at least two questions yet.
Weak areas
No topic below the pass mark.
Recommended next
Hints before you try again?
Continue the course: Make Kubernetes applications reliable in production
A new full quiz with random questions
Work again only on the questions you missed