This guide walks you through installing Proxmox VE 9 on a physical server in 30-45 minutes, or on a dedicated virtual machine, as the section on the two routes explains. This page follows the official ISO; to start from a Debian 13 that is already installed, see Install Proxmox VE 9 on an existing Debian 13. Even if you have never installed a server operating system, this guide details every step with clear explanations. At the end, you will have a working hypervisor ready to host your first virtual machines.
To go further with Proxmox (clustering, ZFS, Ceph, backup, production), you can read Mastering Proxmox, Wasim Ahmed, a book in English.
Amazon affiliate link. Buying through this link supports the site at no extra cost to you.What you will learn
This guide takes you from the empty machine to the web interface, in the order the choices come up. You will be able to:
- choose between a dedicated server and a virtual machine, and size that VM;
- create a bootable USB stick and boot from it;
- choose the filesystem (ext4, ZFS) and reserve the IP address before typing it in;
- decide when to disable Secure Boot, in response to a symptom only;
- log in to the web interface and switch to the free update repository.
What you need
Before you start, gather:
| Item | Why it is needed |
|---|---|
| A dedicated server or PC | Proxmox takes over the whole machine: no workstation, no second system (with no hardware, see the dedicated VM below) |
| A 4 GB USB stick | To create the installation media: the 9.2 ISO weighs 1.6 GB, and a stick sold as 2 GB offers less once formatted |
| A screen + keyboard | For the initial installation (temporary) |
| A network connection | An Ethernet cable plugged into your router/box |
| Another computer | To download the ISO and create the stick |
Two routes to install: dedicated server or virtual machine
Proxmox VE replaces the machine's kernel and takes control of its network: it is therefore never installed on a workstation, nor alongside a system you want to keep. It needs an entire machine, whether physical or virtual. Hence two routes, depending on what you have.
The dedicated server route is the one followed by the rest of this guide: a PC or server to sacrifice, a USB stick and the official ISO. The virtual machine route exists because many readers have no hardware to dedicate to it. You create a VM in your usual hypervisor (VirtualBox, VMware, KVM) and install Proxmox in it, where it is then a guest like any other. Nothing puts your workstation at risk: if the installation goes wrong, you delete the VM.
In a VM, the USB stick of step 3 has no reason to exist: the ISO itself is attached to the VM as a virtual CD drive. Skip step 3, then boot from it at step 4.
What specification should the virtual machine route follow?
A VM that is too small or badly configured lets Proxmox install, then fails afterwards, at the first disk created or the first machine started. The following table therefore sets seven items to respect as soon as the VM is created, each with its reason. These values were measured on 2026-10-27 on an installation of Proxmox VE 9.2.2. They are deliberately larger than the minimum homelab configuration given further down, because the labs create disks and machines inside this Proxmox.
| Item | Expected value | Why |
|---|---|---|
| Version | Proxmox VE 9.x on Debian 13 "trixie" | This is the version taught in this guide and in the course |
| Processor | 4 vCPU | Proxmox and the machines you create in it share the cores |
| Memory | 6 GB of RAM | Proxmox installs its kernel, postfix, open-iscsi and chrony, keeps two kernels during a switchover, and must still hold the disks of the machines created |
| System disk | 40 GB | The system, the two kernels, the ISO images and the first VM disks |
| Second disk | 20 GB, raw, unpartitioned | Without it, the storage labs are impossible: LVM-thin, ZFS pool, adding then removing a vdev |
| Nested virtualization | Enabled on the host hypervisor | Without it, no machine created in this Proxmox starts |
| Network and repository | vmbr0 bridge reachable from your workstation, pve-no-subscription repository configured | You must reach the web interface on port 8006 and be able to update without a subscription |
Nested virtualization consists of running a hypervisor inside a virtual machine: here, your host hypervisor must pass the processor's virtualization extensions (VT-x or AMD-V) through to the Proxmox VM. A vdev is a group of disks inside a ZFS pool, and a bridge (vmbr0) is the virtual switch that connects the machines to the network.
How do you check nested virtualization?
The check takes two steps, because the feature is enabled on the host and observed in the guest. On the host hypervisor (Linux with KVM), the following command must return Y; on an AMD processor, replace kvm_intel with kvm_amd. If your host hypervisor is VirtualBox or VMware, the guide Install DSOXLab locally gives the checkbox to tick in each.
cat /sys/module/kvm_intel/parameters/nestedOnce Proxmox is installed, two checks in the VM confirm that the extensions reach it: the /dev/kvm file must exist, and the vmx counter below must return a nonzero number. A 0 means the option is not enabled on the host: shut the VM down, enable it, then start again.
ls -l /dev/kvmgrep -c vmx /proc/cpuinfoWhich installation method should you choose in a VM?
Three methods exist in a VM, and this page covers the official ISO one. Choose according to what you want to learn or reproduce, the third one having its own page.
- Official ISO, in the console (this page): you answer the installer screen after screen. Do it at least once to learn, because it is the route you will meet in front of a real server.
- Official ISO, automated: the Install Proxmox VE (Automated) entry of
the
Advanced Optionssubmenu makes the installer read its answers from a file prepared in advance, which makes the installation reproducible. The entry is described at step 4, the answer file is not detailed here. - Debian 13, then the Proxmox repository: you first install Debian 13, the system Proxmox VE 9 is built on, then you add the repository and the packages. This is the reproducible route of the course lab, with no graphical console to drive. Its full procedure, with the cloud image traps, lives in Install Proxmox VE 9 on an existing Debian 13.
And if the distinction between a hypervisor installed on the hardware and a hypervisor installed in a virtual machine still escapes you, Type 1 versus Type 2 (in French) lays it out in a few paragraphs.
How do you know whether your installation is compliant?
The course lab has the learner install Proxmox, then scores the compliance item by item. It starts from a bare Debian 13 and not from the ISO: it is therefore found in the lesson Install Proxmox VE 9 on an existing Debian 13.
For an ISO installation, compliance is something you check yourself. The
section "Check that everything works", at the end of step 6, gives the installed
version and the state of the services; the web interface troubleshooting
shows, with ip -brief a, the address carried by the vmbr0 bridge. The VM
specification above sets the seven items to respect as soon as it is
created.
Why use the official ISO?
There are two main ways to install Proxmox:
| Method | For whom? | Difficulty |
|---|---|---|
| Official ISO (this guide) | Everyone, especially beginners | Easy |
| On an existing Debian 13 (route of the lab in a VM) | Comfortable with installing Debian | Hard |
The official ISO is the recommended method because:
- The installer guides you step by step
- The partitioning is automatic (no need to calculate sizes)
- Everything is preconfigured to work together
- You get the web interface ready to use from the first boot
Step 1: Check that your hardware is compatible
Hardware virtualization: mandatory
To run virtual machines, your processor must support hardware virtualization. This is a CPU feature that lets it run the code of isolated machines directly, instead of simulating everything in software, which would be much slower.
| Brand | Technology name | How to check in the BIOS |
|---|---|---|
| Intel | VT-x (or Intel Virtualization Technology) | Look for "VT-x", "Intel VT", or "Virtualization" |
| AMD | AMD-V (or SVM Mode) | Look for "AMD-V", "SVM", or "Virtualization" |
If you already have Linux installed, you can check with this command:
# Check whether virtualization is enabledgrep -E '(vmx|svm)' /proc/cpuinfo- If you see
vmx, Intel VT-x is enabled - If you see
svm, AMD-V is enabled - If nothing is displayed → virtualization is not enabled, go to the BIOS
Minimum versus recommended configuration
To test and learn (homelab)
For a first homelab, aim for the minimum below without overspending: an old desktop PC or a second-hand mini PC is enough to discover Proxmox. The line that really decides is the RAM, not the processor: it is what caps the number of virtual machines you can run in parallel. Look mostly at the right-hand column, it translates each minimum into a concrete use.
| Component | Minimum | What it allows |
|---|---|---|
| CPU | 64-bit with VT-x/AMD-V | Running a few light VMs |
| RAM | 4 GB | 1-2 small VMs (512 MB - 1 GB each) |
| Disk | 32 GB | Proxmox + a few test VMs |
| Network | 1 Ethernet port | Basic access |
For serious use (production)
| Component | Recommended | Why |
|---|---|---|
| CPU | 4+ cores with VT-x/AMD-V | More simultaneous VMs |
| RAM | 16-32 GB | Each VM needs its own RAM |
| OS disk | 64 GB SSD | Proxmox boots faster |
| VM disk | 256 GB+ SSD or 1 TB+ HDD | Storage for your VMs |
| Network | 2 Gigabit ports | Separate management and VM traffic |
RAM: the limiting factor
RAM is often what limits the number of VMs. Each VM needs its own memory:
| What you want to do | Recommended RAM |
|---|---|
| 2-3 light VMs (web server, DNS) | 8 GB |
| 5-10 varied VMs | 16 GB |
| 10-20 VMs or demanding VMs (Windows) | 32 GB |
| Many VMs or ZFS | 64 GB+ |
Simple rule: add up the RAM of your VMs + 2 GB for Proxmox itself.
Step 2: Download the Proxmox ISO
Where do you download it?
-
Go to proxmox.com/downloads
-
Download the latest version (e.g.
proxmox-ve_9.2-1.iso) -
The file is about 1.6 GB (measured on
proxmox-ve_9.2-1.iso), allow a few minutes depending on your connection
Check that the download is correct (optional but recommended)
Sometimes a download can be corrupted (incomplete or damaged file). To check that your file is intact:
# On Linux or macOSsha256sum proxmox-ve_9.2-1.isoCompare the string you get with the one Proxmox publishes, in the
SHA256SUMS file of its image
repository. For the 9.2-1 ISO, the expected value starts with 4e88fe41 and
ends with 2c6c. If the two strings match, your file is
intact: it was neither truncated nor corrupted along the way. A checksum
proves the integrity of the file, not its authenticity: for that, you
would have to verify a signature.
Step 3: Create the bootable USB stick
Why a USB stick?
To install Proxmox, you must boot your server from the installer, not from its hard drive. In the past we burned CDs; today we use a USB stick, faster, reusable, and recognized by every recent BIOS.
Recommended method: Rufus
Rufus is a small free program that creates bootable sticks easily.
-
Download Rufus from rufus.ie
Take the "portable" version, no need to install, it works directly.
-
Plug in your USB stick (4 GB, to hold the 1.6 GB of the ISO)
-
Launch Rufus and configure:
- Device: select your USB stick (check the size to be sure)
- Boot selection: click "SELECT" and choose the Proxmox ISO you downloaded
-
Click START
-
Careful, two important questions:
- "Download a different version of GRUB?" → Click NO
- "Write in ISO or DD mode?" → Choose DD (very important!)
-
Wait for the copy to finish (2-5 minutes depending on the stick's speed)
Alternative: Etcher
If Rufus seems complicated, Etcher is simpler (but less configurable):
- Download and launch Etcher
- Flash from file: select the Proxmox ISO
- Select target: select the USB stick, and check its size so you do not erase another disk
- Flash!: start the write and wait for it to finish
With the Terminal
macOS has no simple graphical tool, but the Terminal does the job very well.
-
Convert the ISO (macOS needs a slightly different format):
Terminal window hdiutil convert proxmox-ve_*.iso -format UDRW -o proxmox-ve.dmg -
Identify your USB stick:
Terminal window diskutil listYou will see a list of disks. Spot your stick by its size (e.g. 8 GB =
/dev/disk2). -
Unmount the stick (but do not unplug it!):
Terminal window # Replace disk2 with your stick's numberdiskutil unmountDisk /dev/disk2 -
Copy the image to the stick:
Terminal window # The "r" before disk makes the copy fastersudo dd if=proxmox-ve.dmg bs=1M of=/dev/rdisk2Enter your Mac password. No progress bar appears, that is normal. Wait 2-5 minutes.
-
Eject cleanly:
Terminal window diskutil eject /dev/disk2
With dd (standard method)
The dd command (disk dump) copies data bit by bit, perfect for creating bootable sticks.
-
Identify your USB stick:
Terminal window lsblkSpot your stick by its size. Example: an 8 GB stick appears as
sdbwith 7.5G. -
Copy the image:
Terminal window # Replace sdX with your stick's letter (sdb, sdc...)sudo dd bs=1M conv=fdatasync if=./proxmox-ve_*.iso of=/dev/sdX status=progressbs=1M: copies in 1 MB blocks (faster)conv=fdatasync: makes sure everything is written before finishingstatus=progress: shows the progress
-
Wait for it to finish (2-5 minutes depending on the stick's speed)
Step 4: Boot from the USB stick
Now that your stick is ready, let's move on to the installation on the server.
-
Plug the USB stick into the server where you want to install Proxmox
-
Also plug in a screen and a keyboard (temporarily, just for the installation)
-
Turn the server on and open the boot menu:
- Press the boot key (often F12, F11, or Esc) right at startup
- Select your USB stick in the list
-
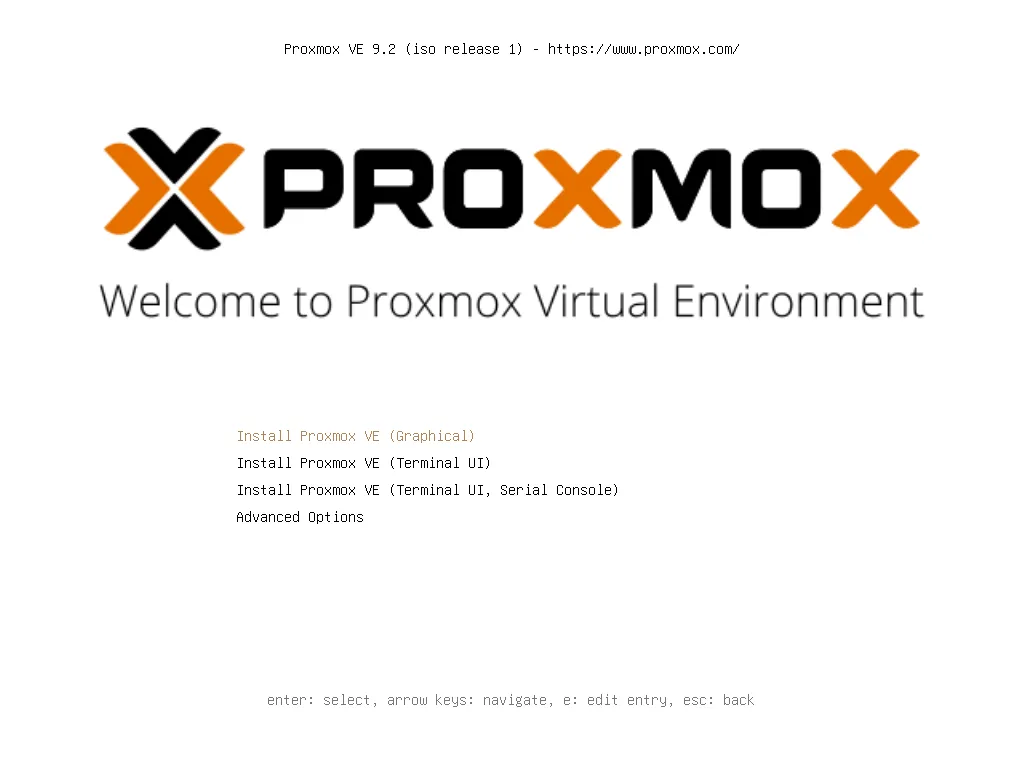
The Proxmox menu appears:
It has four entries, observed on the 9.2-1 ISO:
Option When to choose it Install Proxmox VE (Graphical) Normal case, choose this one Install Proxmox VE (Terminal UI) If the graphical screen stays black or frozen Install Proxmox VE (Terminal UI, Serial Console) Server driven through a serial port, no screen Advanced Options Submenu: nomodeset, diagnostic modes, rescue, memory testThe arrow keys move the selection,
Enterconfirms,eopens the editing of the boot line andEscgoes back. The installer reminds you of these keys at the bottom of the screen.
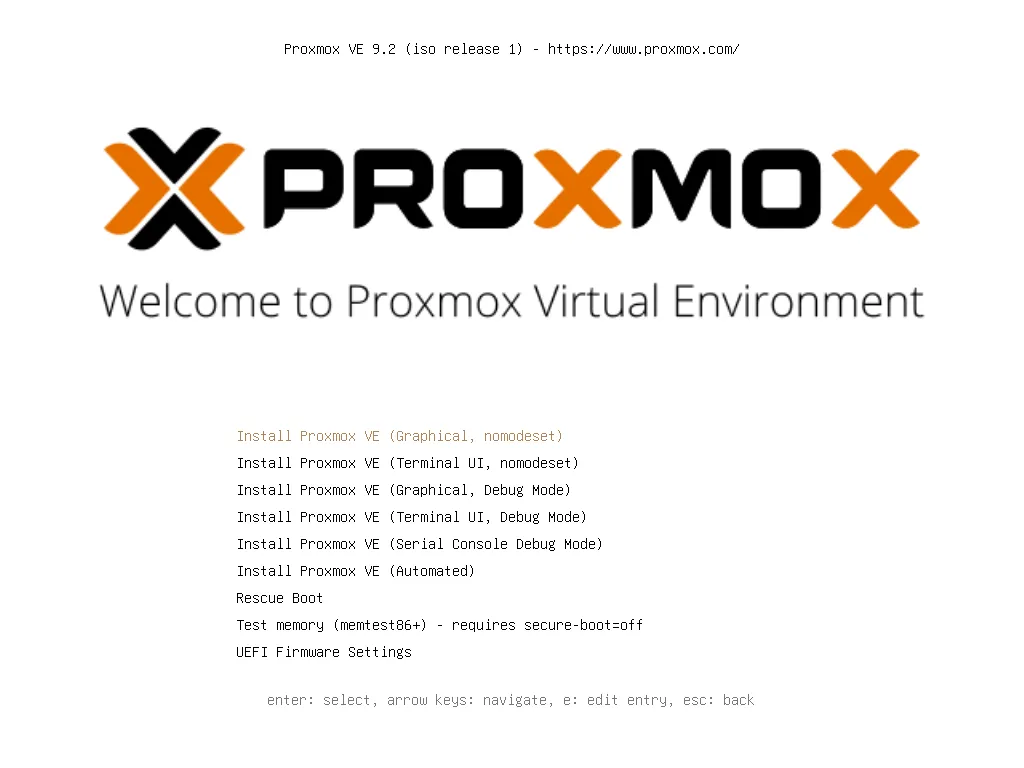
Black or frozen screen? On some hardware (very old or very recent), the graphics drivers cause problems.
The installer already has an entry ready for this case. In the boot menu, open
Advanced Options, then choose Install Proxmox VE (Graphical,
nomodeset). The nomodeset parameter disables the kernel's takeover of the
graphics card: the display is cruder, and it works where the
screen stayed black.
This submenu has nine entries, observed on the 9.2-1 ISO: the two nomodeset
variants, three Debug modes, the automated installation, the
Rescue Boot that repairs an existing installation, a memory test
(memtest86+, which requires Secure Boot to be disabled) and access to the
UEFI settings.
If you need a parameter other than nomodeset, you have to
edit the boot line yourself:
- move to the entry you want, without confirming it;
- press
eto edit it; - go to the line that starts with
linux; - add your parameter at the end of that line;
- press
Ctrl+Xto boot. This change is temporary: it does not survive a reboot.
Do you need to disable Secure Boot to install Proxmox?
No, not on principle: Proxmox VE supports Secure Boot. According to the Proxmox wiki (Secure Boot Setup, consulted on 2026-10-28), its boot loader has been signed by the official Microsoft Secure Boot certificate since Proxmox VE 8.1, and every fresh installation of version 9 already contains the signed packages (shim, GRUB and kernel). So leave the option as your firmware offers it: it protects you from a modified loader or kernel.
Three real limits are worth knowing. Secure Boot only exists in UEFI mode, not in classic BIOS or CSM. A kernel you compile yourself or a DKMS module (a driver rebuilt at every kernel update) must be signed with a key that you enroll. Finally, the memtest86+ entry of the boot menu requires Secure Boot to be disabled.
Disabling it is therefore justified in response to a precise symptom, not beforehand.
That symptom is the one described by the Proxmox wiki, in the
"Troubleshooting" section of the page
Install Proxmox VE on Debian 13 Trixie
(consulted on 2026-10-28): "If the kernel fails to boot with error: bad shim signature., make sure Secure Boot is disabled." In other words, if the kernel
refuses to start with this message, disable Secure Boot in the firmware,
long enough to diagnose. This wiki page deals with installation on
Debian. No source deals with the ISO route separately: the message belongs to the
Secure Boot chain and not to the installation route, so it is handled the same
way after an installation from the ISO. Then re-enable Secure Boot, and check
the state with mokutil --sb-state, which must answer SecureBoot enabled.
Step 5: The installation, step by step
The Proxmox installer guides you through 6 screens. Here is what you need to know about each one.
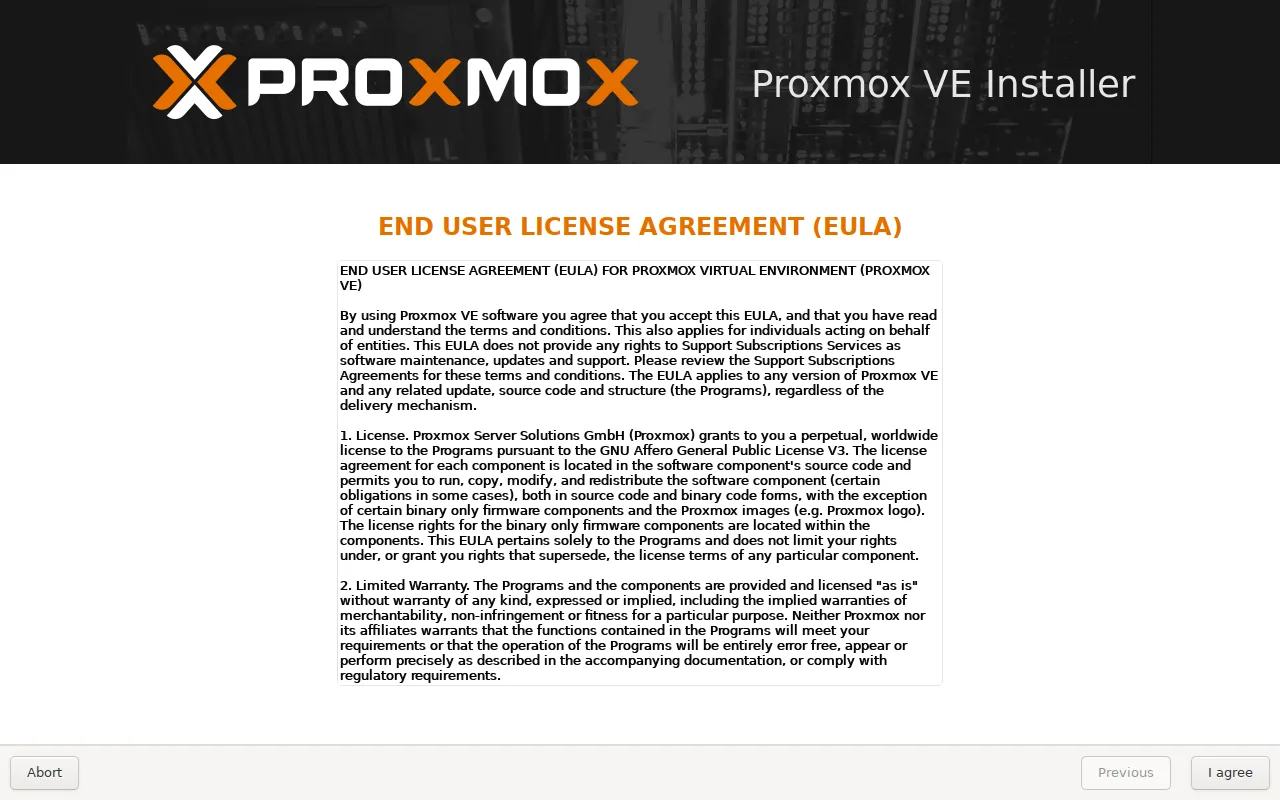
Screen 1: License (EULA)
Click I agree. Proxmox VE is distributed under the GNU AGPL v3 free license, and can be used without a subscription.
Screen 2: choose the disk and the filesystem, a choice with no way back
This is where you decide where and how Proxmox will be installed.
Which disk should you choose?
If you have several disks, select the one where you want to install the Proxmox system. Generally, you choose:
- An SSD for performance (Proxmox boots faster)
- The smallest one if you have an SSD + a big HDD (the HDD will then serve for the VMs)
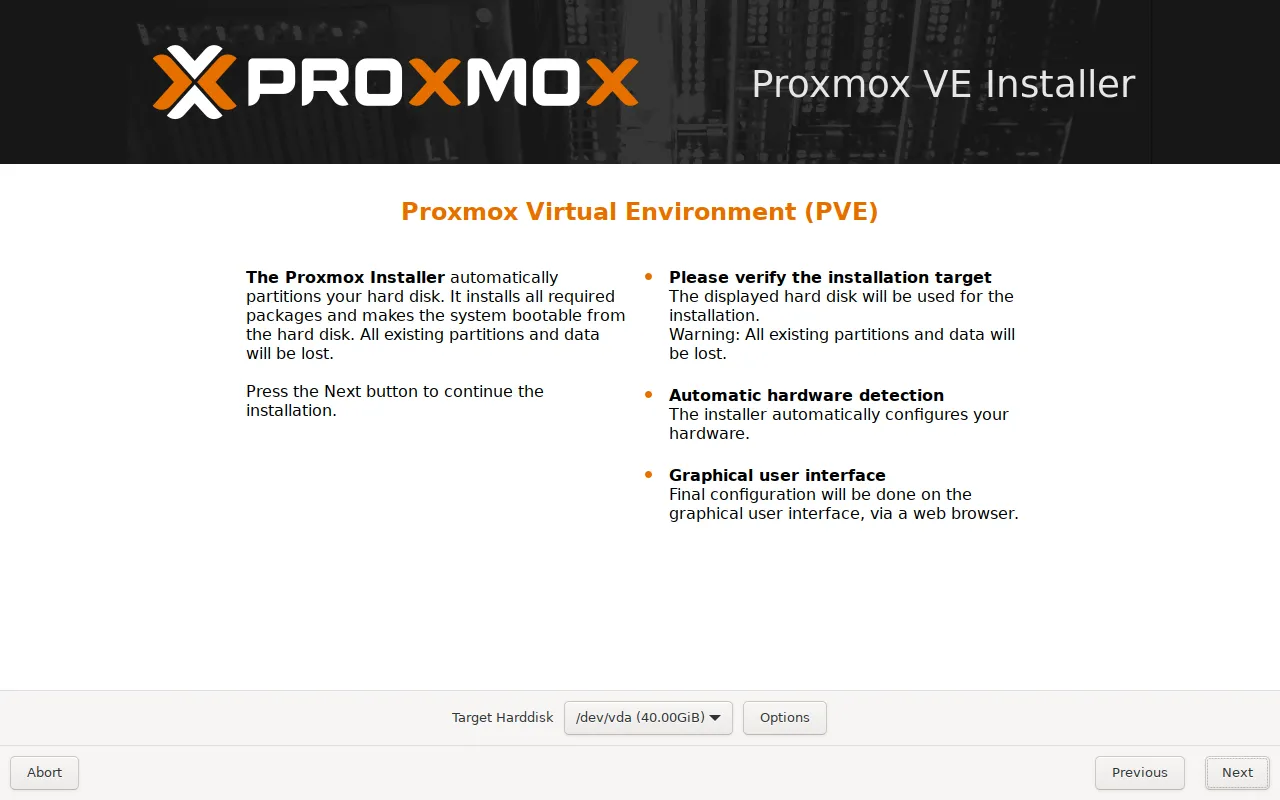
Which filesystem? Click "Options"
The filesystem determines how your data is structured on the disk: snapshots, redundancy, memory consumption. This choice conditions the features you will have afterwards, and it cannot be changed later without reinstalling everything.
| System | What is it? | For whom? |
|---|---|---|
| ext4 | The standard Linux system, simple and proven | Beginners, simple homelab |
| XFS | Like ext4, optimized for very large files | Heavy file servers |
| ZFS | Advanced system with built-in RAID and data protection | Production, critical data |
| BTRFS | Integration still young in Proxmox | To be avoided for now: support is not stable |
Understanding the ext4/XFS options (with LVM)
If you choose ext4 or XFS, Proxmox uses LVM (Logical Volume Manager) to organize the disk. LVM adds a layer between the physical disk and the partitions: it pools the space into a volume group (pve), then carves logical volumes out of it that you can grow or shrink without repartitioning the disk. This flexibility is what makes LVM more practical than classic partitioning.
Your hard drive└── pve (LVM volume group) ├── root (system logical volume) - where Proxmox is installed ├── swap (swap logical volume) - fallback when RAM is full └── data ("thin" pool) - for the disks of your VMs and containersHere is what this actually gives, read with lvs on a fresh installation
done on a 40 GB disk:
| Volume | Size obtained | Share of the disk |
|---|---|---|
| root | 17.31 GB | about 43% |
| swap | 4.88 GB | about 12% |
| data (thin) | 10.43 GB | about 26% |
| free space of the group | 4.88 GB | kept in reserve |
Two lessons. First, the installer does not allocate the whole disk: it leaves a free reserve in the volume group. Second, it is root that takes the biggest share on a small disk, which leaves little room for the machines: on 40 GB, only about ten gigabytes remain for your VMs. That is enough to learn, too tight for real use.
Advanced options (you can keep the default values):
| Option | What it does | Advice |
|---|---|---|
| hdsize | How much of the disk to use | Already prefilled with the disk size: keep the proposed value |
| swapsize | Swap size | Empty by default. 4 to 8 GB are enough, even with 64 GB of RAM |
| maxroot | Maximum size of the system volume | Empty by default. 96 GB is already comfortable |
| minfree | Space left free in the volume group | Empty by default. This space serves LVM-thin snapshots |
| maxvz | Maximum size of the data volume | Empty = all the rest |
A clarification that avoids hesitation in front of the screen: only hdsize carries a value, the other four fields are empty, and an empty field means here "compute it for me".
Understanding the ZFS options (for the curious)
ZFS is more complex, but it brings snapshots and redundancy that LVM does not offer. First point that surprises: the RAID level is not chosen separately, it is part of the name of the filesystem. Observed on the 9.2-1 installer, here is the full list of the selector.
| Selector entry | Disks | Protection |
|---|---|---|
ext4, xfs | 1 | None, with LVM |
zfs (RAID0) | 1 or more | None: losing one disk loses the whole pool |
zfs (RAID1) | 2 or more | Survives the loss of one disk, capacity divided by two |
zfs (RAID10) | 4 or more | Striped mirrors, fast and redundant |
zfs (RAIDZ-1) | 3 or more | Survives 1 failure |
zfs (RAIDZ-2) | 4 or more | Survives 2 failures |
zfs (RAIDZ-3) | 5 or more | Survives 3 failures |
btrfs (RAID0 / RAID1 / RAID10) | depending on the level | Integration still young in Proxmox |
The names single and mirror, which you meet in older tutorials
and in ZFS terminology, do not appear in this installer:
look for RAID0 and RAID1.
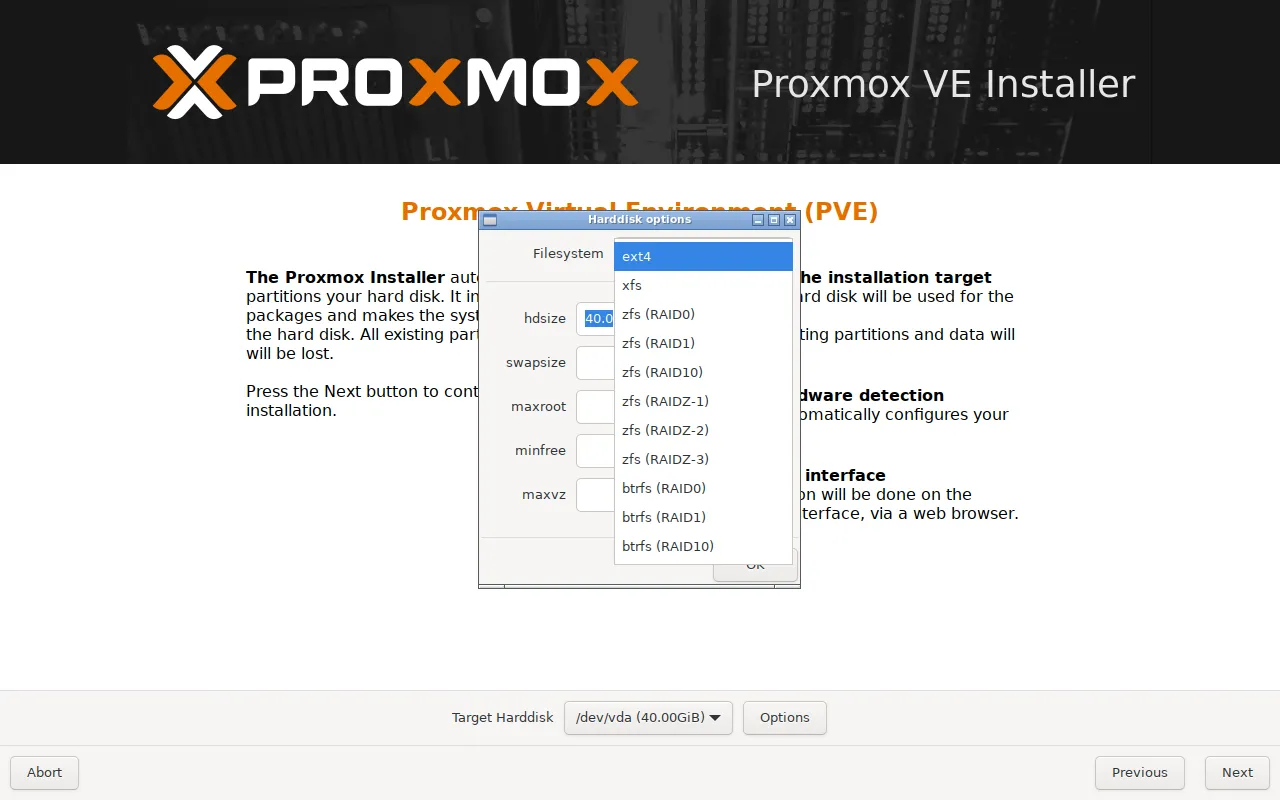
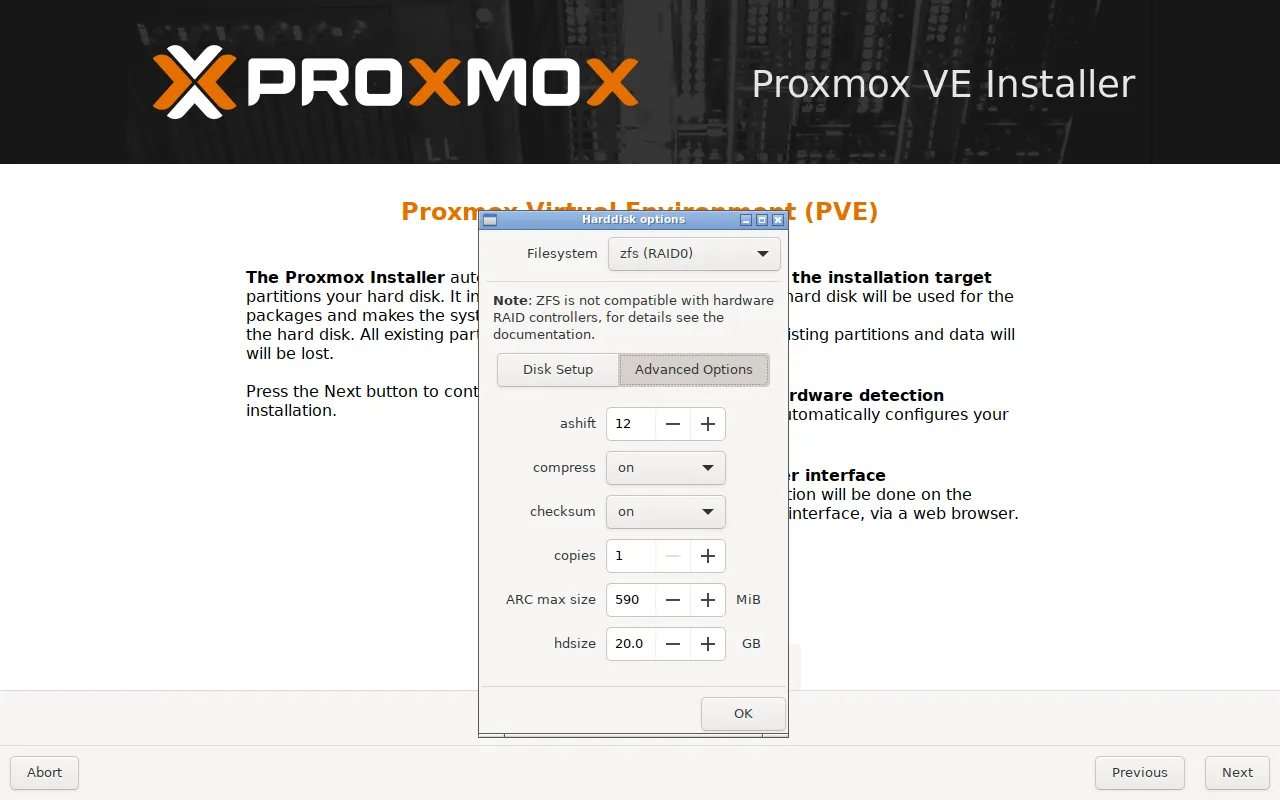
As soon as a ZFS system is selected, the panel displays a warning you must read, and which the box below comes back to: "ZFS is not compatible with hardware RAID controllers". Two tabs then appear, Disk Setup, which chooses the pool's disks, and Advanced Options, whose default values, observed on a machine with 6 GB of RAM, follow.
| Option | What it does | Proposed value |
|---|---|---|
| ashift | Sector size, as a power of 2 | 12, i.e. 4 KiB. The field is numeric, there is no "auto" value |
| compress | Compresses data on the fly | on, which applies ZFS's default algorithm |
| checksum | Verifies the integrity of each block read | on, this is what detects silent corruption |
| copies | Number of copies of each block | 1: redundancy comes from the RAID, not from this setting |
| ARC max size | Memory reserved for the read cache | 590 MiB on this 6 GB machine, i.e. the 10% that the installer has capped since PVE 8.1 |
Keep these values for a first installation. The line that matters is ARC max size: it confirms on screen the cap described above. You will still come across tutorials advising to set it to half of the RAM, which has not been the default since Proxmox VE 8.1.
Screen 3: Location
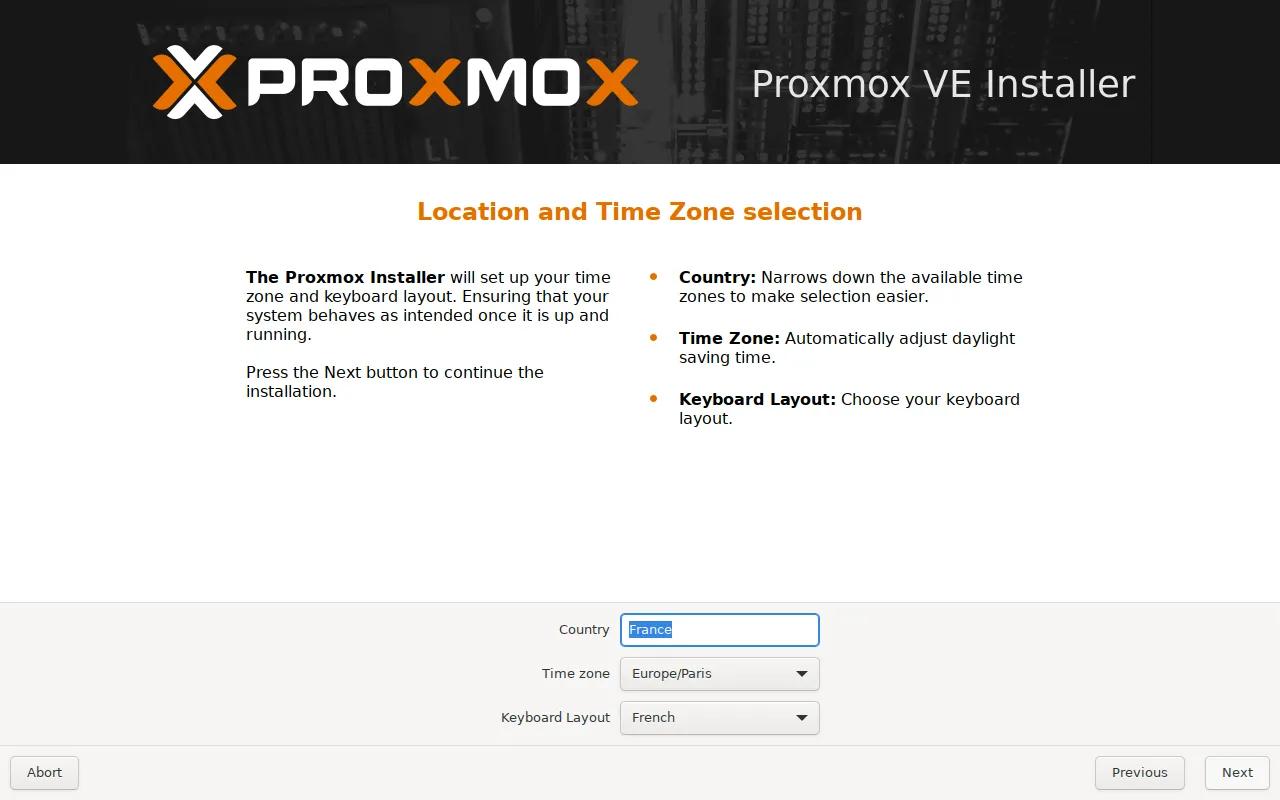
This screen looks harmless, but two of its fields have a real technical effect, not just a cosmetic one. The country guides the choice of download mirrors, and the time zone determines the timestamp of all your logs: a wrong value makes debugging painful the day you cross-reference Proxmox's logs with those of another device.
Good news, there is generally nothing to type: the installer detects
the country and prefills the three lines. On the bench used for this guide,
it already proposed France, Europe/Paris and French. Check them rather
than retyping them, and look above all at the keyboard layout: it is
the one that will be used to type your password on the next screen.
| Field | What to enter | Why it matters |
|---|---|---|
| Country | France | Proxmox will download from nearby servers = faster |
| Time zone | Europe/Paris | So that the log timestamps are correct |
| Keyboard Layout | French | So that your AZERTY keyboard works correctly |
Screen 4: Password and email
| Field | What to enter |
|---|---|
| Password | The installer requires a minimum of 8 characters. Aim rather for 12 or more, with uppercase, digits and symbols: this password opens the root access of the hypervisor |
| Confirm | The same password, to avoid typing mistakes |
| Your real address |
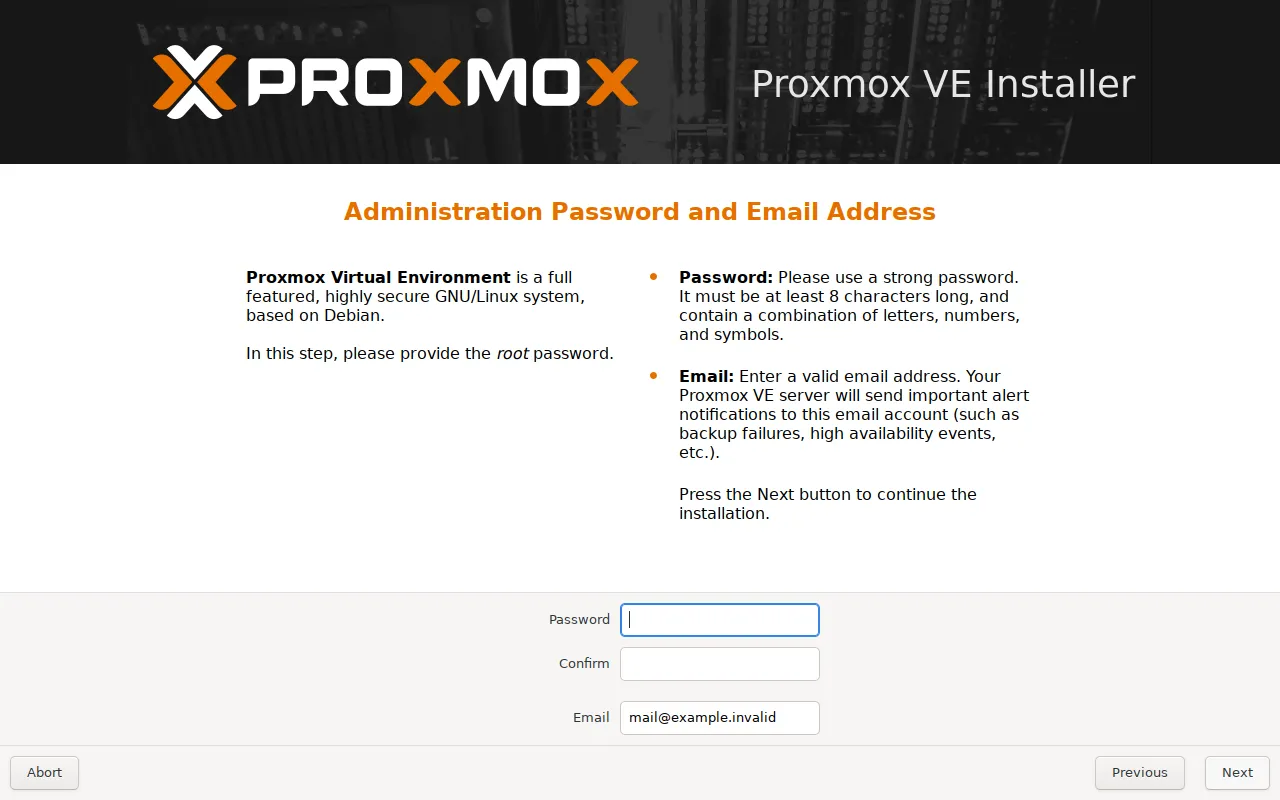
Why is this address requested? Because Proxmox uses it to warn you, and these messages matter: a disk showing signs of failure, security updates available, a failed automatic backup. This is not advertising: it is the alert channel that Proxmox uses by default, and an address that you never read deprives you of these alerts. So give an address that you actually check.
Screen 5: network configuration
A mistake on this screen only shows after the reboot: the web interface becomes unreachable, and you then have to fix the network from the server console.
First point that puzzles: there is no "Netmask" field. The mask is
entered in CIDR notation, in the small field to the right of the address. If
you are looking for where to type 255.255.255.0, write 24 in that field: it is
the same thing, expressed as a number of bits.
| Field | What it is | Example |
|---|---|---|
| Management Interface | The network card to use, with its MAC and driver | nic0 - 52:54:00:… (virtio_net) |
| Hostname (FQDN) | The full name of the server | pve1.home.lab |
| IP Address (CIDR) | The fixed address, then the prefix in the neighboring field | 192.168.1.100 and 24 |
| Gateway | The address of your router or box | 192.168.1.1 |
| DNS Server | The DNS server | 192.168.1.1 |
| Pin network interface names | Freezes the names of the network cards, checked by default | leave it checked |
Second point, reassuring: everything is already prefilled. The installer queried the network over DHCP (the service that automatically hands out addresses on a network, run by your box in most cases) and proposes an address, a gateway and a DNS that work. Your job is to replace the automatically obtained address with the one you have chosen, not to type everything.
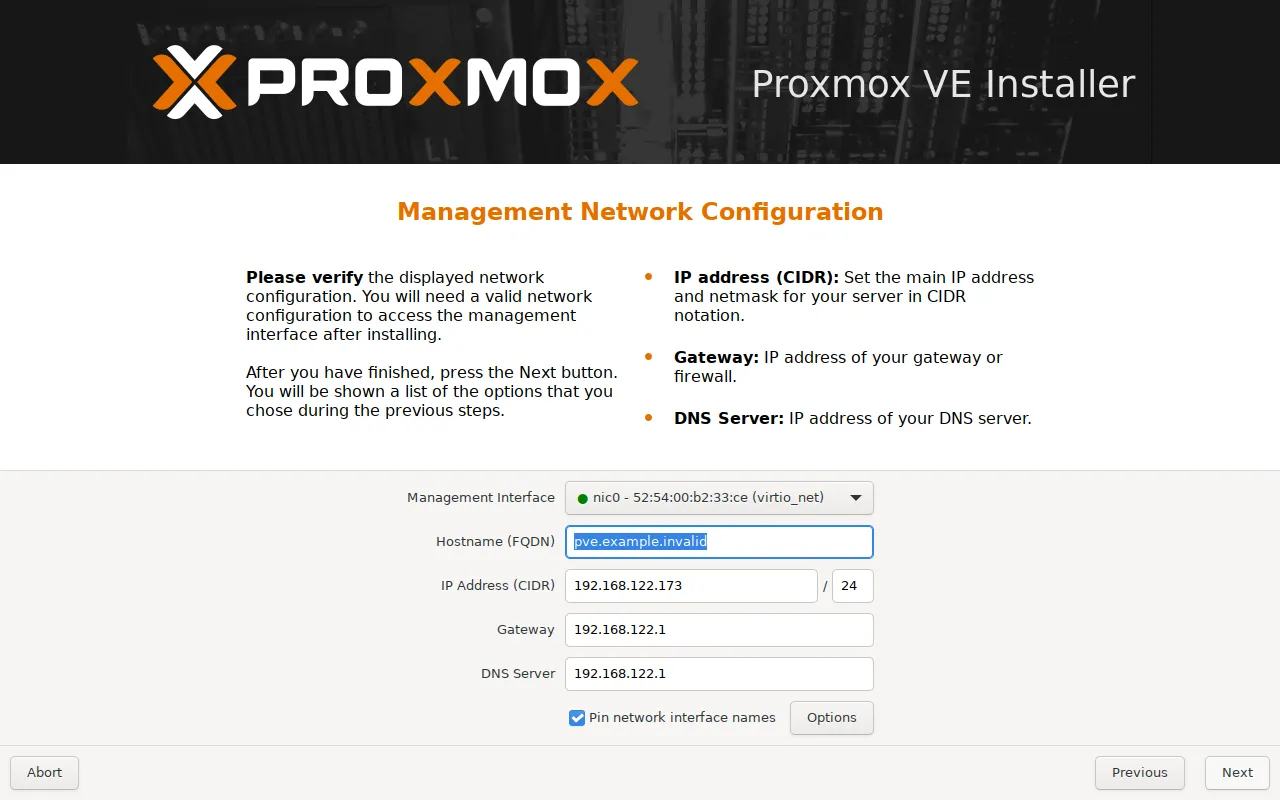
How do you fill in each field?
1. Management Interface
The installer automatically detects your network cards. Choose the one that is plugged in (the installer indicates which ones are connected).
2. Hostname (FQDN)
The name must have the form name.domain.extension:
| Example | Valid? | Why |
|---|---|---|
pve1.home.lab | Yes | Name + domain + extension |
proxmox.mynetwork.lan | Yes | Name + local domain in .lan |
pve1 | No | No domain (incomplete) |
my server.lan | No | Spaces not allowed |
PVE1.Home.Lab | Avoid | It works, but prefer lowercase |
3. IP Address: how do you choose it?
Choose a static IP (fixed): if the address changed, you would no longer know how to reach Proxmox. Four steps, in this order, make it reliable.
- Find your network from your PC's IP: if it is
192.168.1.50, your network is192.168.1.x. - Choose an address outside the DHCP range. Your box automatically hands out addresses in a range (for example 100 to 199): a static address placed inside it could be given to another machine.
- Reserve the address, because that is what guarantees nobody else receives it. You have three ways: a DHCP reservation in your box (the address is tied to the machine's MAC), an entry in an IPAM (the tool that keeps the inventory of an organization's addresses), or, failing that, a static range that you maintain in a file or a table, outside the DHCP range.
- Check before you enter it, with a measurement that really answers the question: the
arping -Dduplicate detection, detailed right after.
For this check, arping -D is used from another Linux machine on the same local network. It sends an ARP request (local network address resolution, explained further down) for duplicate detection for the target address. The package is called iputils-arping on Debian and Ubuntu, and eth0 is to be replaced with your card:
sudo arping -D -I eth0 -c 3 192.168.1.100echo $?# 0: nobody answered during the test# any other value: a machine already carries the address, pick anotherWith no Linux machine at hand, consult your box's DHCP server: its list of leases and reservations shows the addresses already allocated.
A silent ping proves nothing. A machine may not answer
ICMP (the ping protocol) because a firewall filters it, which is what
Windows machines do by default, or because it is powered off at the time of
the test. In both cases, the address is nevertheless taken, and reusing it creates an
address conflict that cuts both machines off intermittently. Conversely, a ping that answers proves that the address is taken.
arping -D does better, because ARP (the resolution of an IP address into a MAC
address (in French), on the local network) is a
layer 2 resolution that IP filtering rules do not see: a machine that is powered on
therefore answers it even when it ignores ping. Layer 2 filtering remains
possible, but rarer. arping -D has two other limits: it does not cross
a router (same network segment only), and it does not see a machine that is
off or a device that has not yet taken its DHCP lease. That is why the check comes after the reservation, never in its place.
Examples of addresses to favor (if your network is 192.168.1.x):
192.168.1.10to192.168.1.30are often outside the DHCP range, because the range of most boxes starts higher- Avoid
192.168.1.1, it is almost always your box - Above all, read the real DHCP range in your box's interface, it is
the only one that counts. The examples in this guide and in the rest of the course
use
192.168.1.100: check that it is outside your DHCP range, or reserve it, before using it as is
Finally: CIDR prefix, Gateway and DNS
| Field | Usual value | How to find it |
|---|---|---|
| CIDR prefix | 24 | It is the equivalent of 255.255.255.0, and applies to almost all home networks |
| Gateway | 192.168.1.1 or 192.168.0.1 | The address of your box or router |
| DNS | The same as the gateway | Your box relays DNS requests. A public resolver also works, at the price of entrusting your browsing to its operator |
Screen 6: Summary and installation
The Summary screen recaps your eleven answers. Check them, and above all the Disk(s) line: it is the disk that is going to be erased. If something is wrong, Previous goes back.
A checkbox is ticked under the table, Automatically reboot after successful installation. It explains the advice below: the server restarts by itself at the end, without leaving you time to remove the stick.
The previous screens were confirmed with Next; this one carries the Install button, and it is from this click that the disk is written, and so erased.
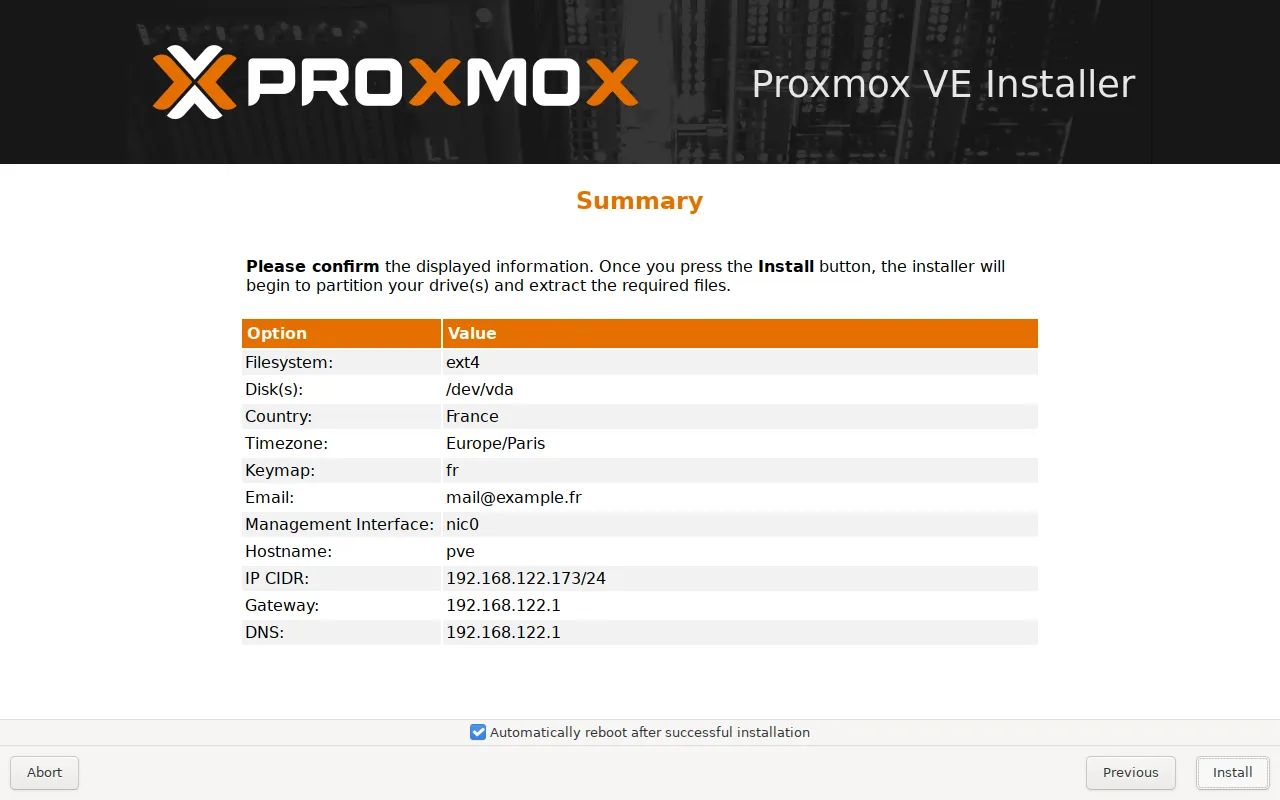
The installation time depends mostly on the disk: measured at about 80 seconds on an NVMe disk, it takes much longer on a mechanical disk. You see a progress bar scroll by and the name of each package installed.
Once finished:
- Remove the USB stick (in a VM, detach the ISO), otherwise the machine will restart on it and relaunch the installer
- The server restarts automatically
- A text screen displays the URL for logging in to the web interface
Step 6: First access to the web interface
Log in from your browser
-
On another computer (your usual PC), open your favorite browser
-
Type the address:
https://YOUR_IP:8006Example:
https://192.168.1.100:8006 -
Your browser will display a security warning, this is normal!
The certificate is "self-signed" (created by Proxmox itself, not by a recognized authority). It is not dangerous on a local network.
- Chrome: click "Advanced" → "Proceed to [IP] (unsafe)"
- Firefox: click "Advanced" → "Accept the Risk and Continue"
- Edge: click "Details" → "Continue to [IP] (unsafe)"
-
Log in:
- User name:
root - Password: the one you chose during the installation
- Realm:
Linux PAM standard authentication - Language: the interface language you prefer (French, for example)
- User name:
Configure updates (no-subscription repository)
By default, Proxmox enables an Enterprise repository (paid) that you cannot query without a subscription. For personal use, switch to the no-subscription repository, which is free. Careful: there are two Enterprise repositories, not one, and that is the trap of this step.
Via the web interface (recommended method):
-
In the left menu, click your server's name (e.g.
pve1) -
Click Updates → Repositories
-
You will see a
pve-enterpriseline marked with a warning icon, this is normal (it does not work without a subscription) -
Select the
pve-enterpriseline and click the Disable button -
Also disable the Ceph Enterprise line, the one whose URL starts with
enterprise.proxmox.com/debian/ceph-. This is the second paid repository, and forgetting it makes theRefreshof step 7 fail on a 401 error, which is surprising when you think you have disabled everything. Ceph is the distributed storage of Proxmox: you only need it if you deploy it, and a free version then exists (see "Errors during updates" in the troubleshooting section) -
Click the Add button, select No-Subscription in the list, then Add. The line created is called
pve-no-subscription: this is the name you will find in the files and inaptmessages -
Go back to Updates, click Refresh to check the available updates
-
If updates appear, click Upgrade to install them
After the switch, the pve-no-subscription line also keeps a warning in
that list, and this is not a flaw in your installation: it is how Proxmox
marks a repository it does not intend for production. The box below says
what that actually implies.
Check that everything works
Log in over SSH or through the web console (click your node → Shell) and check:
# Display the installed Proxmox versionpveversion
# Result observed on a fresh 9.2 installation, on 2026-10-27. The last# digits vary depending on the updates applied:# pve-manager/9.2.2/b9984c6d90a4bd80 (running kernel: 7.0.2-6-pve)# Check that the Proxmox services are runningsystemctl status pve-cluster pvedaemon pveproxy
# You must see "active (running)" for each service# See the available disk spacedf -h /
# The "/" line gives the system's space. Do not look for your VMs there:# with LVM, their disks live in the "thin" pool pve/data, which is not# mounted and therefore does not appear in df. lvs is what shows it:lvsTroubleshooting: common problems
The installation does not start
Even before you see the Proxmox installer, several blockages occur when booting from the USB stick. They almost all have the same origin: the BIOS/UEFI not booting from the right medium, or a badly written stick. A classic trap is the write mode: Proxmox requires writing in raw disk image (DD) mode, not in classic ISO mode, otherwise the stick is not bootable. Go through the middle column, it is what tells a BIOS problem from a stick problem.
| Symptom | Likely cause | Solution |
|---|---|---|
| The PC boots into Windows/Linux | The USB stick is not the priority | Change the boot order in the BIOS |
| Black screen after selection | Graphics driver problem | Advanced Options then the Graphical, nomodeset entry, or failing that Terminal UI |
| "No bootable device" message | The firmware finds no boot code on the stick: boot order or badly written stick | Check the boot order, then recreate the stick in DD mode |
The kernel does not start, message error: bad shim signature. | A signature is missing in the Secure Boot chain | Disable Secure Boot in the firmware long enough to diagnose, see the dedicated section |
| The USB stick does not appear | Stick badly created | Recreate it with Rufus in DD mode |
| "Missing operating system" error | Stick created in ISO mode | Recreate it with DD mode (not ISO) |
Unable to reach the web interface
| Symptom | Likely cause | Solution |
|---|---|---|
| "Connection refused" / "ERR_CONNECTION_REFUSED" | Wrong IP or service stopped | Check the IP on the server with ip a |
| Timeout (nothing happens) | Not on the same network, or firewall | Check that you are on the same network |
| "Invalid certificate" / "Your connection is not private" | Normal (self-signed certificate) | Accept the security exception |
http://IP:8006 does not load | The "s" of HTTPS is missing from the address | Port 8006 only serves HTTPS: type https://IP:8006 |
| Port 8006 is open but nothing answers | The node's certificate is missing: pveproxy listens and its workers die | journalctl -u pveproxy -n 20, then pvecm updatecerts --force |
This last line deserves a word, because it misleads the diagnosis: the
service is indeed active, the port indeed listened on, and yet no answer
comes. The pveproxy journal then names the real cause, an unusable
/etc/pve/local/pve-ssl.pem, and it is the resolution of the node's name
that must be repaired before regenerating the certificate. After an
installation from the ISO, this case is rare, because the installer itself writes
/etc/hosts with the address and name entered on screen 5: the installer's
source code
(Proxmox/Install.pm,
consulted on 2026-10-28) builds this file there from the IP address, the
hostname and the domain of the configuration. The case is however common
on a cloud image, and covered in
Install Proxmox VE 9 on an existing Debian 13.
To check the IP on the server (with the keyboard directly connected):
ip -brief aLook for the address under vmbr0, and not under the physical card. At
installation, Proxmox indeed creates a network bridge named vmbr0, gives it
the server's address, and leaves the physical card without an address, in
manual. This is the bridge your future virtual machines will use
to reach the network. Output observed on a fresh installation:
lo UNKNOWN 127.0.0.1/8 ::1/128nic0 UPvmbr0 UP 192.168.122.173/24 fe80::5054:ff:feb2:33ce/64To check that Proxmox answers:
ss -tlnp | grep 8006# Must show a line with "pveproxy" - otherwise the service is stoppedTo restart the service if needed:
systemctl restart pveproxyErrors during updates
Message "401 Unauthorized" or "Failed to fetch":
An Enterprise repository is still active, and you have no subscription. Read the repository name in the message, because there are two: the Proxmox VE one and the Ceph one. This is the message the second gives when only the first has been disabled:
Err:5 https://enterprise.proxmox.com/debian/ceph-squid trixie InRelease 401 Unauthorized [IP: 51.91.38.34 443]The fix is the same as for pve-enterprise: disable that repository. If
you do deploy Ceph storage, replace it with its free version, which lives on
download.proxmox.com with the no-subscription component. The version
name after ceph- changes with Proxmox releases, squid then tentacle:
read the one your file carries rather than copying ours.
Proxmox VE 9 is built on Debian 13, which describes its repositories in the
deb822 format: .sources files made of Key: value fields, and no
longer the old deb http://… lines of .list files. Procedures
written for Proxmox VE 8 therefore do not apply as is.
A fresh installation contains only three repository files, observed on
2026-10-27, and /etc/apt/sources.list no longer exists at all:
ls /etc/apt/sources.list.d/# ceph.sources debian.sources pve-enterprise.sourcesThis listing carries the cause of the Ceph 401: ceph.sources is right
there, placed by the installer, and it is the one holding the second paid
repository. So the two files to deal with are pve-enterprise.sources and
ceph.sources, not the first one alone.
The same listing shows a last thing: the no-subscription repository is not present at the start. You add it yourself, through the web interface as described above, or by hand.
# Check the state of the Enterprise repositorycat /etc/apt/sources.list.d/pve-enterprise.sources
# To disable it, add the Enabled field to it. Commenting out a line does not# work here: the deb822 format has no "deb" line to comment out.echo 'Enabled: false' >> /etc/apt/sources.list.d/pve-enterprise.sources
# Second paid repository, the Ceph one: read the paragraph under this block firstecho 'Enabled: false' >> /etc/apt/sources.list.d/ceph.sources
Open the Ceph file before appending this line. A >> always writes at the
end of the file. If ceph.sources holds a single entry, the line lands in the
right place. If it holds several, separated by an empty line (the Proxmox wiki
shows the content of this file depending on the repository chosen: enterprise,
no-subscription or test), the command would disable only the last one,
which is not necessarily the one blocking you. Find the entry whose URIs field
starts with enterprise.proxmox.com, and that is the one that gets the
Enabled: false. The web interface makes this distinction on its own, which
is one more reason to leave it in charge.
The file of the free repository, which the interface creates for you or
which you write by hand in /etc/apt/sources.list.d/, is called proxmox.sources
and not pve-no-subscription.sources: its file name does not reuse
the repository's name, which is surprising when you look for it. It contains the following, the
Signed-By field designating the key that authenticates the packages:
Types: debURIs: http://download.proxmox.com/debian/pveSuites: trixieComponents: pve-no-subscriptionSigned-By: /usr/share/keyrings/proxmox-archive-keyring.gpgThe URL is indeed HTTP, and this is not an oversight: APT does not trust the transport, it verifies the signature of each package index
with the key designated by Signed-By. A package modified along the way would be
rejected at installation. Then run the update again:
apt update && apt full-upgrade -ySecurity: first recommended measures
Your Proxmox works! Here are a few security best practices to apply:
| Action | Why | How |
|---|---|---|
| Create a non-root user | Do not use root day to day | Datacenter → Permissions → Users → Add |
| Configure fail2ban | Block brute-force attacks | apt install fail2ban |
| Enable the Proxmox firewall | Limit incoming connections | Datacenter → Firewall → Options → Firewall: Yes |
| Update regularly | Fix security flaws | Updates → Refresh → Upgrade |
Key takeaways
You have installed Proxmox VE 9 successfully! Here are the key points:
- The official ISO is the recommended route for Proxmox VE 9.2 (Debian 13, kernel 7.0, QEMU 11.0, ZFS 2.4). Without a dedicated server, install in a compliant VM (6 GB of RAM, raw second disk, nested virtualization enabled); to start from an existing Debian 13, follow the dedicated lesson
- Hardware virtualization (VT-x/AMD-V) must be enabled in the BIOS before the installation
- The installation erases the chosen disk, and the filesystem cannot be changed without reinstalling everything: take ext4 if you are starting out
- With ZFS, set a second disk reserved for something else to do not use, configure a RAID card in HBA mode, and know that the ARC is capped at 10% of the RAM (16 GiB at most) since PVE 8.1: read
zfs_arc_maxorc_maxon your machine - The hostname is an FQDN (e.g.
pve1.home.lab) and the IP is static and reserved: a silentpingdoes not prove that an address is free, check witharping -Dafter the reservation - Proxmox VE supports Secure Boot: disable it only in response to
error: bad shim signature. - Switch to the no-subscription repository for free updates (homelab and learning, not production), disabling
both Enterprise repositories, the Proxmox VE one and the Ceph one:
forgetting the second gives a 401 error on the first
Refresh - The web interface is at
https://IP:8006(with the S of HTTPS)
Knowledge check
Check that the essentials of this lesson are in place. The questions only cover what has just been explained here.
Knowledge check
Check what you have learned with this interactive quiz
How it works
- The timer starts when you click Start
- Multiple choice, true/false and short answer questions
- You can move between questions
- Detailed results are shown at the end
Starts the quiz and the timer
Review
(0/0)Score by domain
A domain groups several guides and gets several questions, so its score is more reliable than a per-topic score, which often rests on a single question.
Summary
Strengths
No topic passed at 80% on at least two questions yet.
Weak areas
No topic below the pass mark.
Recommended next
Hints before you try again?
Continue the course: Install Proxmox VE 9 on an existing Debian 13
A new full quiz with random questions
Work again only on the questions you missed
FAQ: common questions about installing Proxmox from the ISO
These are the questions that come up most often after a first Proxmox installation, gathered here so you do not have to search the guide again. They cover the installation method, whether it is free of charge, the choice of the filesystem and the minimum configuration.
dd), boot from it and start the graphical installer. Pick the file system, set a static IP and an FQDN hostname, then open the web interface at https://IP:8006.