This guide walks you through creating your first virtual machine in Proxmox VE. You will understand each option of the creation wizard, make the right virtual hardware choices, install a guest OS (Debian 13) and check that everything works. At the end, you will have a working VM with the guest agent installed and a first snapshot.
What you will learn
- The options of the creation wizard and what they mean
- UEFI or SeaBIOS: which firmware to choose and why
- VirtIO: why it matters for performance
- Create the same VM from the CLI with
qm create - Install qemu-guest-agent so that Proxmox can talk to the guest OS
- Take a first snapshot
- Serve a page from the VM and check that it comes back after a reboot
Prerequisites
Four things are needed for what follows: an installed Proxmox VE, a web interface you have already explored, an ISO available in a storage, and enough resources for a small VM.
| Item | Detail |
|---|---|
| Proxmox VE installed | Version 8.x or 9.x, installation guide |
| Web interface mastered | The 3 levels Datacenter → Node → Guest, interface guide |
| An uploaded ISO | Debian 13 or Ubuntu 24.04 in your local storage |
| Available resources | At least 2 GB of RAM and 20 GB of free disk |
Key concepts before you start
The creation wizard asks about ten technical questions. Four notions are enough to answer them without guessing: the KVM VM, VirtIO, the firmware (UEFI or SeaBIOS) and the machine type.
What is a KVM VM?
A KVM VM (Kernel-based Virtual Machine) is a complete virtual computer that behaves as if it had its own processor, memory, disks and network. Unlike an LXC container, which shares the Linux kernel of the host, a VM has its own kernel, so it can run any OS: Linux, Windows, FreeBSD.
VirtIO: the turbo for your VMs
By default, a VM emulates old hardware (an IDE disk, an Intel E1000 network card). It works, but it is slow. VirtIO is a standard of paravirtualized drivers: instead of emulating real hardware, the hypervisor and the VM cooperate directly. The result is markedly better performance than emulation.
| Component | Without VirtIO (emulated) | With VirtIO |
|---|---|---|
| Disk | IDE / SATA, emulated | VirtIO SCSI, paravirtualized |
| Network | Intel E1000, emulated | VirtIO net, paravirtualized |
| Memory | Fixed | Ballooning (dynamic adjustment) |
UEFI (OVMF) or SeaBIOS?
The firmware is the first piece of software that runs when the VM starts, the equivalent of the BIOS of your physical PC. Proxmox offers two options:
| Criterion | SeaBIOS (Legacy BIOS) | OVMF (UEFI) |
|---|---|---|
| Compatibility | Any OS, even an old one | Recent OSes that handle UEFI |
| Secure Boot | Not supported | Supported |
| Boot disk > 2 TB | Only with a GPT table, with a small BIOS Boot partition for GRUB (the 2 TB limit is that of the MBR table) | Yes, with GPT |
| GPU Passthrough | Limited | Recommended |
| Complexity | Nothing to configure | Needs an EFI disk |
| Recommendation | Old OSes, simplicity | Default choice for modern OSes |
Simple rule: choose OVMF (UEFI) unless you are installing an old OS that does not support it.
Machine type: i440fx vs q35
The machine type defines the virtual motherboard. There are two choices:
- i440fx: emulates a chipset from the 1990s. Compatible with everything, but only supports the PCI bus (not PCIe).
- q35: emulates a modern chipset with native PCIe support. Required for GPU passthrough and recommended for modern OSes.
Simple rule: use q35 for new VMs. Keep i440fx only if you have a specific compatibility problem.
Create a VM from the web interface
The Create VM wizard chains eight tabs (General, OS, System, Disks, CPU, Memory, Network, Confirm). The tables below give, for each one, the value recommended for a modern Linux VM and the reason for the choice: follow them in order, and the VM you create will be the one that the next section reproduces on the command line.
-
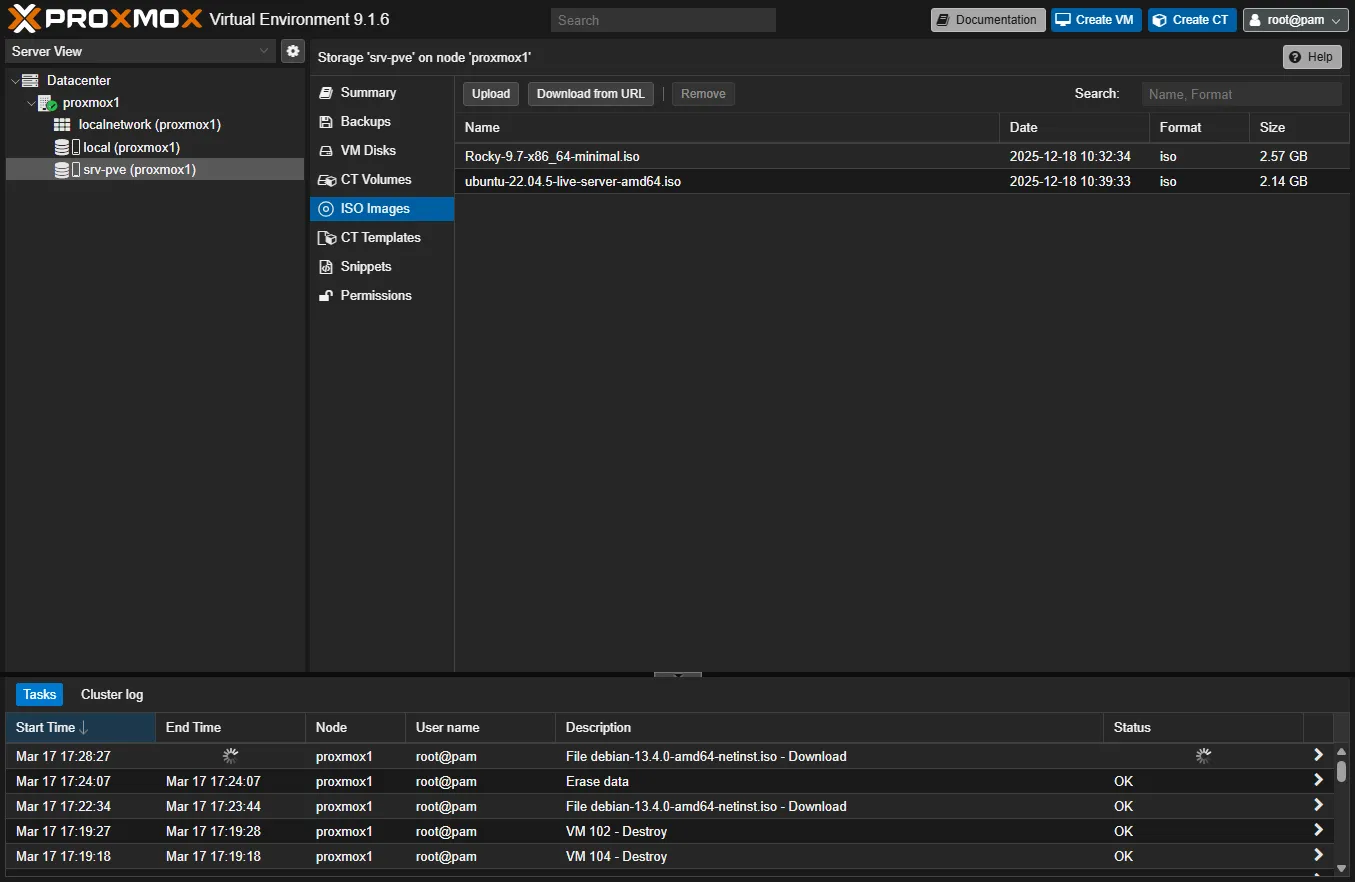
Start the creation wizard
Click the blue Create VM button at the top right of the interface. A wizard with several tabs opens.
-
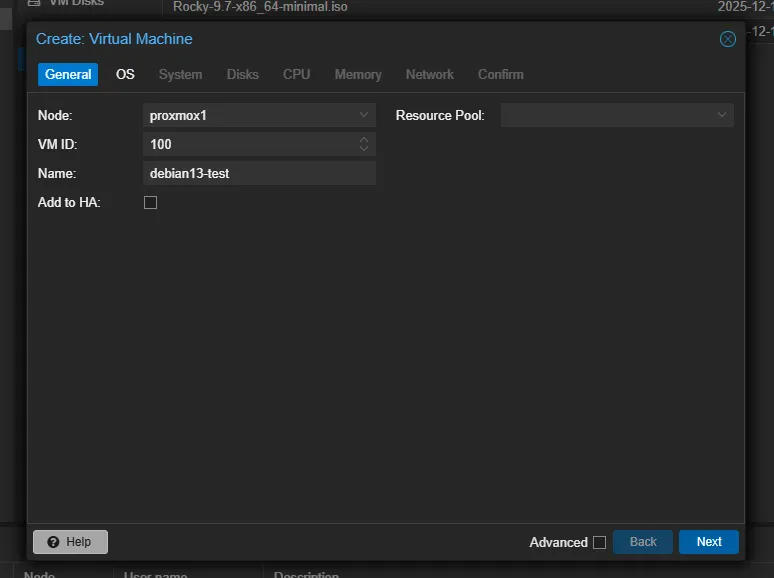
General tab: the identity of the VM
- Node: the server where the VM will be created (if you have a single node, there is no choice)
- VM ID: unique number (Proxmox proposes the next available one, keep it)
- Name: an explicit name, for example
debian13-test
-
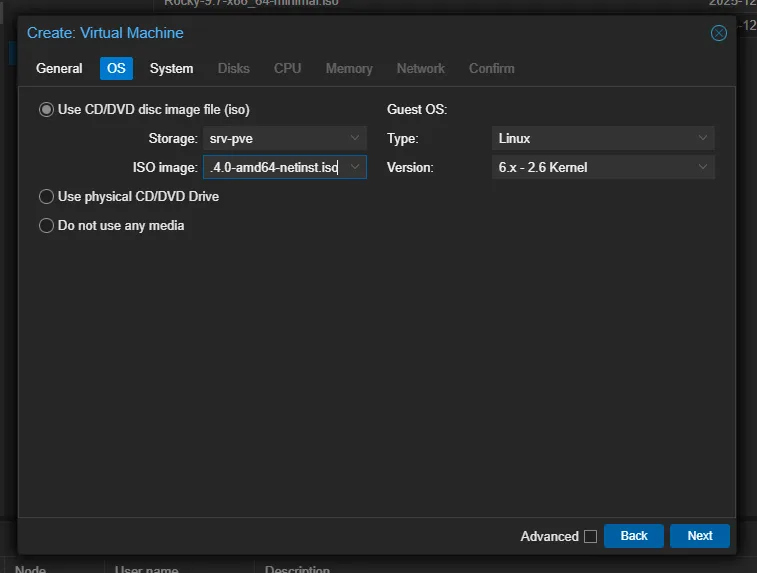
OS tab: operating system
- Use CD/DVD disc image file: select your Debian ISO
- Guest OS Type:
Linux - Version:
6.x - 2.6 Kernel(for Debian 13 / Ubuntu 24.04)
This choice influences the optimizations that Proxmox enables automatically (timers, default drivers).
-
System tab: firmware and controller
This is the most technical tab. Here are the right settings for a modern Linux VM:
Option Recommended value Why Graphic card Default Standard VGA, enough for the console Machine q35 Modern chipset, PCIe support BIOS OVMF (UEFI) Modern boot, GPT, Secure Boot possible Add EFI Disk Checked Stores the UEFI configuration EFI Storage local-lvm Same storage as the main disk SCSI Controller VirtIO SCSI single Better disk throughput Qemu Agent Checked Enables Proxmox ↔ VM communication Add TPM Unchecked Not needed for Linux (required for Windows 11) 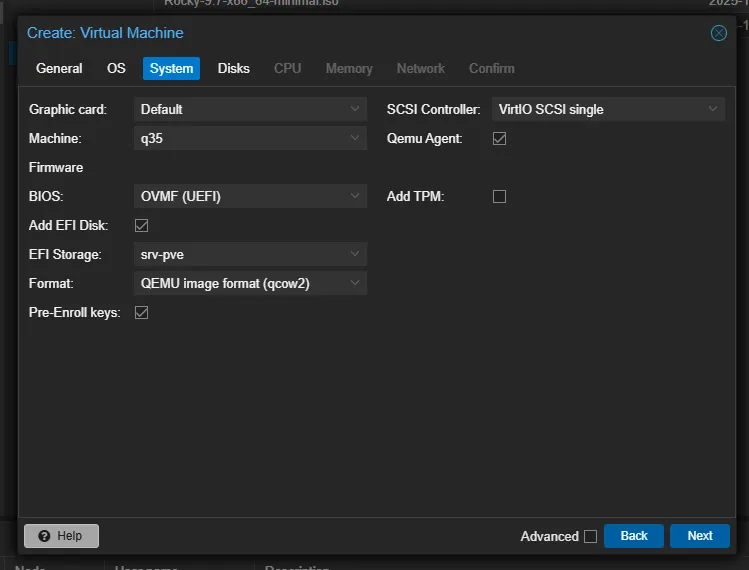
-
Disks tab: storage
Option Recommended value Why Bus/Device SCSI (0) Uses the VirtIO SCSI controller Storage local-lvm Your default storage; on a node installed on top of Debian, choose local(see below)Disk size (GiB) 32 Enough for a basic Linux OS Cache Write back Better write performance Discard Checked Frees the space when the VM deletes files IO thread Checked A dedicated I/O thread per disk 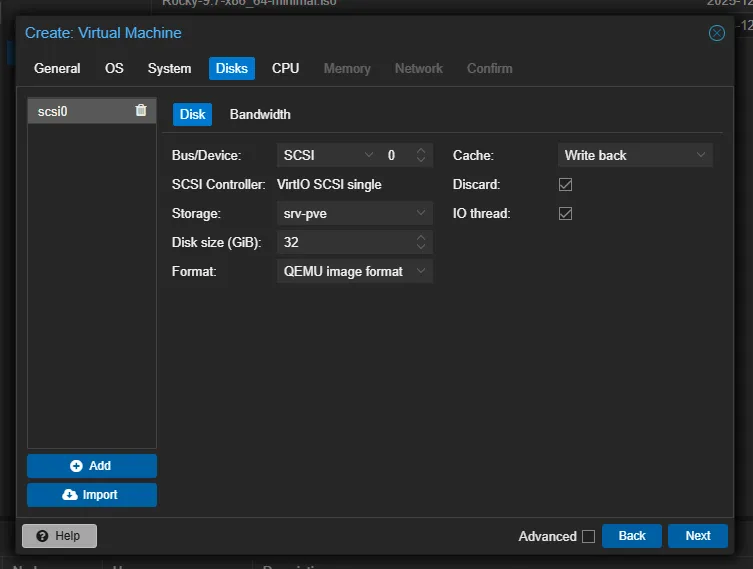
-
CPU tab: processor
Option Recommended value Why Sockets 1 Unless you have a specific NUMA need Cores 2 Comfortable minimum for a server Type host Exposes all CPU instructions 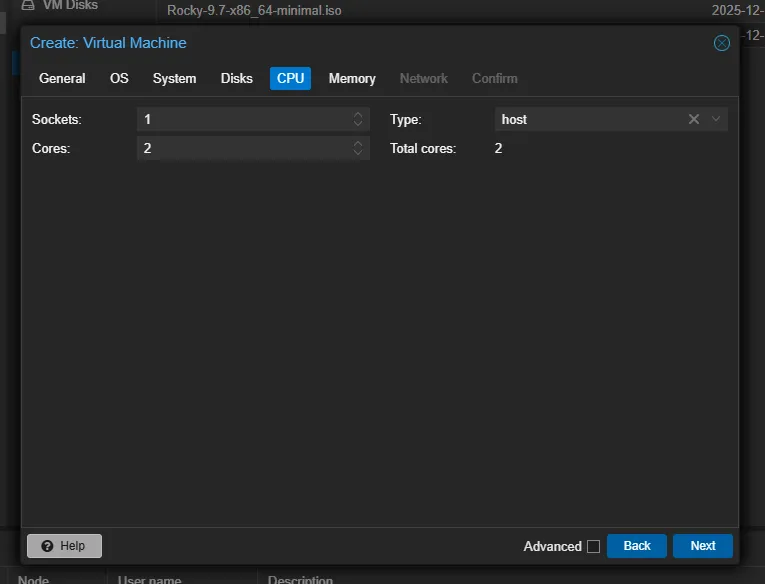
-
Memory tab: RAM
Option Recommended value Why Memory (MiB) 2048 2 GB of RAM, enough for a minimal Debian Ballooning Device Checked (default) Adds the device that lets the host reclaim RAM, provided you set a minimum memory lower than the maximum Minimum memory (MiB) 1024 The floor of the ballooning. This field is in the advanced settings: it stays hidden until the Advanced box is checked Ballooning lets Proxmox take back the RAM that the VM is not actively using. The principle fits in one sentence:
memoryis the ceiling of the VM andballoonis its floor, the guaranteed minimum memory. Proxmox only makes the VM's RAM vary between the two, so only if the floor is lower than the ceiling. To get the VM of the next section, check Advanced and set Minimum memory (MiB) to1024. See below for the table of the four cases, with theqmcommand.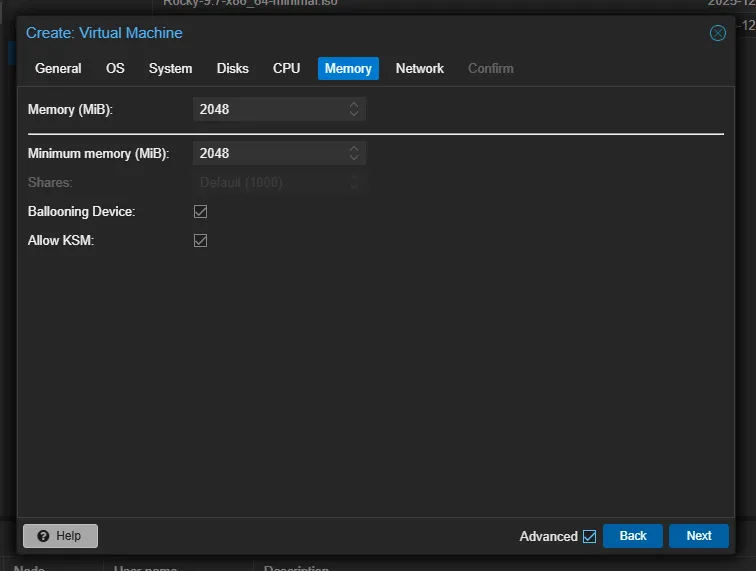
-
Network tab: network
Option Recommended value Why Bridge vmbr0 The default Proxmox bridge Model VirtIO (virtio) Paravirtualized network driver, much faster than E1000 Firewall Checked Enables the Proxmox firewall for this interface 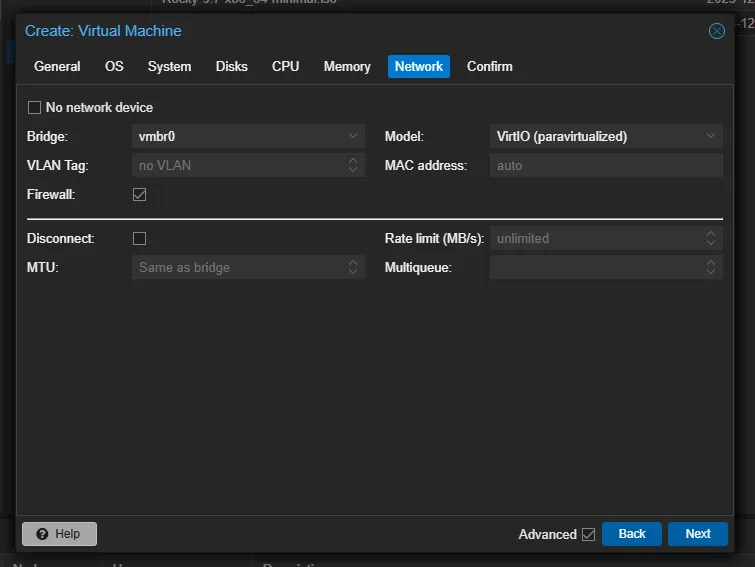
-
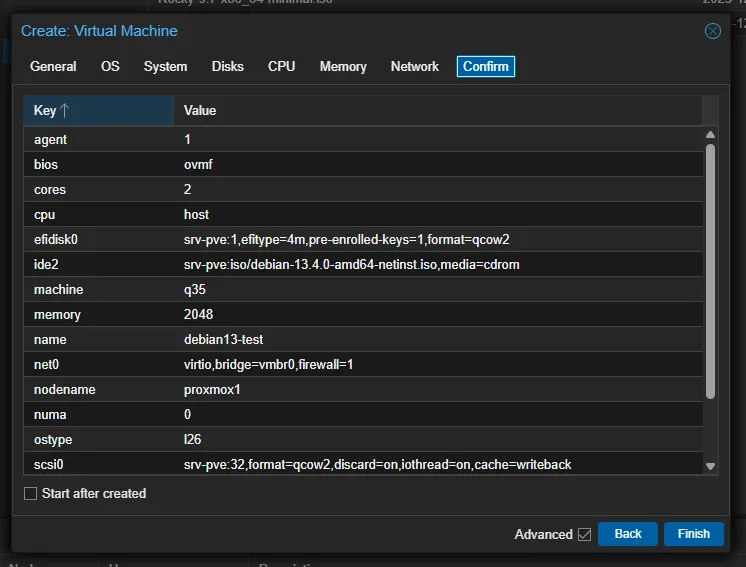
Confirm tab: check and create
The wizard shows a summary of all your choices. Read it carefully, then click Finish to create the VM.
The VM appears in the left panel under your node. It is created but not started yet.
Create the same VM from the command line
The web interface calls exactly the same commands that you can run over SSH. Here is the CLI equivalent of the VM created above:
# Create the VMqm create 100 \ --name debian13-test \ --ostype l26 \ --machine q35 \ --bios ovmf \ --cpu host \ --cores 2 \ --memory 2048 \ --balloon 1024 \ --net0 virtio,bridge=vmbr0,firewall=1 \ --scsihw virtio-scsi-single \ --scsi0 local-lvm:32,cache=writeback,discard=on,iothread=1 \ --ide2 local:iso/debian-13.4.0-amd64-netinst.iso,media=cdrom \ --boot order=ide2\;scsi0 \ --agent enabled=1 \ --efidisk0 local-lvm:1,efitype=4mIn this command, --memory 2048 sets the ceiling to 2 GB and
--balloon 1024 sets the floor to 1 GB: the host can take back up to 1 GB
from the VM when it runs short of RAM (ballooning). Writing --balloon 2048
with --memory 2048 reclaims nothing, because floor and ceiling are then equal.
What about a node installed on top of Debian, without local-lvm?
The command above writes the disks to local-lvm, the storage that the ISO
installation creates with LVM. A node obtained by installing Proxmox on top of a
Debian 13 (the route of the guide
install Proxmox on Debian)
does not have this storage: the only one available is the local directory,
where the disks are qcow2 files. Replace the two disk lines accordingly:
--scsi0 local:32,format=qcow2,discard=on,iothread=1 \ --efidisk0 local:1,efitype=4m,format=qcow2If Proxmox refuses to create a disk on local, open this storage to disks and
templates with the following command, then run qm create again:
pvesm set local --content iso,vztmpl,backup,images,rootdir,snippetsWhat does balloon really do?
The following table was measured on Proxmox VE 9.2.21 (qemu-server 9.2.11),
with started VMs, through qm status --verbose. It compares the four possible
values of the --balloon option for a VM with --memory 2048.
Value of --balloon | Floor (balloon_min) | virtio-balloon device | Auto-ballooning |
|---|---|---|---|
Lower than memory (1024) | 1 GiB (1073741824) | Present | Active: RAM varies between 1 and 2 GiB |
Equal to memory (2048) | 2 GiB (2147483648) | Present | No effect: floor equal to ceiling |
0 | None | Absent | Disabled |
| Option absent | None | Present | Ignored: the VM is skipped |
The QEMU command line generated is identical for 1024 and 2048
(virtio-balloon-pci present, -m 2048): the difference only shows in the
floor, which you read with qm status 100 --verbose | grep balloon_min.
With --balloon 0, info balloon answers Error: No balloon device has been activated. The qm.adoc documentation puts it this way: when memory and
minimum memory are equal, Proxmox simply allocates what you specify. By default
the host aims at 80 % of RAM used before asking the VMs to give memory back, and
this threshold is adjustable: pvestatd reads the ballooning-target key,
which can be changed with
pvenode config set --ballooning-target <0-100>. The adjustment is gradual, at
most 100 MiB per cycle: a VM does not give its memory back all at once. Without
memory pressure on the host, nothing is taken back, even with a low floor.
All of this finally assumes that the guest cooperates, through its
virtio-balloon driver. According to the Proxmox documentation, the kernels of
Linux distributions released after 2010 include it. On Windows, it is installed
from the virtio-win ISO, Balloon folder, and the same documentation notes that
it can slow the guest down. Without this driver, the floor and the ceiling are
set on the host side, but nothing happens inside the VM.
Proxmox does not validate the consistency between the two options:
--balloon 3000 with --memory 2048 is accepted without error, even though
the floor exceeds the ceiling. Only a negative value is refused
(value must have a minimum value of 0). So re-read your own command and check
balloon_min after the creation.
Start it and reach the console:
# Start the VMqm start 100
# Open a serial terminal (from the Proxmox host)qm terminal 100
qm terminal only works if the VM has a serial port (for example
qm set 100 --serial0 socket): without one, use the Console button of the web
interface, which uses the graphical screen.
Install the guest OS
The VM is created but powered off, with the installation ISO inserted in its virtual drive. Four steps are enough: start the VM and open its console, run through the Debian installer, reboot onto the disk, then fix the VM's address.
-
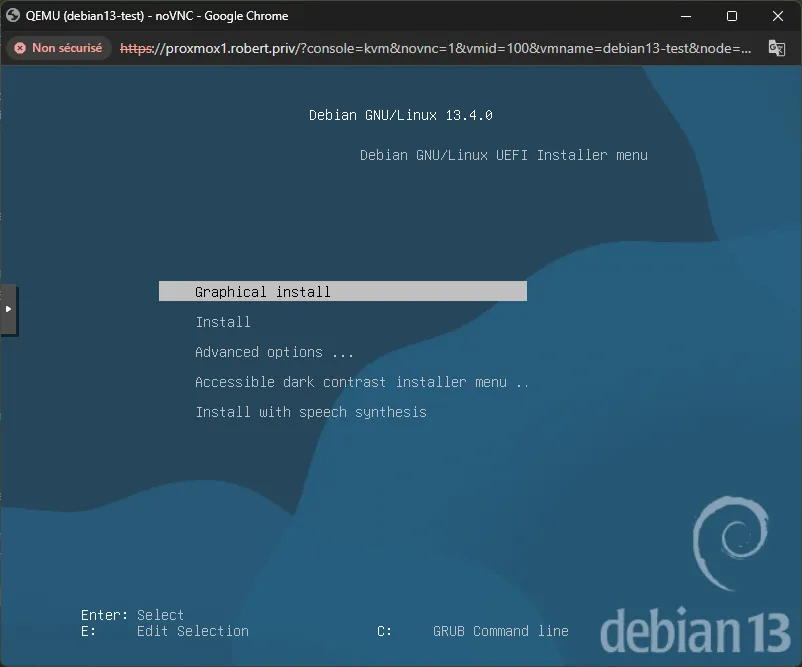
Start the VM and open the console
Select the VM in the left panel, click Start, then Console (button at the top). The Debian installer appears.
-
Follow the standard installation
The Debian installation is classic. A few points of attention for a Proxmox VM:
- Partitioning: choose "Guided - use entire disk". The VirtIO disk appears
as
/dev/sda. - Root password: set one (needed for the Proxmox console if SSH is not configured yet).
- Software: check SSH server and standard system utilities. Uncheck the desktop environment unless you need it.
- Partitioning: choose "Guided - use entire disk". The VirtIO disk appears
as
-
Reboot after installation
When the installer asks you to remove the installation media, let it eject the ISO. If the VM still reboots on the installer, go to Hardware → CD/DVD Drive → Do not use any media (from the command line,
qm set 100 --ide2 none,media=cdrom), then reboot the VM.Then check the boot order. The creation command put the
ide2drive before thescsi0disk, which served the installation and no longer does. Put the disk first, then re-read the configuration:Terminal window qm set 100 --boot order=scsi0qm config 100 | grep -E '^(boot|ide2)'The
bootline must announceorder=scsi0, andide2must no longer mention an ISO. -
Set a static address
A VM that hosts a service needs an address that does not change. Once Debian is installed, log in through the console and find the name of the card with
ip -br link(this name depends on the machine type and on the PCI slot of the card:ens18,enp6s18...). Then edit/etc/network/interfaces: replace theiface <name> inet dhcpline with the static form. The nameens18and the addresses below are examples: use the name you read on your machine and the values of your network (here a192.168.1.0/24network). Keep theautoorallow-hotplugline already present for this card, without duplicating it:iface ens18 inet staticaddress 192.168.1.150/24gateway 192.168.1.1Apply the configuration with
systemctl restart networking(or reboot the VM), then check withip -br addr show ens18: the address you chose must appear there. If you lose your SSH access when you make the change, get back in through the web console, which does not depend on the VM's network.
Install qemu-guest-agent
The qemu-guest-agent is a small service that runs inside the VM and lets Proxmox:
- Ask the guest to shut down through the agent (without an agent, Proxmox falls back on the ACPI signal)
- Read the IP address of the VM (visible in the Summary tab)
- Freeze the filesystem before a snapshot (data consistency)
# Install the guest agentsudo apt update && sudo apt install -y qemu-guest-agent
# Start the servicesudo systemctl start qemu-guest-agent# Install the guest agentsudo dnf install -y qemu-guest-agent
# Start the servicesudo systemctl start qemu-guest-agentMount the VirtIO ISO in a CD drive of the VM, then run the MSI installer:
D:\guest-agent\qemu-ga-x86_64.msiThe QEMU Guest Agent service starts automatically.
Check from the Proxmox host:
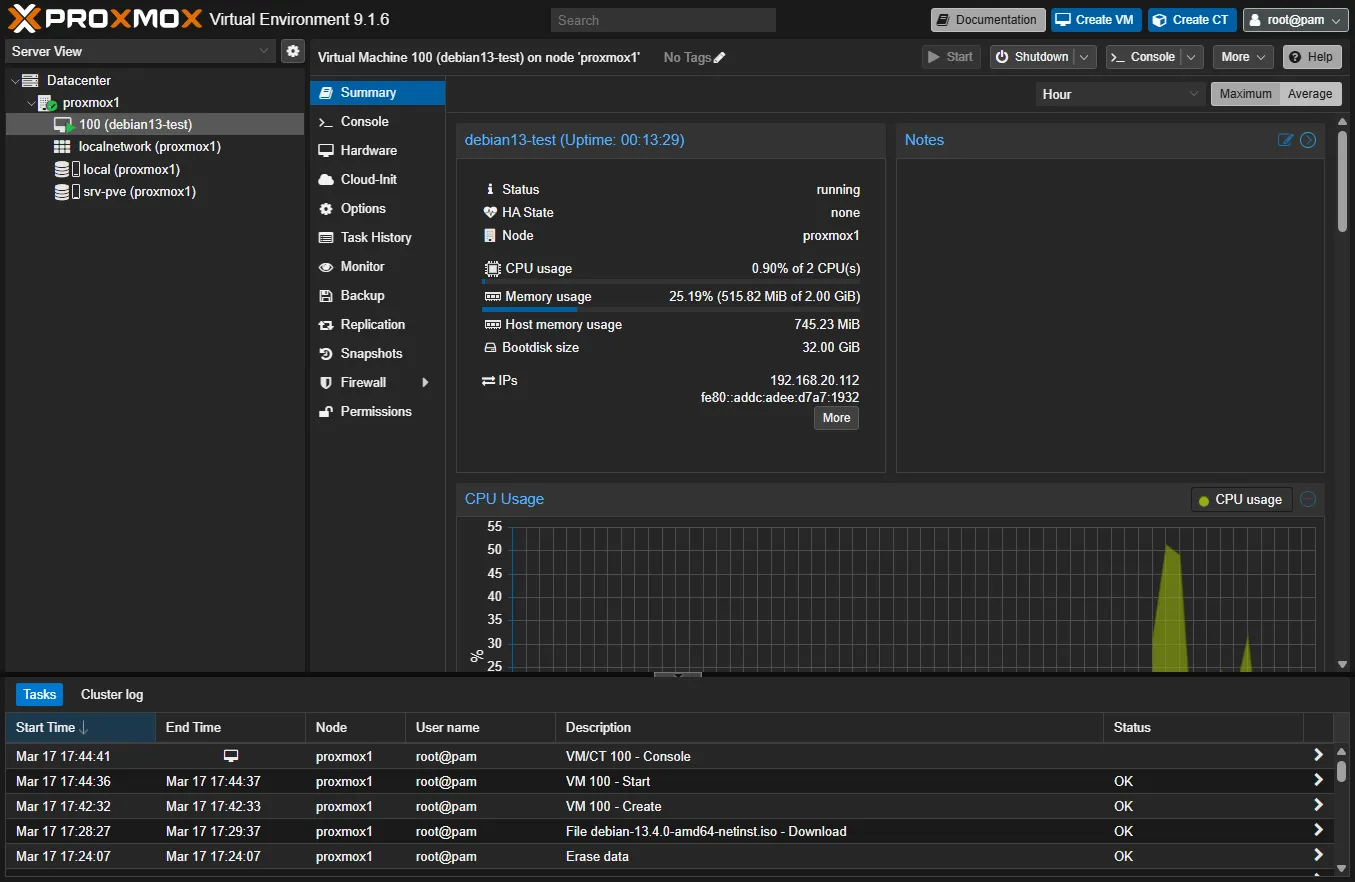
qm agent 100 pingIf the answer is {"return":{}}, the guest agent works. The IP address of the
VM now appears in Summary → IPs. If the agent does not answer, the
qemu-guest-agent guide
details the causes and the clean sequence to enable it on an existing VM.
Take a first snapshot
A snapshot captures the complete state of the VM at a point in time: disk, memory (optional) and configuration. It is your safety net before any change.
-
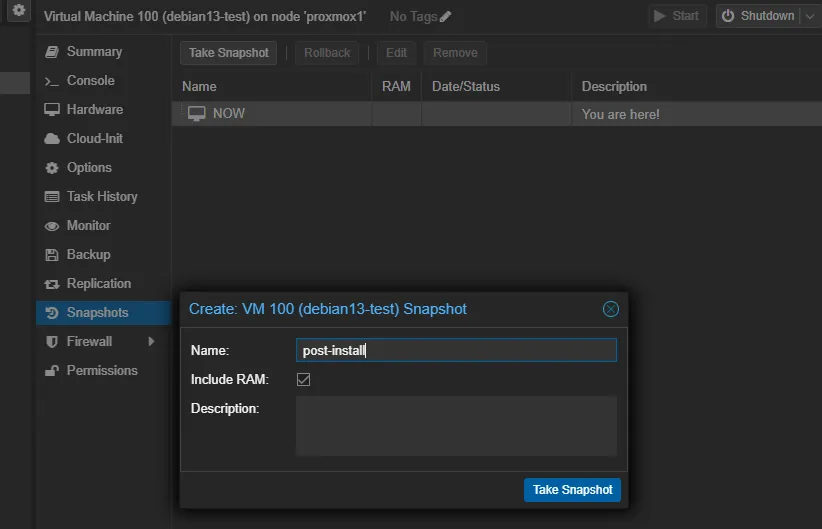
Create the snapshot
Select the VM → Snapshots tab → Take Snapshot button.
- Name:
post-install(no spaces) - Description:
Clean Debian 13 install + guest agent - Include RAM: unchecked (the snapshot will be faster and smaller)
- Name:
-
Check the snapshot
The snapshot appears in the list with its date and size. You can return to this state at any time with Rollback.
From the CLI:
# Create a snapshotqm snapshot 100 post-install --description "Clean Debian 13 install + guest agent"
# List the snapshotsqm listsnapshot 100
# Roll back to a snapshot (warning: overwrites the current state)qm rollback 100 post-installServe a page and check the reboot
A VM is only delivered if its service comes back on its own after a reboot: a
process started by hand in the console disappears with the session. The remedy
is to hand the service over to systemd, which restarts it at every boot. This
example serves a minimal page on port 8080 with the Python HTTP module, and
assumes the static address set above (here 192.168.1.150, to be replaced by
yours). Inside the VM:
sudo apt install -y python3sudo mkdir -p /srv/temoinecho "page temoin" | sudo tee /srv/temoin/index.htmlsudo tee /etc/systemd/system/temoin.service <<'EOF'[Unit]Description=Page temoin sur le port 8080After=network-online.targetWants=network-online.target
[Service]ExecStart=/usr/bin/python3 -m http.server 8080 --directory /srv/temoinRestart=on-failure
[Install]WantedBy=multi-user.targetEOFsudo systemctl daemon-reloadsudo systemctl enable --now temoin.service
The enable --now command enables the service at boot and starts it right
away. From the Proxmox host, read the page, reboot the VM, wait about thirty
seconds, then read it again without restarting anything in the VM:
curl -s http://192.168.1.150:8080/qm reboot 100curl -s http://192.168.1.150:8080/Both reads must return page temoin. If the second one fails, the VM has not
finished booting: wait, then check in the console that
systemctl status temoin.service announces active (running).
qm cheat sheet
The qm commands that are most useful to manage your VMs day to day:
| Action | Command | Notes |
|---|---|---|
| Create a VM | qm create <vmid> --name <name> ... | See the full example above |
| List the VMs | qm list | Shows ID, name, status, RAM, PID |
| Start | qm start <vmid> | |
| Clean shutdown | qm shutdown <vmid> | Goes through the agent if it is active, otherwise through ACPI |
| Force stop | qm stop <vmid> | Equivalent to a hard power off, to keep for a VM that no longer answers |
| Reboot | qm reboot <vmid> | Same mechanism as the clean shutdown |
| View the config | qm config <vmid> | Shows all the parameters |
| Change a parameter | qm set <vmid> --<option> <value> | E.g. qm set 100 --cores 4 |
| Delete a VM | qm destroy <vmid> | Also deletes the disks, with no way back |
Troubleshooting
The nine symptoms below are the ones you meet most often with a first VM. Read the row that looks like what you see, check the probable cause, then apply the solution: most of them are fixed in the Hardware or Options tab of the VM.
| Symptom | Probable cause | Solution |
|---|---|---|
| VM does not start, "TASK ERROR" | Missing ISO or wrong path | Check Hardware → CD/DVD: the ISO must exist in the storage |
| Black screen after UEFI boot | OS that does not support UEFI | Recreate the VM with SeaBIOS instead of OVMF |
| Disk not detected in the installer | SCSI controller not supported by the OS | Switch from VirtIO SCSI to SATA (slower) or load the VirtIO drivers |
| No network in the VM | Missing VirtIO driver | Temporarily switch the network model from VirtIO to E1000, or load the drivers |
| Guest agent "not running" | Service not installed in the VM | Install qemu-guest-agent (see section above) |
| IP missing in Summary | Guest agent not configured in Proxmox | In Options → QEMU Guest Agent, check that it is enabled |
| Poor disk performance | Cache set to "No cache" or no IO thread | Switch to Write back and enable IO thread in Hardware → Disk |
qm shutdown does nothing (timeout) | Guest agent missing or OS does not answer to ACPI | Install the guest agent. If the VM no longer answers at all, qm stop cuts it by force (like pulling a plug): keep it as a last resort |
| "not enough memory" error at creation | Not enough RAM on the host | Reduce the allocated RAM or stop other VMs |
Put it into practice
The lab has you create VM 150 with the hardware contract of this lesson
(q35 machine, OVMF firmware and efidisk0, host CPU, virtio-scsi-single,
virtio card on vmbr0, at most 2 cores and 2048 MB) on the local storage,
the only one of this node (see the section on the node installed on Debian). You
then install Debian from the supplied ISO with a static address, remove the ISO
and put the disk first in the boot order, then serve a test page on port 8080
that systemd restarts at boot. The validation reads the configuration with
qm config, checks that no ISO is inserted and that scsi0 is first in the
boot order, reads the page from the node, then reboots the VM and waits for the
page to come back on its own.
Key takeaways
-
For a modern Linux VM, this lesson settles on the q35 machine type and the OVMF (UEFI) firmware, which needs its own EFI disk.
-
The VirtIO SCSI single controller and the virtio network card avoid emulating old hardware (IDE, E1000). Windows needs the drivers from the virtio-win ISO to recognize them.
-
The
qemu-guest-agentreports the VM's address and lets you freeze its filesystems before a snapshot. Without it,qm shutdowngoes through ACPI, which is still a clean shutdown. -
The Write back cache speeds up writes, at a price: the last writes can be lost if the host stops abruptly. The
hostCPU type ties the VM to that processor, and a cluster prefers a common type such as x86-64-v2-AES. -
A snapshot is not a backup: it depends on the original disk. An independent backup is made with vzdump.
-
Every action of the web interface matches a
qmcommand, which can be scripted and replayed identically. -
On a node installed on top of Debian, the only storage is
local: the disks there are qcow2 files, notlocal-lvmvolumes. -
A VM is only finished after a successful reboot: the disk first in the boot order, the ISO removed, and the service started by systemd so that it comes back on its own.